Blog

  • HacktoberProject

    🙌 Hacktoberfest

    This is a #Hacktoberfest training git repo on GitHub. It contains resources for learning Git. 99% of the contributions in this repository are from different first time beginners just like you. So, jump right in! 🎯

    Meetup Event sponsorship DigitalOcean →

    DO

    📝 About Hacktoberfest:

    What is Hacktoberfest?

    Hacktoberfest is a month-long celebration of open source software run by DigitalOcean in partnership with GitHub and Dev.

    • Hacktoberfest is open to everyone in our global community!
    • Four quality pull requests must be submitted to public GitHub repositories.
    • You can sign up anytime between October 1 and October 31.

    2024

    💙 Git Resources:

    Listing a few git resources here for everyone.

    ⚡️ Git Basics:

    ⚡️ Git Tutorials:

    There are tons of learning material on the Web

    ⚡️ Git for WordPress:

    ⚡️ Git Tools:

    Various tools for daily operations

    • GitHub Desktop — Git Client by GitHub. works with GitHub and GitHub Enterprise seamless
    • SourceTree — free (in-beer) GUI client. Windows and Mac only
    • GitKraken — a cross Git client for Windows, Mac & Linux. Electron based. Free for non-commercial use and paid Pro version is available.
    • Tower — a popular non-free Git GUI client. Mac and Windows
    • SmartGit — a commercial comprehensive SCM client with Git, SVN, Mercurial. cross-platform (works on Windows, Mac and Linux)
    • RabbitVCS — TortoiseSVN inspired graphic tool for version control systems, with Nautilus and Thunar integration
    • gitg — a open-source GTK+ GUI client
    • git-cola — a cross-platform Git GUI client
    • SGit — Git client for Android 4.x
    • Ungit — The easiest way to use git. On any platform. Anywhere.
    • MyRepos — a tool to manage multiple version control repositories
    • awesome-git-addons — lists more than 20 git addons including all available commands
    • GitIgnore Collection — collection of gitignore files for various programming language
    • git-extras – git utilities adding useful git commands
    • git-extra-commands — Another collection of useful git commands
    • GitUp — a clean, minimal Git client. Mac only.
    • GitExtensions — a shell extension, a Visual Studio 2010-2015 plugin and a standalone Git repository tool.
    • Octotree — a must-have browser extension to explore code on GitHub
    • Tig – text-mode interface for Git
    • Sublime Merge – a cross-platform Git client from the makers of Sublime Text.
    • Gitless – an experimental version of Git that changes some of Git’s underlying concepts
    • ghq — Organization for remote repositories
    • bash-git-prompt – An informative and fancy bash prompt for Git users

    ⚡️ Git Extensions

    Git is designed for source control management. Extensions help people to extend the idea and push version control to everywhere

    • Git Large File Storage — practical solution for versioning large files. supported by GitHub
    • Git Virtual File System or GVFS — solution for managing very large Git repository while maintaining speed and efficiency of most operations, in development by Microsoft.
    • git-annex — allow managing massive binaries among machines, as if operating a standard git repository. Possible to create a synchronized folder with git-annex assistant
    • GitLens – A Visual Studio code extension which helps you visualize code authorship at a glance via Git blame annotations and code lens. Allows you to seamlessly explore Git repositories and gain valuable insights via powerful comparison commands.

    ⚡️ Git Repository Hosting

    People have plenty of options to host their source code

    • GitHub — the de-facto git hosting service. Perfect integration with most external services.
    • GitLab.com — a free Git repository hosting service served by GitLab EE. Unlimited repositories and private collaborators
    • BitBucket — well-known for its free private repository (5 user max).
    • Kiln — paid Git repository hosting service
    • CodePlex — Microsoft’s free open source code hosting service with many ASP/C# OSS projects
    • AWS CodeCommit — a SaaS service provided by Amazon Web Service on high availability infrastructure
    • Codeplane — a paid Git repository hosting service with no contributor limit
    • Deveo — a paid repository hosting service with support for Git, Subversion, Mercurial, WebDAV
    • SourceForge — a long-standing free Git repository hosting service

    ⚡️ Git Self-Hosted Repository

    Or you can host the code yourselves

    • Gitolite — a simple with fine-grained access control
    • GitHub Enterprise — self-hosted solution provided from GitHub
    • Bitbucket Server — self-hosted refrom Atlassian. Good integration with JIRA and other Atlassian products
    • GitLab CE/EE — a popular open-source Git (CE) with paid support option (EE).
    • Upsource — recent offer from Jetbrains, a famos developer-oriented software company. Code repository hosting feature pending. Free for 10 users. Good integration with YouTrack and TeamCity
    • GitBucket — a GitHub clone powered by Scala.
    • Gogs — a self-hosted Git Service written in Go.
    • Gitea – a community managed fork of Gogs
    • GitBlit — Pure Java Stack for managing, view, and serving Git repositories.
    • Apache Allura — an open source implementation of project hosting platform
    • Phabricator — an integrated set of powerful tools to help companies build higher quality software
    • RhodeCode CE/EE — a platform delivering enterprise source code management

    ⚡️ Git Workflow

    Inexpensive branching allows people adopt workflows other than the classic centralilzed workflow

    ⚡️ Git Hook management

    Git provide hooks at commit/push phrase, allowing integration with and code quality checking tool and Continuous Integration (CI)

    • pre-commit — a framework for managing and maintaining multi-language pre-commit hooks from Yelp. Extensive support for multiple programming language.
    • Overcommit — a extendable Git hook manager written with Ruby.
    • git-hooks — tool to manage project, user, and global Git hooks
    • quickhook — a fast, Unix’y, opinionated Git hook runner
    • husky – Git hooks for Node.js, manage your hooks from your package.json

    :octocat: GitHub Resources

    A curated list of GitHub’s Resources.

    The awesomeness is currently organized into just a few different buckets:


    Infomation for People Who Are New to GitHub

    • Code School’s Try Git — If you’d like to better understand Git, one of the technologys that makes GitHub possible, this is a great place to start. No GitHub account required.
    • Git-it — 💻 🎓 A workshopper for learning Git and GitHub.
    • On-Demand GitHub Training — Self-paced, interactive projects created and maintained by GitHub’s own Training team.
    • Bingo Board — Play bingo 💥 by sending pull requests!
    • Writing on GitHub — GitHub’s own guide to using GitHub for more than just software development.
    • GitHubGuides — GitHub Training & Guides on YouTube.
    • GitHub Pages — Websites for you and your projects. Hosted directly from your GitHub repository. Just edit, push, and your changes are live.
    • Filetypes that GitHub can do magic with:
      • GeoJSON/TopoJSON — Instantly render maps when you add a GeoJSON file to a repository.
      • iPython/Jupyter — Yes, that’s right, GitHub also renders ipynb files right in the browser. The possibilities are endless.
      • PDF — View PDFs right in your browser.
      • STL files — It’s pretty amazing, 3D right in the browser.
      • CSV — Data journalists and civic data nerds rejoice, comma separated values right in the browser!
      • SVG — Not only can you view scalable vector graphics in the browser, but you can see the difference between versions visually! You’ve got to see it to believe it. (In fact, you can do this with most image files.)
      • PSD — That’s right, same idea as SVG, but for Photoshop files!
    • GitHub Government Community — Information on joining GitHub’s government community — a collaborative community for sharing best practices in furtherance of open source, open data, and open government efforts.
    • Classroom for GitHub — Your course assignments on GitHub.
    • Fun with GitHub — A fun overview of GitHub.

    Resources for Those Already Familiar With GitHub

    • GitHub Cheat Sheet — Use this list to test your GitHub knowledge.
    • GitHub Universe — Two full days on how to build, collaborate, and deploy great software, presented by GitHub. October 1 & 2, 2015, SF.
    • GitHub Desktop — Simple collaboration from your desktop.
    • Atom — Did you know that GitHub makes an editor? Use it to write, code, and more.
    • Electron — Build cross platform desktop apps with web technologies
    • GitHub Buttons — Showcase your GitHub repo’s success with hotlinkable GitHub star, fork, or follow buttons.
    • Resume — Resumes generated using GitHub.
    • Speaker Deck — Share Presentations without the Mess, by GitHub.
    • Blocks — This is a simple viewer for code examples hosted on GitHub Gist. (Introduction is here)
    • Block Builder — Quickly create, edit, and fork D3.js examples
    • GitHub Template Guidelines — Guidelines for creating template files for a GitHub project..

    Tips, Tricks, Tools, and Add-Ons for GitHub Power Users

    • GitHub Integrations Directory — Use your favorite tools with GitHub.
    • GitHub Cheat Sheet — Use this list to test your GitHub knowledge. (A resource so good, it’s worth mentioning twice.)
    • A collection of awesome browser extensions for GitHub. — Well, the link kinda’ says it all.
    • Gitter — Chat, for GitHub. Unlimited public rooms and one-to-one chats, free.
    • ZenHub — Project management inside of GitHub, including kanban boards and more.
    • HuBoard — Instant project management for your GitHub issues (sadly, no free plan, but appears to be open source)
    • Overv.io — Agile project management for teams who love GitHub. Kanban baords and more.
    • Penflip — Collaborative writing and version control, powered by GitLab (similar to GitHub).
    • Gitbook — A modern publishing toolchain. Simply taking you from ideas to finished, polished books.
    • Prose — Prose provides a beautifully simple content authoring environment for CMS-free websites. It’s a web-based interface for managing content on GitHub.
    • Redliner — A tool for facilitating the redlining of documents with the GitHub uninitiated.
    • Gatekeeper — Enables client-side applications to dance OAuth with GitHub.
    • github-secret-keeper — Microservice to enable GitHub login for multiple server-less applications.
    • Hub — A command line tool that wraps git in order to extend it with extra features and commands that make working with GitHub easier.
    • Ghizmo — A command line for GitHub, allowing access to all APIs.
    • cli-github — GitHub made pretty, within the command line.
    • GitHub Dark — A sophisticated dark theme for GitHub.
    • github-issues-import — A Python script that allows you to import issues and pull requests from one GitHub repository to another
    • Github-Auto-Issue-Creator — A Python script that searches a GitHub repository (locally) and automatically creates GitHub issues for TODO statements, keeping them tracked.
    • Problem Child — Allows authenticated or anonymous users to fill out a standard web form to create GitHub issues (and pull requests).
    • gitify — All your GitHub notifications on your menu.
    • HubPress — A web application to build your Blog on GitHub
    • TinyPress — TinyPress is the easiest way to publish a blog on GitHub.
    • Issue and Pull Request Template Generator — Generate templates customized to your project, with the help of Cthulhu and Lewis Carroll
    • Noteit — Manage your notes at CLI with GitHub Gists.
    • Zappr — A free/open-source GitHub integration that removes bottlenecks around pull request approval and helps dev teams to painlessly abide by compliance requirements.
    • Migrating to Git LFS — Easily manage huge files in your Git projects, useful for Data Science projects

    Novel Uses of GitHub

    Configuration management

    DigitalOcean Developer documentation

    GitHub

    Open source projects

    Editors

    Community OSS projects

    • do-sshuttle – Transparent Proxying via sshuttle to DigitalOcean Droplet.
    • drophosts – Update /etc/hosts with peer droplets.
    • droplan – Manage iptable rules for the private interface on DigitalOcean droplets.
    • foreman-digitalocean – Plugin to enable management of DigitalOcean droplets in Foreman.
    • lita-digitalocean – Lita handler for managing DigitalOcean services.
    • DDNS – Personal DDNS client with DigitalOcean Networking DNS as backend.
    • Less Confusing Menus – A Chrome extension that makes account menus less confusing.
    • DigitalOcean Droplet creator – A dialog-based shell script to quickly create a single DigitalOcean Droplet.
    • do-upgrade-plans – A script to upgrade your DigitalOcean Droplets to better plans with the same cost.

    Clients

    • doctl – Command-line tool for DigitalOcean services.
    • digitalocean-indicator – Debian Gnome panel client.
    • domanager – Linux and Windows System Tray Client.
    • OceanBar – macOS menu bar client.
    • Tugboat – Ruby command-line tool for DigitalOcean services, focusing on a more guided UX.

    DigitalOcean Community

    ⚡️ Git Cheat Sheet


    Setup

    Show current configuration:
    $ git config --list
    
    Show repository configuration:
    $ git config --local --list
    
    Show global configuration:
    $ git config --global --list
    
    Show system configuration:
    $ git config --system --list
    
    Set a name that is identifiable for credit when review version history:
    $ git config --global user.name "[firstname lastname]"
    
    Set an email address that will be associated with each history marker:
    $ git config --global user.email "[valid-email]"
    
    Set automatic command line coloring for Git for easy reviewing:
    $ git config --global color.ui auto
    
    Set global editor for commit:
    $ git config --global core.editor vi
    

    Configuration Files

    Repository specific configuration file [–local]:
    <repo>/.git/config
    
    User-specific configuration file [–global]:
    ~/.gitconfig
    
    System-wide configuration file [–system]:
    /etc/gitconfig
    

    Create

    Clone an existing repository:

    There are two ways:

    Via SSH

    $ git clone ssh://user@domain.com/repo.git
    

    Via HTTP

    $ git clone http://domain.com/user/repo.git
    
    Create a new local repository:
    $ git init
    

    Local Changes

    Changes in working directory:
    $ git status
    
    Changes to tracked files:
    $ git diff
    
    Add all current changes to the next commit:
    $ git add .
    
    Add some changes in <file> to the next commit:
    $ git add -p <file>
    
    Commit all local changes in tracked files:
    $ git commit -a
    
    Commit previously staged changes:
    $ git commit
    
    Commit with message:
    $ git commit -m 'message here'
    
    Commit skipping the staging area and adding message:
    $ git commit -am 'message here'
    
    Commit to some previous date:
    $ git commit --date="`date --date='n day ago'`" -am "<Commit Message Here>"
    
    Change last commit:

    Don’t amend published commits!

    $ git commit -a --amend
    
    Amend with last commit but use the previous commit log message

    Don’t amend published commits!

    $ git commit --amend --no-edit
    Change committer date of last commit:
    GIT_COMMITTER_DATE="date" git commit --amend
    
    Change Author date of last commit:
    $ git commit --amend --date="date"
    Move uncommitted changes from current branch to some other branch:
    $ git stash
    $ git checkout branch2
    $ git stash pop
    
    Restore stashed changes back to current branch:
    $ git stash apply

    Restore particular stash back to current branch:

    • {stash_number} can be obtained from git stash list
    $ git stash apply stash@{stash_number}
    Remove the last set of stashed changes:
    $ git stash drop
    

    Search

    A text search on all files in the directory:
    $ git grep "Hello"
    
    In any version of a text search:
    $ git grep "Hello" v2.5
    

    Commit History

    Show all commits, starting with newest (it’ll show the hash, author information, date of commit and title of the commit):
    $ git log
    
    Show all the commits(it’ll show just the commit hash and the commit message):
    $ git log --oneline
    
    Show all commits of a specific user:
    $ git log --author="username"
    
    Show changes over time for a specific file:
    $ git log -p <file>
    
    Display commits that are present only in remote/branch in right side
    $ git log --oneline <origin/master>..<remote/master> --left-right
    
    Show git log with beautiful graph tree (adog)
    $ git log --all --decorate --oneline --graph
    
    Who changed, what and when in <file>:
    $ git blame <file>
    
    Show Reference log:
    $ git reflog show
    
    Delete Reference log:
    $ git reflog delete
    

    Branches & Tags

    List all local branches:
    $ git branch
    

    List local/remote branches

    $ git branch -a
    
    List all remote branches:
    $ git branch -r
    
    Switch HEAD branch:
    $ git checkout <branch>
    
    Checkout single file from different branch
    $ git checkout <branch> -- <filename>
    
    Create and switch new branch:
    $ git checkout -b <branch>
    

    Checkout and create a new branch from existing commit

    $ git checkout <commit-hash> -b <new_branch_name>
    
    Create a new branch based on your current HEAD:
    $ git branch <new-branch>
    
    Create a new tracking branch based on a remote branch:
    $ git branch --track <new-branch> <remote-branch>
    
    Delete a local branch:
    $ git branch -d <branch>
    
    Rename current branch to new branch name
    $ git branch -m <new_branch_name>
    Force delete a local branch:

    You will lose unmerged changes!

    $ git branch -D <branch>
    
    Mark the current commit with a tag:
    $ git tag <tag-name>
    
    Mark the current commit with a tag that includes a message:
    $ git tag -a <tag-name>
    

    Update & Publish

    List all current configured remotes:
    $ git remote -v
    
    Show information about a remote:
    $ git remote show <remote>
    
    Add new remote repository, named <remote>:
    $ git remote add <remote> <url>
    
    Download all changes from <remote>, but don’t integrate into HEAD:
    $ git fetch <remote>
    
    Download changes and directly merge/integrate into HEAD:
    $ git remote pull <remote> <url>
    
    Get all changes from HEAD to local repository:
    $ git pull origin master
    
    Get all changes from HEAD to local repository without a merge:
    $ git pull --rebase <remote> <branch>
    
    Publish local changes on a remote:
    $ git push remote <remote> <branch>
    
    Delete a branch on the remote:
    $ git push <remote> :<branch> (since Git v1.5.0)
    

    OR

    $ git push <remote> --delete <branch> (since Git v1.7.0)
    
    Publish your tags:
    $ git push --tags
    

    Configure the merge tool globally to meld (editor)

    $ git config --global merge.tool meld
    Use your configured merge tool to solve conflicts:
    $ git mergetool
    

    Merge & Rebase

    Merge branch into your current HEAD:
    $ git merge <branch>
    
    Merge branch without fast forward (keeps the notion of explicit branches):
    $ git merge --no-ff <branch>
    
    Rebase your current HEAD onto <branch>:

    Don’t rebase published commit!

    $ git rebase <branch>
    
    Abort a rebase:
    $ git rebase --abort
    
    Continue a rebase after resolving conflicts:
    $ git rebase --continue
    
    Use your editor to manually solve conflicts and (after resolving) mark file as resolved:
    $ git add <resolved-file>
    
    $ git rm <resolved-file>
    
    Squashing commits:
    $ git rebase -i <commit-just-before-first>
    

    Now replace this,

    pick <commit_id>
    pick <commit_id2>
    pick <commit_id3>
    

    to this,

    pick <commit_id>
    squash <commit_id2>
    squash <commit_id3>
    

    Undo

    Discard all local changes in your working directory:
    $ git reset --hard HEAD
    
    Get all the files out of the staging area(i.e. undo the last git add):
    $ git reset HEAD
    
    Discard local changes in a specific file:
    $ git checkout HEAD <file>
    
    Revert a commit (by producing a new commit with contrary changes):
    $ git revert <commit>
    
    Reset your HEAD pointer to a previous commit and discard all changes since then:
    $ git reset --hard <commit>
    
    Reset your HEAD pointer to a remote branch current state.
    $ git reset --hard <remote/branch> e.g., upstream/master, origin/my-feature
    
    Reset your HEAD pointer to a previous commit and preserve all changes as unstaged changes:
    $ git reset <commit>
    
    Reset your HEAD pointer to a previous commit and preserve uncommitted local changes:
    $ git reset --keep <commit>
    
    Remove files that were accidentally committed before they were added to .gitignore
    $ git rm -r --cached .
    $ git add .
    $ git commit -m "remove xyz file"
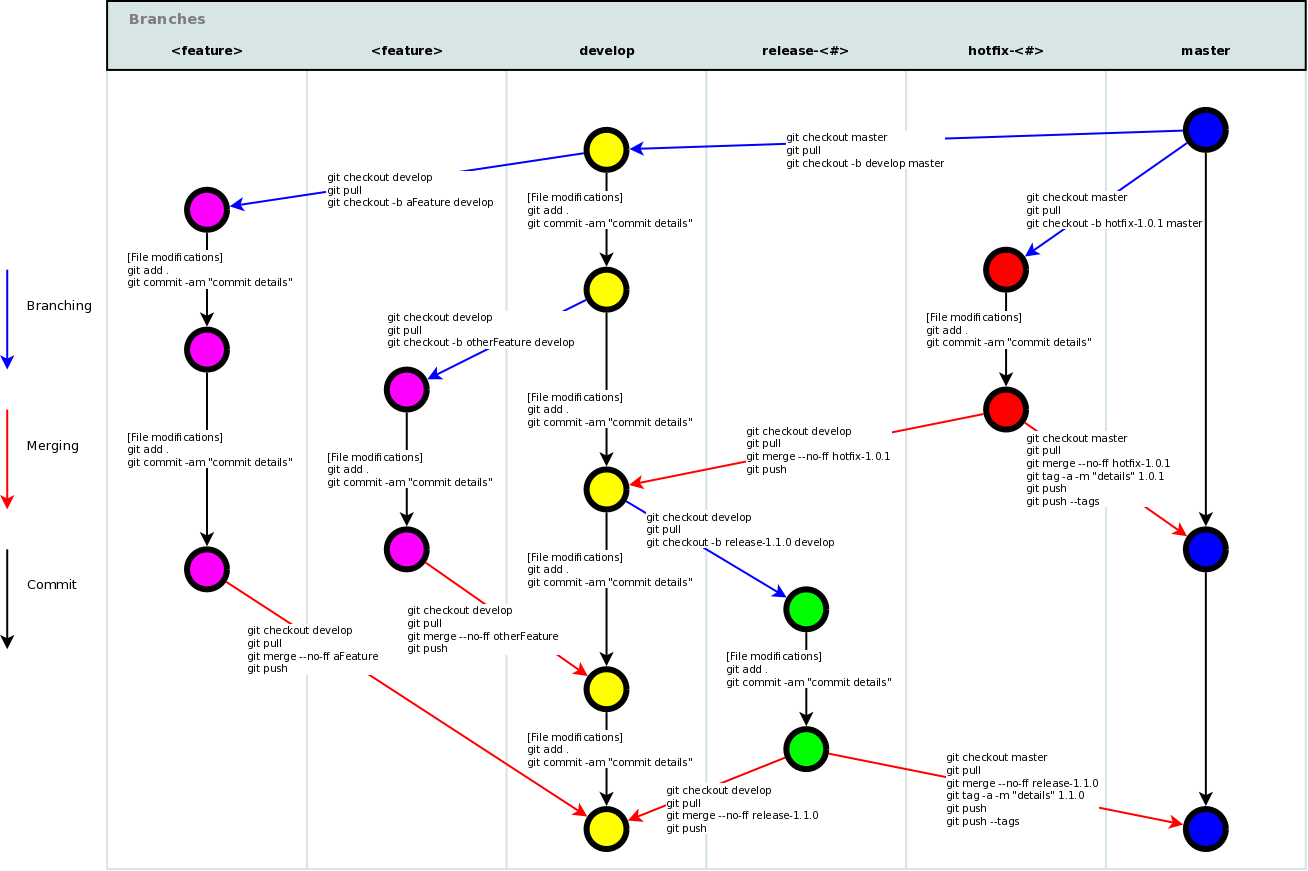
    

    ⚡️ Git-Flow

    Improved Git-flow


    Setup

    You need a working git installation as prerequisite. Git flow works on OSX, Linux and Windows.
    OSX Homebrew:
    $ brew install git-flow-avh
    
    OSX Macports:
    $ port install git-flow
    
    Linux (Debian-based):
    $ sudo apt-get install git-flow
    
    Windows (Cygwin):
    You need wget and util-linux to install git-flow.
    $ wget -q -O - --no-check-certificate https://raw.githubusercontent.com/petervanderdoes/gitflow/develop/contrib/gitflow-installer.sh install <state> | bash

    Getting Started

    Git flow needs to be initialized in order to customize your project setup. Start using git-flow by initializing it inside an existing git repository:
    Initialize:
    You’ll have to answer a few questions regarding the naming conventions for your branches. It’s recommended to use the default values.
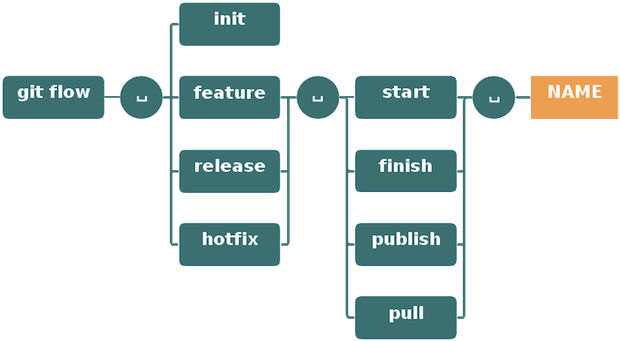
    git flow init

    OR

    To use default
    git flow init -d

    Features

    Develop new features for upcoming releases. Typically exist in developers repos only.
    Start a new feature:
    This action creates a new feature branch based on ‘develop’ and switches to it.
    git flow feature start MYFEATURE
    
    Finish up a feature:
    Finish the development of a feature. This action performs the following:
    1) Merged MYFEATURE into ‘develop’.
    2) Removes the feature branch.
    3) Switches back to ‘develop’ branch
    git flow feature finish MYFEATURE
    
    Publish a feature:
    Are you developing a feature in collaboration? Publish a feature to the remote server so it can be used by other users.
    git flow feature publish MYFEATURE
    
    Getting a published feature:
    Get a feature published by another user.
    git flow feature pull origin MYFEATURE
    
    10 Simple steps to contribute to any existing open source project on Github:
    1) First of all choose a project you want to contribute to.
    2) Go to the repository on Github page.
    3) Press the ‘fork’ button on the right side.
    4) Press the ‘Clone’ button to clone that project.
    5) Create a new branch and push it.
    6) Make all the changes on that new branch.
    7) Commit all the changes to that new and push them.
    8) Now go to that existing project and create a pull request by pressing the compare and pull request button.
    9) Congratulations your job is done :).
    10) Now the people maintaining that branch will review those changes and merge them.
    Tracking a origin feature:
    You can track a feature on origin by using
    git flow feature track MYFEATURE
    

    Make a Release

    Support preparation of a new production release. Allow for minor bug fixes and preparing meta-data for a release
    Start a release:
    To start a release, use the git flow release command. It creates a release branch created from the ‘develop’ branch. You can optionally supply a [BASE] commit sha-1 hash to start the release from. The commit must be on the ‘develop’ branch.
    git flow release start RELEASE [BASE]
    
    It’s wise to publish the release branch after creating it to allow release commits by other developers. Do it similar to feature publishing with the command:
    git flow release publish RELEASE
    
    (You can track a remote release with the: git flow release track RELEASE command)
    Finish up a release:
    Finishing a release is one of the big steps in git branching. It performs several actions:
    1) Merges the release branch back into ‘master’
    2) Tags the release with its name
    3) Back-merges the release into ‘develop’
    4) Removes the release branch
    git flow release finish RELEASE
    
    Don’t forget to push your tags with git push --tags

    Hotfixes

    Hotfixes arise from the necessity to act immediately upon an undesired state of a live production version. May be branched off from the corresponding tag on the master branch that marks the production version.
    Git flow hotfix start:
    Like the other git flow commands, a hotfix is started with
    $ git flow hotfix start VERSION [BASENAME]
    
    The version argument hereby marks the new hotfix release name. Optionally you can specify a basename to start from.
    Finish a hotfix:
    By finishing a hotfix it gets merged back into develop and master. Additionally the master merge is tagged with the hotfix version
    git flow hotfix finish VERSION
    

    Commands

    Git


    Git flow schema

    Git


    squash

    $ git squash fixed-cursor-styling "Fixed cursor styling"
    $ git squash 95b7c52
    $ git squash HEAD~3
    

    summary

    $ git summary
    
     project  : git
     repo age : 10 years
     active   : 11868 days
     commits  : 40530
     files    : 2825
     authors  :
     15401	Junio C Hamano                  38.0%
      1844	Jeff King                       4.5%
    

    line-summary

    $ git line-summary
    
     project  : gulp
     lines    : 3900
     authors  :
     1040 Contra                    26.7%
      828 Sindre Sorhus             21.2%
    

    effort

    $ git effort
    
      file                                          commits    active days
    
      .gitattributes............................... 3          3
      .gitignore................................... 265        226
      .mailmap..................................... 47         40
    

    authors

    $ git authors
    Contra <contra@maricopa.edu>
    Eric Schoffstall <contra@wearefractal.com>
    Sindre Sorhus <sindresorhus@gmail.com>
    

    changelog

    $ git changelog
    ## 3.9.0
    
    - add babel support
    - add transpiler fallback support
    - add support for some renamed transpilers (livescript, etc)
    - add JSCS
    - update dependecies (liftoff, interpret)
    - documentation tweaks
    
    ## 3.8.11
    
    - fix node 0.12/iojs problems
    - add node 0.12 and iojs to travis
    - update dependencies (liftoff, v8flags)
    - documentation tweaks
    

    commits-since

    $ git commits-since yesterday
    ... changes since yesterday
    TJ Holowaychuk - Fixed readme
    

    count

    $ git count
    total 855
    

    create-branch

    $ git create-branch development
    Total 3 (delta 0), reused 0 (delta 0)
    To https://github.com/tj/git-extras.git
     * [new branch]      HEAD -> development
    Branch development set up to track remote branch development from origin.
    Switched to a new branch 'development'
    

    delete-submodule

    $ git delete-submodule lib/foo
    

    delete-tag

    $ git delete-tag v0.1.1
    Deleted tag 'v0.1.1' (was 9fde751)
    To https://github.com/tj/git-extras.git
     - [deleted]         v0.1.1
    

    delete-merged-branches

    $ git delete-merged-branches
    Deleted feature/themes (was c029ab3).
    Deleted feature/live_preview (was a81b002).
    Deleted feature/dashboard (was 923befa).
    

    fresh-branch

    $ git fresh-branch docs
    Removing .DS_Store
    Removing .editorconfig
    Removing .gitignore
    

    guilt

    $ git guilt `git log --until="3 weeks ago" --format="%H" -n 1` HEAD
    Paul Schreiber                +++++++++++++++++++++++++++++++++++++++++++++(349)
    spacewander                   +++++++++++++++++++++++++++++++++++++++++++++(113)
    Mark Eissler                  ++++++++++++++++++++++++++
    

    merge-into

    $ git merge-into master
    Switched to branch 'master'
    Your branch is up-to-date with 'origin/master'.
    Updating 9fde751..e62edfa
    Fast-forward
     234 | 0
     1 file changed, 0 insertions(+), 0 deletions(-)
     create mode 100644 234
    Switched to branch 'development'
    

    graft

    $ git graft development
    Your branch is up-to-date with 'origin/master'.
    Merge made by the 'recursive' strategy.
     package.json | 2 +-
     1 file changed, 1 insertion(+), 1 deletion(-)
    Deleted branch development (was 64b3563).
    

    alias

    $ git alias last "cat-file commit HEAD"
    $ git alias
    last = cat-file commit HEAD
    

    ignore

    $ git ignore build "*.o" "*.log"
    ... added 'build'
    ... added '*.o'
    ... added '*.log'
    

    info

    $ git info
    
        ## Remote URLs:
    
        origin              git@github.com:sampleAuthor/git-extras.git (fetch)
        origin              git@github.com:sampleAuthor/git-extras.git (push)
    
        ## Remote Branches:
    
        origin/HEAD -> origin/master
        origin/myBranch
    
        ## Local Branches:
    
        myBranch
        * master
    
        ## Most Recent Commit:
    
        commit e3952df2c172c6f3eb533d8d0b1a6c77250769a7
        Author: Sample Author <sampleAuthor@gmail.com>
    
        Added git-info command.
    
        Type 'git log' for more commits, or 'git show <commit id>' for full commit details.
    
        ## Configuration (.git/config):
    
        color.diff=auto
        color.status=auto
    

    fork

    $ git fork LearnBoost/expect.js
    

    release

    $ git release 0.1.0
    ... releasing 0.1.0
    On branch development
    Your branch is up-to-date with 'origin/development'.
    nothing to commit, working directory clean
    Total 0 (delta 0), reused 0 (delta 0)
    To https://github.com/tj/git-extras.git
       9fde751..e62edfa  master -> master
    Counting objects: 1, done.
    Writing objects: 100% (1/1), 166 bytes | 0 bytes/s, done.
    Total 1 (delta 0), reused 0 (delta 0)
    To https://github.com/tj/git-extras.git
     * [new tag]         0.1.0 -> 0.1.0
    ... complete
    

    contrib

    $ git contrib visionmedia
    visionmedia (18):
      Export STATUS_CODES
      Replaced several Array.prototype.slice.call() calls with Array.prototype.unshift.call()
      Moved help msg to node-repl
    

    repl

    $ git repl
    
    git> ls-files
    History.md
    Makefile
    

    undo

    $ git undo
    Unstaged changes after reset:
    M	package.json
    M	readme.md
    

    gh-pages

    $ git gh-pages
    

    scp

    $ git scp staging HEAD
    

    setup

    $ git setup
    Initialized empty Git repository in /GitHub/test/gulp/.git/
    [master (root-commit) 9469797] Initial commit
     69 files changed, 3900 insertions(+)
     create mode 100644 .editorconfig
     create mode 100644 .gitignore
     create mode 100644 .jscsrc
    

    touch

    $ git touch index.js
    

    obliterate

    $ git obliterate secrets.json
    Rewrite 2357a4334051a6d1733037406ab7538255030d0b (1/981)rm 'secrets.json'
    Rewrite b5f62b2746c23150917d346bd0c50c467f01eb03 (2/981)rm 'secrets.json'
    Rewrite 3cd94f3395c2701848f6ff626a0a4f883d8a8433 (3/981)rm 'secrets.json'
    

    feature|refactor|bug|chore

    $ git feature dependencies
    $ git feature finish dependencies
    Already up-to-date.
    Deleted branch feature/dependencies (was f0fc4c7).
    Deleted remote-tracking branch origin/feature/dependencies (was f0fc4c7).
    To git@github.com:stevemao/gulp.git
     - [deleted]         feature/dependencies
    

    local-commits

    $ git local-commits
    commit 5f00a3c1bb71876ebdca059fac96b7185dea5467
    Merge: 7ad3ef9 841af4e
    Author: Blaine Bublitz <blaine@iceddev.com>
    Date:   Thu Aug 20 11:35:15 2015 -0700
    
        Merge pull request #1211 from JimiHFord/patch-1
    
        Update guidelines.md
    
    commit 841af4ee7aaf55b505354d0e86d7fb876d745e26
    Author: Jimi Ford <JimiHFord@users.noreply.github.com>
    Date:   Thu Aug 20 11:55:38 2015 -0400
    
        Update guidelines.md
    
        fixed typo
    

    archive-file

    $ git archive-file
    Building archive on branch "master"
    Saved to "gulp.v3.9.0-36-g47cb6b0.zip" ( 60K)
    

    missing

    $ git missing master
    < d14b8f0 only on current checked out branch
    > 97ef387 only on master
    

    lock

    $ git lock config/database.yml
    

    locked

    $ git locked
    config/database.yml
    

    unlock

    $ git unlock config/database.yml
    

    reset-file

    $ git reset-file README.md HEAD^
    Reset 'README.md' to HEAD^
    

    pr

    $ git pr 226
    From https://github.com/tj/git-extras
     * [new ref]       refs/pulls/226/head -> pr/226
    Switched to branch 'pr/226'
    

    root

    $ git root
    /GitHub/git
    

    delta

    $ git delta
    README.md
    

    merge-repo

    $ git merge-repo git@github.com:tj/git-extras.git master .
    git fetch git@github.com:tj/git-extras.git master
    warning: no common commits
    remote: Counting objects: 3507, done.
    remote: Compressing objects: 100% (5/5), done.
    remote: Total 3507 (delta 1), reused 0 (delta 0), pack-reused 3502
    Receiving objects: 100% (3507/3507), 821.12 KiB | 286.00 KiB/s, done.
    Resolving deltas: 100% (1986/1986), done.
    From github.com:tj/git-extras
     * branch            master     -> FETCH_HEAD
    Added dir 'git-merge-repo.E95m0gj'
    No local changes to save
    

    psykorebase

    $ git psykorebase master
    $ git psykorebase --continue
    $ git psykorebase master feature
    

    flow init

    $ git flow init
    
    Which branch should be used for bringing forth production releases?
       - changelog
       - master
    Branch name for production releases: [master]
    
    Which branch should be used for integration of the "next release"?
       - changelog
    Branch name for "next release" development: [master]
    Production and integration branches should differ.
    

    flow feature

    $ git flow feature
    $ git flow feature start awesome-feature
    $ git flow feature finish awesome-feature
    $ git flow feature delete awesome-feature
    
    $ git flow feature publish awesome-feature
    $ git flow feature pull remote awesome-feature
    

    flow release

    $ git flow release
    $ git flow release start awesome-release
    $ git flow release finish awesome-release
    $ git flow release delete awesome-release
    

    flow hotfix

    $ git flow hotfix
    $ git flow hotfix start awesome-release
    $ git flow hotfix finish awesome-release
    $ git flow hotfix delete awesome-release
    

    flow support

    $ git flow support
    
    $ git up
    Fetching origin
    4.0       fast-forwarding...
    changelog ahead of upstream
    master    fast-forwarding...
    returning to 4.0
    

    clone

    $ git clone schacon/ticgit
    > git clone git://github.com/schacon/ticgit.git
    
    $ git clone -p schacon/ticgit
    > git clone git@github.com:schacon/ticgit.git
    
    $ git clone resque
    > git clone git@github.com/YOUR_USER/resque.git
    

    remote add

    $ git remote add rtomayko
    > git remote add rtomayko git://github.com/rtomayko/CURRENT_REPO.git
    
    $ git remote add -p rtomayko
    > git remote add rtomayko git@github.com:rtomayko/CURRENT_REPO.git
    
    $ git remote add origin
    > git remote add origin git://github.com/YOUR_USER/CURRENT_REPO.git
    

    fetch

    $ git fetch mislav
    > git remote add mislav git://github.com/mislav/REPO.git
    > git fetch mislav
    
    $ git fetch mislav,xoebus
    > git remote add mislav ...
    > git remote add xoebus ...
    > git fetch --multiple mislav xoebus
    

    cherry-pick

    $ git cherry-pick https://github.com/mislav/REPO/commit/SHA
    > git remote add -f --no-tags mislav git://github.com/mislav/REPO.git
    > git cherry-pick SHA
    
    $ git cherry-pick mislav@SHA
    > git remote add -f --no-tags mislav git://github.com/mislav/CURRENT_REPO.git
    > git cherry-pick SHA
    
    $ git cherry-pick mislav@SHA
    > git fetch mislav
    > git cherry-pick SHA
    

    am

    $ git am https://github.com/github/hub/pull/55
    [ downloads patch via API ]
    > git am /tmp/55.patch
    
    $ git am --ignore-whitespace https://github.com/davidbalbert/hub/commit/fdb9921
    [ downloads patch via API ]
    > git am --ignore-whitespace /tmp/fdb9921.patch
    

    apply

    $ git apply https://gist.github.com/8da7fb575debd88c54cf
    [ downloads patch via API ]
    > git apply /tmp/gist-8da7fb575debd88c54cf.txt
    

    fork

    $ git fork
    [ repo forked on GitHub ]
    > git remote add -f YOUR_USER git@github.com:YOUR_USER/CURRENT_REPO.git
    

    pull-request

    $ git pull-request
    [ opens text editor to edit title & body for the request ]
    [ opened pull request on GitHub for "YOUR_USER:feature" ]
    

    checkout

    $ git checkout https://github.com/github/hub/pull/73
    > git remote add -f --no-tags -t feature mislav git://github.com/mislav/hub.git
    > git checkout --track -B mislav-feature mislav/feature
    

    merge

    $ git merge https://github.com/github/hub/pull/73
    > git fetch git://github.com/mislav/hub.git +refs/heads/feature:refs/remotes/mislav/feature
    > git merge mislav/feature --no-ff -m 'Merge pull request #73 from mislav/feature...'
    

    create

    $ git create
    [ repo created on GitHub ]
    > git remote add origin git@github.com:YOUR_USER/CURRENT_REPO.git
    

    init

    $ git init -g
    > git init
    > git remote add origin git@github.com:YOUR_USER/REPO.git
    

    push

    $ git push origin,staging,qa bert_timeout
    > git push origin bert_timeout
    > git push staging bert_timeout
    > git push qa bert_timeout
    

    browse

    $ git browse
    > open https://github.com/YOUR_USER/CURRENT_REPO
    

    compare

    $ git compare refactor
    > open https://github.com/CURRENT_REPO/compare/refactor
    

    submodule

    $ git submodule add wycats/bundler vendor/bundler
    > git submodule add git://github.com/wycats/bundler.git vendor/bundler
    

    ci-status

    $ git ci-status
    success
    

    ⚡️ Git Tips

    Collection of git-tips, want to add your tips? Checkout contributing.md

    Tools:

    P.S: All these commands are tested on git version 2.7.4 (Apple Git-66).

    Everyday Git in twenty commands or so

    git help everyday

    Show helpful guides that come with Git

    git help -g

    Search change by content

    git log -S'<a term in the source>'

    Sync with remote, overwrite local changes

    git fetch origin && git reset --hard origin/master && git clean -f -d

    List of all files till a commit

    git ls-tree --name-only -r <commit-ish>

    Git reset first commit

    git update-ref -d HEAD

    List all the conflicted files

    git diff --name-only --diff-filter=U

    List of all files changed in a commit

    git diff-tree --no-commit-id --name-only -r <commit-ish>

    Unstaged changes since last commit

    git diff

    Changes staged for commit

    git diff --cached

    Alternatives:

    git diff --staged

    Show both staged and unstaged changes

    git diff HEAD

    List all branches that are already merged into master

    git branch --merged master

    Quickly switch to the previous branch

    git checkout -

    Alternatives:

    git checkout @{-1}

    Remove branches that have already been merged with master

    git branch --merged master | grep -v '^\*' | xargs -n 1 git branch -d

    Alternatives:

    git branch --merged master | grep -v '^\*\|  master' | xargs -n 1 git branch -d # will not delete master if master is not checked out

    List all branches and their upstreams, as well as last commit on branch

    git branch -vv

    Track upstream branch

    git branch -u origin/mybranch

    Delete local branch

    git branch -d <local_branchname>

    Delete remote branch

    git push origin --delete <remote_branchname>

    Alternatives:

    git push origin :<remote_branchname>

    Delete local tag

    git tag -d <tag-name>

    Delete remote tag

    git push origin :refs/tags/<tag-name>

    Undo local changes with the last content in head

    git checkout -- <file_name>

    Revert: Undo a commit by creating a new commit

    git revert <commit-ish>

    Reset: Discard commits, advised for private branch

    git reset <commit-ish>

    Reword the previous commit message

    git commit -v --amend

    See commit history for just the current branch

    git cherry -v master

    Amend author.

    git commit --amend --author='Author Name <email@address.com>'

    Reset author, after author has been changed in the global config.

    git commit --amend --reset-author --no-edit

    Changing a remote’s URL

    git remote set-url origin <URL>

    Get list of all remote references

    git remote

    Alternatives:

    git remote show

    Get list of all local and remote branches

    git branch -a

    Get only remote branches

    git branch -r

    Stage parts of a changed file, instead of the entire file

    git add -p

    Get git bash completion

    curl http://git.io/vfhol > ~/.git-completion.bash && echo '[ -f ~/.git-completion.bash ] && . ~/.git-completion.bash' >> ~/.bashrc

    What changed since two weeks?

    git log --no-merges --raw --since='2 weeks ago'

    Alternatives:

    git whatchanged --since='2 weeks ago'

    See all commits made since forking from master

    git log --no-merges --stat --reverse master..

    Pick commits across branches using cherry-pick

    git checkout <branch-name> && git cherry-pick <commit-ish>

    Find out branches containing commit-hash

    git branch -a --contains <commit-ish>

    Alternatives:

    git branch --contains <commit-ish>

    Git Aliases

    git config --global alias.<handle> <command>
    git config --global alias.st status

    Saving current state of tracked files without commiting

    git stash

    Alternatives:

    git stash save

    Saving current state of unstaged changes to tracked files

    git stash -k

    Alternatives:

    git stash --keep-index
    git stash save --keep-index

    Saving current state including untracked files

    git stash -u

    Alternatives:

    git stash save -u
    git stash save --include-untracked

    Saving current state with message

    git stash save <message>

    Saving current state of all files (ignored, untracked, and tracked)

    git stash -a

    Alternatives:

    git stash --all
    git stash save --all

    Show list of all saved stashes

    git stash list

    Apply any stash without deleting from the stashed list

    git stash apply <stash@{n}>

    Apply last stashed state and delete it from stashed list

    git stash pop

    Alternatives:

    git stash apply stash@{0} && git stash drop stash@{0}

    Delete all stored stashes

    git stash clear

    Alternatives:

    git stash drop <stash@{n}>

    Grab a single file from a stash

    git checkout <stash@{n}> -- <file_path>

    Alternatives:

    git checkout stash@{0} -- <file_path>

    Show all tracked files

    git ls-files -t

    Show all untracked files

    git ls-files --others

    Show all ignored files

    git ls-files --others -i --exclude-standard

    Create new working tree from a repository (git 2.5)

    git worktree add -b <branch-name> <path> <start-point>

    Create new working tree from HEAD state

    git worktree add --detach <path> HEAD

    Untrack files without deleting

    git rm --cached <file_path>

    Alternatives:

    git rm --cached -r <directory_path>

    Before deleting untracked files/directory, do a dry run to get the list of these files/directories

    git clean -n

    Forcefully remove untracked files

    git clean -f

    Forcefully remove untracked directory

    git clean -f -d

    Update all the submodules

    git submodule foreach git pull

    Alternatives:

    git submodule update --init --recursive
    git submodule update --remote

    Show all commits in the current branch yet to be merged to master

    git cherry -v master

    Alternatives:

    git cherry -v master <branch-to-be-merged>

    Rename a branch

    git branch -m <new-branch-name>

    Alternatives:

    git branch -m [<old-branch-name>] <new-branch-name>

    Rebases ‘feature’ to ‘master’ and merges it in to master

    git rebase master feature && git checkout master && git merge -

    Archive the master branch

    git archive master --format=zip --output=master.zip

    Modify previous commit without modifying the commit message

    git add --all && git commit --amend --no-edit

    Prunes references to remote branches that have been deleted in the remote.

    git fetch -p

    Alternatives:

    git remote prune origin

    Retrieve the commit hash of the initial revision.

     git rev-list --reverse HEAD | head -1

    Alternatives:

    git rev-list --max-parents=0 HEAD
    git log --pretty=oneline | tail -1 | cut -c 1-40
    git log --pretty=oneline --reverse | head -1 | cut -c 1-40

    Visualize the version tree.

    git log --pretty=oneline --graph --decorate --all

    Alternatives:

    gitk --all

    Deploying git tracked subfolder to gh-pages

    git subtree push --prefix subfolder_name origin gh-pages

    Adding a project to repo using subtree

    git subtree add --prefix=<directory_name>/<project_name> --squash git@github.com:<username>/<project_name>.git master

    Get latest changes in your repo for a linked project using subtree

    git subtree pull --prefix=<directory_name>/<project_name> --squash git@github.com:<username>/<project_name>.git master

    Export a branch with history to a file.

    git bundle create <file> <branch-name>

    Import from a bundle

    git clone repo.bundle <repo-dir> -b <branch-name>

    Get the name of current branch.

    git rev-parse --abbrev-ref HEAD

    Ignore one file on commit (e.g. Changelog).

    git update-index --assume-unchanged Changelog; git commit -a; git update-index --no-assume-unchanged Changelog

    Stash changes before rebasing

    git rebase --autostash

    Fetch pull request by ID to a local branch

    git fetch origin pull/<id>/head:<branch-name>

    Alternatives:

    git pull origin pull/<id>/head:<branch-name>

    Show the most recent tag on the current branch.

    git describe --tags --abbrev=0

    Show inline word diff.

    git diff --word-diff

    Show changes using common diff tools.

    git difftool -t <commit1> <commit2> <path>

    Don’t consider changes for tracked file.

    git update-index --assume-unchanged <file_name>

    Undo assume-unchanged.

    git update-index --no-assume-unchanged <file_name>

    Clean the files from .gitignore.

    git clean -X -f

    Restore deleted file.

    git checkout <deleting_commit>^ -- <file_path>

    Restore file to a specific commit-hash

    git checkout <commit-ish> -- <file_path>

    Always rebase instead of merge on pull.

    git config --global pull.rebase true

    Alternatives:

    #git < 1.7.9
    git config --global branch.autosetuprebase always

    List all the alias and configs.

    git config --list

    Make git case sensitive.

    git config --global core.ignorecase false

    Add custom editors.

    git config --global core.editor '$EDITOR'

    Auto correct typos.

    git config --global help.autocorrect 1

    Check if the change was a part of a release.

    git name-rev --name-only <SHA-1>

    Dry run. (any command that supports dry-run flag should do.)

    git clean -fd --dry-run

    Marks your commit as a fix of a previous commit.

    git commit --fixup <SHA-1>

    Squash fixup commits normal commits.

    git rebase -i --autosquash

    Skip staging area during commit.

    git commit --only <file_path>

    Interactive staging.

    git add -i

    List ignored files.

    git check-ignore *

    Status of ignored files.

    git status --ignored

    Commits in Branch1 that are not in Branch2

    git log Branch1 ^Branch2

    List n last commits

    git log -<n>

    Alternatives:

    git log -n <n>

    Reuse recorded resolution, record and reuse previous conflicts resolutions.

    git config --global rerere.enabled 1

    Open all conflicted files in an editor.

    git diff --name-only | uniq | xargs $EDITOR

    Count unpacked number of objects and their disk consumption.

    git count-objects --human-readable

    Prune all unreachable objects from the object database.

    git gc --prune=now --aggressive

    Instantly browse your working repository in gitweb.

    git instaweb [--local] [--httpd=<httpd>] [--port=<port>] [--browser=<browser>]

    View the GPG signatures in the commit log

    git log --show-signature

    Remove entry in the global config.

    git config --global --unset <entry-name>

    Checkout a new branch without any history

    git checkout --orphan <branch_name>

    Extract file from another branch.

    git show <branch_name>:<file_name>

    List only the root and merge commits.

    git log --first-parent

    Change previous two commits with an interactive rebase.

    git rebase --interactive HEAD~2

    List all branch is WIP

    git checkout master && git branch --no-merged

    Find guilty with binary search

    git bisect start                    # Search start
    git bisect bad                      # Set point to bad commit
    git bisect good v2.6.13-rc2         # Set point to good commit|tag
    git bisect bad                      # Say current state is bad
    git bisect good                     # Say current state is good
    git bisect reset                    # Finish search
    

    Bypass pre-commit and commit-msg githooks

    git commit --no-verify

    List commits and changes to a specific file (even through renaming)

    git log --follow -p -- <file_path>

    Clone a single branch

    git clone -b <branch-name> --single-branch https://github.com/user/repo.git

    Create and switch new branch

    git checkout -b <branch-name>

    Alternatives:

    git branch <branch-name> && git checkout <branch-name>

    Ignore file mode changes on commits

    git config core.fileMode false

    Turn off git colored terminal output

    git config --global color.ui false

    Specific color settings

    git config --global <specific command e.g branch, diff> <true, false or always>

    Show all local branches ordered by recent commits

    git for-each-ref --sort=-committerdate --format='%(refname:short)' refs/heads/

    Find lines matching the pattern (regex or string) in tracked files

    git grep --heading --line-number 'foo bar'

    Clone a shallow copy of a repository

    git clone https://github.com/user/repo.git --depth 1

    Search Commit log across all branches for given text

    git log --all --grep='<given-text>'

    Get first commit in a branch (from master)

    git log master..<branch-name> --oneline | tail -1

    Undos last commit but files are still staged

    git reset --soft HEAD

    Unstaging Staged file

    git reset HEAD <file-name>

    Force push to Remote Repository

    git push -f <remote-name> <branch-name>

    Adding Remote name

    git remote add <remote-nickname> <remote-url>

    Show the author, time and last revision made to each line of a given file

    git blame <file-name>

    Group commits by authors and title

    git shortlog

    Forced push but still ensure you don’t overwrite other’s work

    git push --force-with-lease <remote-name> <branch-name>

    Show how many lines does an author contribute

    '_Your_Name_Here_' --pretty=tformat: --numstat | gawk '{ add += <!-- @doxie.inject start -->; subs += <!-- @doxie.inject end -->; loc += <!-- @doxie.inject start --> - <!-- @doxie.inject end --> } END { printf "added lines: %s removed lines: %s total lines: %s ", add, subs, loc }' -

    Alternatives:

    '_Your_Name_Here_' --pretty=tformat: --numstat | awk '{ add += <!-- @doxie.inject start -->; subs += <!-- @doxie.inject end -->; loc += <!-- @doxie.inject start --> - <!-- @doxie.inject end --> } END { printf "added lines: %s, removed lines: %s, total lines: %s ", add, subs, loc }' - # on Mac OSX

    Revert: Reverting an entire merge

    git revert -m 1 <commit-ish>

    Number of commits in a branch

    git rev-list --count <branch-name>

    Alias: git undo

    git config --global alias.undo '!f() { git reset --hard $(git rev-parse --abbrev-ref HEAD)@{${1-1}}; }; f'

    Add object notes

    git notes add -m 'Note on the previous commit....'

    Show all the git-notes

    git log --show-notes='*'

    Apply commit from another repository

    git --git-dir=<source-dir>/.git format-patch -k -1 --stdout <SHA1> | git am -3 -k

    Specific fetch reference

    git fetch origin master:refs/remotes/origin/mymaster

    Find common ancestor of two branches

    diff -u <(git rev-list --first-parent BranchA) <(git rev-list --first-parent BranchB) | sed -ne 's/^ //p' | head -1

    List unpushed git commits

    git log --branches --not --remotes

    Alternatives:

    git log @{u}..
    git cherry -v

    Add everything, but whitespace changes

    git diff --ignore-all-space | git apply --cached

    Edit [local/global] git config

    git config [--global] --edit

    blame on certain range

    git blame -L <start>,<end>

    Show a Git logical variable.

    git var -l | <variable>

    Preformatted patch file.

    git format-patch -M upstream..topic

    Get the repo name.

    git rev-parse --show-toplevel

    logs between date range

    git log --since='FEB 1 2017' --until='FEB 14 2017'

    Exclude author from logs

    git log --perl-regexp --author='^((?!excluded-author-regex).*)
    

    Generates a summary of pending changes

    git request-pull v1.0 https://git.ko.xz/project master:for-linus

    List references in a remote repository

    git ls-remote git://git.kernel.org/pub/scm/git/git.git

    Backup untracked files.

    git ls-files --others -i --exclude-standard | xargs zip untracked.zip

    List all git aliases

    git config -l | grep alias | sed 's/^alias\.//g'

    Alternatives:

    git config -l | grep alias | cut -d '.' -f 2

    Show git status short

    git status --short --branch

    Checkout a commit prior to a day ago

    git checkout master@{yesterday}

    Push a new local branch to remote repository and track

    git push -u origin <branch_name>

    ⚡️ How to Contribute Here?

    Make sure you follow the following simple set of rules here while trying to contribute.

    • Every Pull Request must have a title.
    • Every Pull Request must have a description.
    • Write the title and description of what you have done in the imperative mode, that is as if you were commanding someone.
      • DO: Start the line with “FIX”, “ADD”, “IMPROVE”.
      • DON’T: Start with “Fixed”, “Added”, “Adding”, “Improved”.
      • 🎯 Read → How to Write a Git Commit Message!
    • Don’t end the summary line with a period – it’s a title and titles don’t end with a period.
    • Have fun.

    This open source project is maintained by the help of awesome businesses listed below. What? Read more about it →


    🎯 License

    MIT © Ahmad Awais

    Contributors

    ahmadawais wpcontentstudio worwox driftikharahmad ahmadbilalme finktanks
    ahmadawais wpcontentstudio worwox driftikharahmad ahmadbilalme finktanks
    mrbilloo wpbizreview NidaBatool usmanworwox TheWPCouple a2podcast
    mrbilloo wpbizreview NidaBatool usmanworwox TheWPCouple a2podcast
    nighatiftikhar MahamBatool TheOpenDeveloper WPMetaList freakify finktanksceo
    nighatiftikhar MahamBatool TheOpenDeveloper WPMetaList freakify finktanksceo
    TheDevCouple ahmedzerar alexruf mrumair AliRaza1844 AdnanMuhib
    TheDevCouple ahmedzerar alexruf mrumair AliRaza1844 AdnanMuhib
    arximughal prubianes saqibameen Elias504 Endless7188 shoaibahmedqureshi
    arximughal prubianes saqibameen Elias504 Endless7188 shoaibahmedqureshi
    GayathriVenkatesh jamezrin julicheng WisdomSky kkdroidgit luisfmelo
    GayathriVenkatesh jamezrin julicheng WisdomSky kkdroidgit luisfmelo
    k0R73z michaelwright74 green-leaves omerl13 Omkar-Ajnadkar petrkle
    k0R73z michaelwright74 green-leaves omerl13 Omkar-Ajnadkar petrkle
    starchow darpr vyaspranjal33 RajithaFernando rchung95 riacheruvu
    starchow darpr vyaspranjal33 RajithaFernando rchung95 riacheruvu
    MarkisDev Burnett2k SnehPandya18 sudaisasif saayv1 WajahatAnwar
    MarkisDev Burnett2k SnehPandya18 sudaisasif saayv1 WajahatAnwar
    ybaruchel alljp kuwali Smith-erin
    ybaruchel alljp kuwali Smith-erin

    For anything else, tweet at @MrAhmadAwais

    I have released a video course to help you become a better developer — Become a VSCode Power User →


    VSCode

    VSCode Power User Course →

    Visit original content creator repository https://github.com/ade-dayo/HacktoberProject
  • ignition

    ignition

    alt text

    The Starter Theme that Could

    Ignition is an amazing WordPress starter theme that aims to make your life easier and your development faster!

    Note: The site below has a splash page that is a bit old and mentions one day incorporating Gutenberg… We are long past that! Luckily the documentation has been updated. Please stand by while we find time to update the splash page.

    Ignition 4.0

    Ignition 4.0 is out as of Jun 16, 2020

    Features

    Ignition has a lot of features while remaining lightweight and bare bones. It allows you to create your website without having to rebuild the most common things found in most projects. Here are just some of the features found in ignition.

    • NPM and Webpack ready so you can use the latest js, as well as sass, postcss, and more
    • We use dart sass for the latest sass including @use and @forward
    • Quick theme configuration via theme.config.json for settings you don’t want clients touching
    • A powerful CSS grid system that falls back on flexbox for older browsers.
    • Upload svg logos in the customizer, and they will output as inline logos for easy css styling. Logo will also appear on login page
    • A beautiful menu that works with submenus, dropdowns, and menu placement via the theme config.
    • All your JS scripts will be minified and concatenated and set for output, so you wont need to enqueue any front end JS files. They automatically are included.
    • Google Fonts at the ready. Easily changeable in the theme config file.
    • ACF Blocks Included. Easily use and add your own in the blocks folder.
    • Javascript events for scroll animations and click events and even moving items from around the page with simple data attributes.
    • svg icons support with iconify.design
    • An automatic header block that can be added when a new post is made automatically using the theme config file
    • Drag and drop folders of js, css, and even php for plug and play. Any underscored files will be auto included in the build. Even underscored php files.

    Quick Install

    First things first!
    Download the theme into your WordPress theme directory.

    npx create-ignition-theme theme-directory-name --setup

    This will ask you for the new name of your theme. You must also give a slug which will be used as your text domain and in some functions. Example: Theme Name: My Amazing Theme, Slug: amazing-theme If you are using a local environment with something like flywheel, make sure to enter the local url. The default is ignition.local

    Answer all the questions and your theme will be all set up and ready to use!

    You should also install Advanced Custom Fields Pro as Ignition works best with it.

    Theme Config

    There is now a theme config file. It has some nifty quick settings for you without letting the client mess around. Some of these settings use to be in the WP customizer. We have moved them here. Note the name and slug here were created by running the setup. If you run the setup again, it will do a replacement based on whats here. So to change the theme name again, run the setup, don’t just change those here!

    {
     "name": "Ignition", //Theme name. Created by the setup we ran before. No touchy!
     "slug": "ignition", //Theme slug. No touchy! If you want to change the theme name, run setup again
     "local": "ignition.local", //browsersync url proxy
     "google_fonts": [
       "Roboto:400,400i,700,700i", //change me to your liking!
       "Roboto Slab:400,700"
     ],
      "menu_icon": "", //svg icons can be added here and in the icon settings below
       "sidebar_icon": "",
       "submenu_arrow_icon": "",
       "comment_icon": "",
       "search_menu_item": false, //adds a search item to top menu
       "dev_admin_bar_color": "#156288", //color of local admin bar
       "admin_access_capability": "manage_options", //capability of who can access back end
       "load_custom_icons": false, //now that we use iconify.design you might not need to load any custom icons, although you can still add them
       "mobile_menu_type": "app-menu", //fancy mobile menu, leave blank for regular
       "logo_position": "logo-left", //logo position with menu
       "site_top_container": "container", //contain the menu and logo takes container, container-fluid or nothing
       "default_acf_header_block" : ["post", "page"] //create default header block for these post types (assumes they use Gutenberg)
    }

    By setting these up here you wont have to delve into files or through setting pages. It’s fast and easy!

    Variables.scss

    This file resides in “src/sass”. Here you can edit your CSS variables and colors and fonts. Add the google fonts you created in the theme config here so they are applied to the entire site. For adding or changing SASS variables, please use the resources.scss file. SASS variables are still being used for media queries and the like. Otherwise try and use CSS variables.

    Functions File

    If you have made a theme before, you know this one. Here you can set up your theme. However, the theme config has basically taken care of almost everything for you! The only thing you may find you need to do here is add image-sizes based on the site you are making. Remember, the web is responsive and pixel size matters less than ratio size. If the client has two image sizes of 500×200 and 1000×400, only make the bigger one. Users should upload images twice the size of the image-size so they look good on retina. I also recommend going to the back end of the site and setting the media sizes of medium and large to 0. This way disk space is saved and images uploaded don’t create a plethora of image sizes. Lastly, all main styles and scripts have been enqueued for you.

    Adding to functions

    When adding your own filters and actions you can stick them in functions.php OR keep it clean and make a new file, probably in the inc folder. This file can be added to function.php with an include or require… but you don’t even need to do that!
    You can add php files to functions.php by simply giving the file a name that starts with an underscore.

    Any php file that starts with an underscore inside the “inc”, “blocks”, and “parts” folders will automatically be included to functions.php A similar ability exists with js files and scss files that start with an underscore and are found in one of those folders. This allows you to bundle your php, scss, and js files together without explicitly importing or enqueuing them. See the blocks example below.

    With all these files setup your ready to start making a theme!!

    Developing

    To get development rolling, open the terminal and run

    npm run start

    This will watch your files and reload the browser using browsersync.

    Creating Template files and Folders

    Most of your development will take place in the src folder. This is where everything you make will go. From template files, to js files to scss. What’s really cool is you can group your sass, js, and php files together! They don’t have to be separated into separate folders. Not only that but underscored files are automatically imported. No need to enqueue those files!

    This is because of special functionality ignition has. Let’s look at the blocks folder for a good example:

     - blocks/
     -- section-menu/
     ---- _section-menu.scss
     ---- _section-menu-block.php
     ---- section-menu-block.php
    

    This is a block that spits out a custom menu section. Here, we can see there is an underscore php file _section-menu-block.php. This means it will automatically be included in the functions.php file. This file is responsible for setting up and registering the block. The scss file is also underscored so it will automatically be added to both the front and back end bundle css files. The last file there is a php file which is the actual template file for showing the block and wont be imported anywhere. The ability to add underscore files into the system means you can drag and drop folders with functionality straight into your theme. Drag a block you made in another project right in and its ready to use. (The only piece you might need to put elsewhere is the acf-json file if your block is using that,=. that must go in the acf-json folder)

    This will greatly organize your files so you can work in one folder without having to fly around folders.

    Non-underscored files need to be imported manually

    If your js or scss file is not underscored it will not be imported. You will have to add it yourself, if you choose to. This allows you to choose if it should be enqueued or put somewhere specific etc… js files can be imported into the index.js or admin-index.js files in the src folder. Admin-index is for the back end.
    SASS files can be imported via @use or @forward within the SASS folder in one of the files there. If the file requires sass variables or mixins, make sure to use @use "resources" as *; at the top of the file.

    Routing and Template Parts

    When a single post is shown it uses the single.php file in the root. This is standard WordPress templating.
    This file in turn will check which current post type is being shown and find the appropriate content file. This is ignition templating.
    By default it will go to src/parts/post-type/ folder and get a file there. This is all done using a special template function Ignition comes with. It’s similar to say, get_template_part() and actually uses locate_template() under the hood, except it’s faster and you can pass variables to it.

    ign_template('somePrefix'); //gets somePrefix-{post-type}.php

    See the difference below:

     //Assumes your in a loop
    
    //The following is the non ignition way to get a template part based on dynamic post type
    locate_template( 'src/parts/' . get_post_type() . '/content-'  . get_post_type() . '.php');
    
    //The following is the ignition way. It also has fallbacks that eventually go to the post folder
    ign_template('content');
    //This little line will search for a file in this order, stops after it finds one:
    //looks for src/parts/{post-type}/content-{post-type}.php
    //looks for src/parts/{post-type}/content.php
    //looks for src/parts/post/content-{post-type}.php
    //looks for src/parts/post/content.php

    Therefore it’s best to work and divide your content into post type folders and give your files name-{post-type}.php

    Furthermore you can pass a second parameter of variables like so:

    $var = 'hello'; //will not be available inside the file below using WP function locate_template()
    locate_template( 'src/parts/' . get_post_type() . '/content-'  . get_post_type() . '.php');
    
    $var = 'hello'; //WILL be available using Ignition function ign_template()
    ign_template('content', array('var'=> $var)); //pass an array of variables $var will now work

    You can also use ign_template outside the loop by giving it a full path from the root of the theme

    ign_template('src/some-folder/some-file.php'); //you can also pass variables if wanted here too

    With ign_template(), you don’t need to make a single-portfolio.php for a portfolio post-type. You just make a new post-type folder with all the different views and template files that exist for that post type. Your post type folders should have a content-{post-type}.php and a card-{post-type}.php file to begin with. If the header is to look different, it should also have a header-{post-type}.php file.
    A good place to start is to duplicate and rename the post folder. Rename the files inside too. The content one is for full view and the card one is usually for archive listings. The card view is used by default in index.php

    Remember you can and should also add scss files as well as js files into your post-type folders. This keeps your post types and everything they need together.

    Header Block/Template

    Every post and page has a header. Sometimes you need the same header. Sometimes you want a different one per post type. Sometimes you want three for one post type and one for another. It can get confusing, but Ignition has finally made this part somewhat easier! Using the function above, a header template can be shown easily with:

    ign_template('header'); //outputs header-{post-type}.php
    //if your post type does not have this file it will try and load header-post.php as default

    But what if you create a header block for say a carousel? And you would like to use that block instead? Ignition comes with another function that will check for a header block and if it exists, it will not output the header template. This function is used as follows and can be seen in content-post.php

    //checks if there is a header block and if not outputs a header-{post-type}.php
    ign_header_block();
    
    //usually this comes next.
    the_content();

    The ign_header_block(); will check for a header block that has a name starting with header-. If you create a block with a name like header-carousel, it will be considered a header and if it’s used, the header template file will not be shown. If it does not find a header block on the current post, it will use ign_template() to load a file. By default it loads header-{post-type}.php You can change this by adding a string inside so a different file is loaded.

    Default Header Templates

    Default headers per post type are great, but they are not blocks… They wont show up on the back end when your client is creating posts and pages with Gutenberg. This does not result in a smooth experience! While the template part would load on the front end it will not show up on the back. However, wouldn’t it be nice if this file can be seen in the back end as well and act like a Gutenberg block so the client gets a smooth experience when using the default header?

    Ignition to the rescue! In the themes.config file there is a setting for default_acf_header_block. Add your post type here and automatically your header-{post-type}.php template file will be added as a choosable block for that post type. Whats more it will be automatically loaded when the client goes to make a new post!
    This gives the client a smooth experience when creating a page. It even updates when the client changes the title! The header template file can continue being used as a template file and works the same. You can use the_title() or any in-the-loop template tags, that you normally might not have access to in a block. It’s magic.

    You can add an ACF group and connect it to your default header block…er… template hybrid. Just make sure you understand that when the default header-{post-type}.php file is used as a block, get_field() will get fields from the block unless you specify the second parameter.

    //inside some portfolio/header-portfolio.php
    
    the_title(); //works even when used as a block!
    
    //if you want a custom field from the post
    get_field('some_post_meta', get_the_ID()); //make sure to get the meta from the post NOT the block
    
    //if you want a custom field from the block
    get_field('some_post_meta'); //note: if this header is loaded as a template this might yield nothing.

    So now your header template file is showing up in Gutenberg and ‘pretending’ to be a block! This feature is enabled by default for posts and pages. go try and make a post and see the header template file show up.


    This documentation is not complete! It will be finished soon!

    Learn More

    Visit the documentation to learn how to use the starter theme. It’s quite simple and reading the documentation should take less than 25 minutes. So download ignition and give it a try!

    View ChangeLog

    View the changelog For helpful info.

    Is it Ignition or ignition without a capital?

    I dunno. Who cares!? Why do people ask these questions!? Just download it and see how easy your theming will become!!

    Visit original content creator repository https://github.com/saltnpixels/ignition
  • chrono-adventure

    Video Game that was created with phaser JS, HTML, CSS, Tiled.

    ABOUT THE GAME:

    The astronaut has been tasked with collecting data from an abandoned alien spaceship. He was sent there using highly advanced technology, which has one major drawback: it leaves a time-dimensional track behind the user. It’s crucial to avoid bumping into the track, otherwise the hero will be sent back to the beginning of his mission.

    HOW TO PLAY:

    Movements – W, A, S, D, ↑, ←, ↓, →

    Acceleration – HOLD SPACE BUTTON WHILE MOVING

    Main Menu – M

    Skip Dialog – PRESS ANY BUTTON

    INSTALLATION

    Run command npm install to install all required dependencies.

    DEVELOPMENT

    Run command npm start to run local webpack-dev-server with livereload and autocompile on localhost

    DEPLOYMENT

    Run command npm run build to build current application

    SPECIAL THANKS TO:

    P. S. Please, support me – https://ko-fi.com/dendyy1945, subscribe, and give a star to this project if it was helpful for you.

    Visit original content creator repository
    https://github.com/Ddd1945/chrono-adventure

  • roqueform

    Roqueform

    The form state management library that can handle hundreds of fields without breaking a sweat.


    npm install --save-prod roqueform

    🔰 Features

    🔌 Built-in plugins

    ⚛️ React integration

    🎯 Motivation

    Introduction

    The central piece of Roqueform is the concept of a field. A field holds a value and provides a means to update it.

    Let’s start by creating a field:

    import { createField } from 'roqueform';
    
    const field = createField();
    // ⮕ Field<any>

    A value can be set to and retrieved from the field:

    field.setValue('Pluto');
    
    field.value; // ⮕ 'Pluto'

    Provide the initial value for a field:

    const ageField = createField(42);
    // ⮕ Field<number>
    
    ageField.value; // ⮕ 42

    The field value type is inferred from the initial value, but you can explicitly specify the field value type:

    interface Planet {
      name: string;
    }
    
    interface Universe {
      planets: Planet[];
    }
    
    const universeField = createField<Universe>();
    // ⮕ Field<Universe | undefined>
    
    universeField.value; // ⮕ undefined

    Retrieve a child field by its key:

    const planetsField = universeField.at('planets');
    // ⮕ Field<Planet[] | undefined>

    planetsField is a child field, and it is linked to its parent universeField.

    planetsField.key; // ⮕ 'planets'
    
    planetsField.parent; // ⮕ universeField

    Fields returned by the Field.at method have a stable identity. This means that you can invoke at(key) with the same key multiple times and the same field instance is returned:

    universeField.at('planets');
    // ⮕ planetsField

    So most of the time you don’t need to store a child field in a variable if you already have a reference to a parent field.

    The child field has all the same functionality as its parent, so you can access its children as well:

    planetsField.at(0).at('name');
    // ⮕ Field<string | undefined>

    When a value is set to a child field, a parent field value is also updated. If parent field doesn’t have a value yet, Roqueform would infer its type from a key of the child field.

    universeField.value; // ⮕ undefined
    
    universeField.at('planets').at(0).at('name').setValue('Mars');
    
    universeField.value; // ⮕ { planets: [{ name: 'Mars' }] }

    By default, for a key that is a numeric array index, a parent array is created, otherwise an object is created. You can change this behaviour with custom accessors.

    When a value is set to a parent field, child fields are also updated:

    const nameField = universeField.at('planets').at(0).at('name');
    
    nameField.value; // ⮕ 'Mars'
    
    universeField.setValue({ planets: [{ name: 'Venus' }] });
    
    nameField.value; // ⮕ 'Venus'

    Events and subscriptions

    You can subscribe to events published by a field:

    const unsubscribe = planetsField.subscribe(event => {
      if (event.type === 'valueChanged') {
        // Handle the field value change
      }
    });
    // ⮕ () => void

    All events conform the FieldEvent interface.

    Without plugins, fields publish only valueChanged event when the field value is changed via Field.setValue.

    The root field and its descendants are updated before valueChanged event is published, so it’s safe to read field values in a listener.

    Fields use SameValueZero  comparison to detect that the value has changed.

    planetsField
      .at(0)
      .at('name')
      .subscribe(event => {
        // Handle the event here
      });
    
    // ✅ The value has changed, the listener is called
    planetsField.at(0).at('name').setValue('Mercury');
    
    // 🚫 The value is unchanged, the listener isn't called
    planetsField.at(0).setValue({ name: 'Mercury' });

    Plugins may publish their own events. Here’s an example of the errorAdded event published by the errorsPlugin.

    import { createField } from 'roqueform';
    import errorsPlugin from 'roqueform/plugin/errors';
    
    const field = createField({ name: 'Bill' }, [errorsPlugin()]);
    
    field.subscribe(event => {
      if (event.type === 'errorAdded') {
        // Handle the error here
        event.payload; // ⮕ 'Illegal user'
      }
    });
    
    field.addError('Illegal user');

    Event types published by fields and built-in plugins:

    valueChanged
    The new value was set to the target field. The event payload contains the old value.
    initialValueChanged
    The new initial value was set to the target field. The event payload contains the old initial value.
    validityChanged
    The field’s validity state has changed. The event payload contains the previous validity state.
    errorAdded
    An error was added to a field. The event payload contains an error that was added.
    errorDeleted
    An error was deleted from a field. The event payload contains an error that was deleted.
    errorsCleared
    All errors were removed from the field. The event payload contains the previous array of errors.
    errorDetected
    An event type that notifies the errors plugin that an error must be added to a target field. The event payload must contain an error to add.
    annotationsChanged
    Field annotations were patched. The event payload contains the annotations before the patch was applied.
    validationStarted
    The validation of the field has started. The event payload contains the validation that has started.
    validationFinished
    The validation of the field has finished. The event payload contains the validation that has finished.

    Transient updates

    When you call Field.setValue on a field its value is updates along with values of its ancestors and descendants. To manually control the update propagation to fields ancestors, you can use transient updates.

    When a value of a child field is set transiently, values of its ancestors aren’t immediately updated.

    const field = createField();
    // ⮕ Field<any>
    
    field.at('hello').setTransientValue('world');
    
    field.at('hello').value; // ⮕ 'world'
    
    // 🟡 Parent value wasn't updated
    field.value; // ⮕ undefined

    You can check that a field is in a transient state:

    field.at('hello').isTransient; // ⮕ true

    To propagate the transient value contained by the child field to its parent, use the Field.flushTransient method:

    field.at('hello').flushTransient();
    
    // 🟡 The value of the parent field was updated
    field.value; // ⮕ { hello: 'world' }

    Field.setTransientValue can be called multiple times, but only the most recent update is propagated to the parent field after the Field.flushTransient call.

    When a child field is in a transient state, its value visible from the parent may differ from the actual value:

    const planetsField = createField(['Mars', 'Pluto']);
    
    planetsField.at(1).setTransientValue('Venus');
    
    planetsField.at(1).value; // ⮕ 'Venus'
    
    // 🟡 Transient value isn't visible from the parent
    planetsField.value[1]; // ⮕ 'Pluto'

    Values are synchronized after the update is flushed:

    planetsField.at(1).flushTransient();
    
    planetsField.at(1).value; // ⮕ 'Venus'
    
    // 🟡 Parent and child values are now in sync
    planetsField.value[1]; // ⮕ 'Venus'

    Accessors

    ValueAccessor creates, reads and updates field values.

    By default, Roqueform uses naturalValueAccessor which supports:

    • plain objects,
    • class instances,
    • arrays,
    • Map-like instances,
    • Set-like instances.

    If the field value object has add() and [Symbol.iterator]() methods, it is treated as a Set instance:

    const usersField = createField(new Set(['Bill', 'Rich']));
    
    usersField.at(0).value; // ⮕ 'Bill'
    
    usersField.at(1).value; // ⮕ 'Rich'

    If the field value object has get() and set() methods, it is treated as a Map instance:

    const planetsField = createField(
      new Map([
        ['red', 'Mars'],
        ['green', 'Earth'],
      ])
    );
    
    planetsField.at('red').value; // ⮕ 'Mars'
    
    planetsField.at('green').value; // ⮕ 'Earth'

    When the field is updated, naturalValueAccessor infers a parent field value from the child field key: for a key that is a numeric array index, a parent array is created, otherwise an object is created.

    const carsField = createField();
    
    carsField.at(0).at('brand').setValue('Ford');
    
    carsField.value; // ⮕ [{ brand: 'Ford' }]

    You can explicitly provide a custom accessor along with the initial value:

    import { createField, naturalValueAccessor } from 'roqueform';
    
    const field = createField(['Mars', 'Venus'], undefined, naturalValueAccessor);

    Plugins

    FieldPlugin callbacks that are invoked once for each newly created field. Plugins can constrain the type of the root field value and add mixins to the root field and its descendants.

    Pass an array of plugins that must be applied to createField:

    import { createField } from 'roqueform';
    import errorsPlugin from 'roqueform/plugin/errors';
    
    const field = createField({ hello: 'world' }, [errorsPlugin()]);

    A plugin receives a mutable field instance and should enrich it with the additional functionality. To illustrate how plugins work, let’s create a simple plugin that enriches a field with a DOM element reference.

    import { FieldPlugin } from 'roqueform';
    
    interface MyValue {
      hello: string;
    }
    
    interface MyMixin {
      element: Element | null;
    }
    
    const myPlugin: FieldPlugin<MyValue, MyMixin> = field => {
      // 🟡 Initialize mixin properties
      field.element = null;
    };

    To apply the plugin to a field, pass it to the field factory:

    const field = createField({ hello: 'world' }, [myPlugin]);
    // ⮕ Field<MyValue, MyMixin>
    
    field.element; // ⮕ null

    The plugin is applied to the field itself and its descendants when they are accessed for the first time:

    field.at('hello').element; // ⮕ null

    Plugins can publish custom events. Let’s update the myPlugin implementation so it publishes an event when an element is changed:

    import { FieldPlugin } from 'roqueform';
    
    interface MyMixin {
      element: Element | null;
    
      setElement(element: Element | null): void;
    }
    
    const myPlugin: FieldPlugin<MyValue, MyMixin> = field => {
      field.element = null;
    
      field.setElement = element => {
        field.element = element;
    
        // 🟡 Publish an event for field listeners
        field.publish({
          type: 'elementChanged',
          target: field,
          relatedTarget: null,
          payload: element,
        });
      };
    };

    Field.publish invokes listeners subscribed to the field and its ancestors, so events bubble up to the root field which effectively enables event delegation:

    const field = createField({ hello: 'world' }, [myPlugin]);
    
    // 1️⃣ Subscribe a listener to the root field
    field.subscribe(event => {
      if (event.type === 'elementChanged') {
        event.target.element; // ⮕ document.body
      }
    });
    
    // 2️⃣ Event is published by the child field
    field.at('hello').setElement(document.body);

    Annotations plugin

    annotationsPlugin associates arbitrary data with fields.

    import { createField } from 'roqueform';
    import annotationsPlugin from 'roqueform/plugin/annotations';
    
    const field = createField({ hello: 'world' }, [
      annotationsPlugin({ isDisabled: false }),
    ]);
    
    field.at('hello').annotations.isDisabled; // ⮕ false

    Update annotations for a single field:

    field.annotate({ isDisabled: true });
    
    field.annotations.isDisabled; // ⮕ true
    
    field.at('hello').annotations.isDisabled; // ⮕ false

    Annotate field and all of its children recursively:

    field.annotate({ isDisabled: true }, { isRecursive: true });
    
    field.annotations.isDisabled; // ⮕ true
    
    // 🌕 The child field was annotated along with its parent
    field.at('hello').annotations.isDisabled; // ⮕ true

    Annotations can be updated using a callback. This is especially useful in conjunction with recursive flag:

    field.annotate(
      field => {
        // Toggle isDisabled for the field and its descendants
        return { isDisabled: !field.annotations.isDisabled };
      },
      { isRecursive: true }
    );

    Subscribe to annotation changes:

    field.subscribe(event => {
      if (event.type === 'annotationsChanged') {
        event.target.annotations; // ⮕ { isDisabled: boolean }
      }
    });

    Errors plugin

    errorsPlugin associates errors with fields:

    import { createField } from 'roqueform';
    import errorsPlugin from 'roqueform/plugin/errors';
    
    const field = createField({ hello: 'world' }, [errorsPlugin<string>()]);
    
    field.at('hello').addError('Invalid value');

    Read errors associated with the field:

    field.at('hello').errors;
    // ⮕ ['Invalid value']

    Check that the field has associated errors:

    field.at('hello').isInvalid; // ⮕ true

    Get all fields that have associated errors:

    field.getInvalidFields();
    // ⮕ [field.at('hello')]

    Delete an error from the field:

    field.at('hello').deleteError('Invalid value');

    Clear all errors from the field and its descendants:

    field.clearErrors({ isRecursive: true });

    By default, the error type is unknown. To restrict type of errors that can be added to a field, provide it explicitly:

    interface MyError {
      message: string;
    }
    
    const field = createField({ hello: 'world' }, [
      errorsPlugin<MyError>(),
    ]);
    
    field.errors; // ⮕ MyError[]

    By default, if an error is an object that has a message field, it is added only if a message value is distinct. Otherwise, if an error isn’t an object or doesn’t have a message field, then it is added only if it has a unique identity. To override this behavior, provide an error concatenator callback:

    import { createField } from 'roqueform';
    import errorsPlugin from 'roqueform/plugin/errors';
    
    const field = createField({ hello: 'world' }, [
      errorsPlugin<MyError>((prevErrors, error) => {
        return prevErrors.includes(error) ? prevErrors : [...prevErrors, error];
      }),
    ]);

    To add an error to field, you can publish an errorDetected event instead of calling the addError method:

    field.publish({
      type: 'errorDetected',
      target: field,
      relatedTarget: null,
      payload: 'Ooops',
    });
    
    field.errors; // ⮕ ['Oops']

    This is especially useful if you’re developing a plugin that adds errors to fields but you don’t want to couple with the errors plugin implementation.

    Subscribe to error changes:

    field.subscribe(event => {
      if (event.type === 'errorAdded') {
        event.target.errors; // ⮕ MyError[]
      }
    });

    DOM element reference plugin

    refPlugin associates DOM elements with fields.

    import { createField } from 'roqueform';
    import refPlugin from 'roqueform/plugin/ref';
    
    const field = createField({ hello: 'world' }, [refPlugin()]);
    
    field.at('hello').ref(document.querySelector('input'));

    Access an element associated with the field:

    field.at('hello').element; // ⮕ Element | null

    Focus and blur an element referenced by a field. If a field doesn’t have an associated element this is a no-op.

    field.at('hello').focus();
    
    field.at('hello').isFocused; // ⮕ true

    Scroll to an element:

    field.at('hello').scrollIntoView({ behavior: 'smooth' });

    Reset plugin

    resetPlugin enhances fields with methods that manage the initial value.

    import { createField } from 'roqueform';
    import resetPlugin from 'roqueform/plugin/reset';
    
    const field = createField({ hello: 'world' }, [resetPlugin()]);
    
    field.at('hello').setValue('universe');
    
    field.value; // ⮕ { hello: 'universe' }
    
    field.reset();
    
    // 🟡 The initial value was restored
    field.value; // ⮕ { hello: 'world' }

    Change the initial value of a field:

    field.setInitialValue({ hello: 'universe' });
    
    field.at('hello').initialValue; // ⮕ 'universe'

    The field is considered dirty when its value differs from the initial value. Values are compared using an equality checker function passed to the resetPlugin. By default, values are compared using fast-deep-equal .

    const field = createField({ hello: 'world' }, [resetPlugin()]);
    
    field.at('hello').setValue('universe');
    
    field.at('hello').isDirty; // ⮕ true
    
    field.isDirty; // ⮕ true

    Get the array of all dirty fields:

    field.getDirtyFields();
    // ⮕ [field, field.at('hello')]

    Subscribe to initial value changes:

    field.subscribe(event => {
      if (event.type === 'initialValueChanged') {
        event.target.initialValue;
      }
    });

    Scroll to error plugin

    scrollToErrorPlugin enhances the field with methods to scroll to the closest invalid field.

    import { createField } from 'roqueform';
    import scrollToErrorPlugin from 'roqueform/plugin/scroll-to-error';
    
    const field = createField({ hello: 'world' }, [scrollToErrorPlugin()]);
    
    // Associate a field with a DOM element
    field.at('hello').ref(document.querySelector('input'));
    
    // Mark a field as invalid
    field.at('hello').isInvalid = true;
    
    // 🟡 Scroll to an invalid field
    field.scrollToError();
    // ⮕ field.at('hello')

    This plugin works best in conjunction with the errorsPlugin. If the invalid field was associated with an element via ref than Field.scrollToError scrolls the viewport the reveal this element.

    import { createField } from 'roqueform';
    import errorsPlugin from 'roqueform/plugin/errors';
    import scrollToErrorPlugin from 'roqueform/plugin/scroll-to-error';
    
    const field = createField({ hello: 'world' }, [
      errorsPlugin(),
      scrollToErrorPlugin(),
    ]);
    
    field.at('hello').ref(document.querySelector('input'));
    
    field.at('hello').addError('Invalid value');
    
    field.scrollToError();
    // ⮕ field.at('hello')

    If there are multiple invalid fields, use an index to scroll to a particular field:

    const field = createField({ name: 'Bill', age: 5 }, [
      errorsPlugin(),
      scrollToErrorPlugin(),
    ]);
    
    // Associate fields with DOM elements
    field.at('name').ref(document.getElementById('#name'));
    
    field.at('age').ref(document.getElementById('#age'));
    
    // Add errors to fields
    field.at('name').addError('Cannot be a nickname');
    
    field.at('age').addError('Too young');
    
    // 🟡 Scroll to the "age" field
    field.scrollToError(1);
    // ⮕ field.at('age')

    Uncontrolled plugin

    uncontrolledPlugin updates fields by listening to change events of associated DOM elements.

    import { createField } from 'roqueform';
    import uncontrolledPlugin from 'roqueform/plugin/uncontrolled';
    
    const field = createField({ hello: 'world' }, [uncontrolledPlugin()]);
    
    field.at('hello').ref(document.querySelector('input'));

    The plugin would synchronize the field value with the value of an input element.

    If you have a set of radio buttons, or checkboxes that update a single field, call Field.ref multiple times providing each element. For example, let’s use uncontrolledPlugin to manage an array of animal species:

    <input type="checkbox" value="Elephant" />
    <input type="checkbox" value="Monkey" />
    <input type="checkbox" value="Zebra" />

    Create a field:

    const field = createField({ animals: ['Zebra'] }, [uncontrolledPlugin()]);

    Associate all checkboxes with a field:

    document
      .querySelectorAll('input[type="checkbox"]')
      .forEach(field.at('animals').ref);

    Right after checkboxes are associated, input with the value “Zebra” becomes checked. This happens because the uncontrolledPlugin updated the DOM to reflect the current state of the field.

    If the user would check the “Elephant” value, then the field gets updated:

    field.at('animals').value; // ⮕ ['Zebra', 'Elephant']

    Value coercion

    By default, uncontrolledPlugin uses the opinionated element value accessor that applies following coercion rules to values of form elements:

    Elements Value
    Single checkbox boolean, see checkboxFormat.
    Multiple checkboxes An array of value attributes of checked checkboxes, see checkboxFormat.
    Radio buttons The value attribute of a radio button that is checked or null if no radio buttons are checked.
    Number input number, or null if empty.
    Range input number
    Date input The value attribute, or null if empty, see dateFormat.
    Time input A time string, or null if empty, see timeFormat.
    Image input A string value of the value attribute.
    File input File or null if no file selected, file inputs are read-only.
    Multi-file input An array of File.
    Other The value attribute, or null if element doesn’t support it.

    null, undefined, NaN and non-finite numbers are coerced to an empty string and written to value attribute.

    To change how values are read from and written to DOM, provide a custom ElementsValueAccessor implementation to a plugin, or use a createElementsValueAccessor factory to customise the default behaviour:

    import { createField } from 'roqueform';
    import uncontrolledPlugin, { createElementsValueAccessor } from 'roqueform/plugin/uncontrolled';
    
    const myValueAccessor = createElementsValueAccessor({
      dateFormat: 'timestamp',
    });
    
    const field = createField({ date: Date.now() }, [
      uncontrolledPlugin(myValueAccessor),
    ]);

    Read more about available options in ElementsValueAccessorOptions.

    Validation plugin

    validationPlugin enhances fields with validation methods.

    Tip

    This plugin provides the low-level functionality. Have a look at constraintValidationPlugin or schemaPlugin as an alternative.

    import { createField } from 'roqueform';
    import validationPlugin from 'roqueform/plugin/validation';
    
    const field = createField({ hello: 'world' }, [
      validationPlugin(validation => {
        // Validate the field value and return some result
        return { ok: true };
      }),
    ]);

    The Validator callback receives a Validation object that references a field where Field.validate was called.

    Any result returned from the validator callback, is returned from the Field.validate method:

    field.at('hello').validate();
    // ⮕ { ok: boolean }

    Validator may receive custom options so its behavior can be altered upon each Field.validate call:

    const field = createField({ hello: 'world' }, [
      validationPlugin((validation, options: { coolStuff: string }) => {
        // 1️⃣ Receive options in a validator
        return options.coolStuff;
      }),
    ]);
    
    // 2️⃣ Pass options to the validator
    field.validate({ coolStuff: 'okay' });
    // ⮕ 'okay'

    For asynchronous validation, provide a validator that returns a Promise:

    const field = createField({ hello: 'world' }, [
      validationPlugin(async validation => {
        // Do async validation here
        await doSomeAsyncCheck(validation.field.value);
      }),
    ]);

    Check that async validation is pending:

    field.isValidating; // ⮕ true

    Abort the pending validation:

    field.abortValidation();

    When Field.validate is called, it instantly aborts any pending validation associated with the field. Use abortController to detect that a validation was cancelled:

    const field = createField({ hello: 'world' }, [
      validationPlugin(async validation => {
        if (validation.abortController.signal.aborted) {
          // Handle aborted validation here
        }
      }),
    ]);
    
    field.validate();
    
    // 🟡 Aborts pending validation
    field.at('hello').validate();

    Field.validate sets validation property for a field where it was called and to all of its descendants that hold a non-transient value:

    field.validate();
    
    field.isValidating; // ⮕ true
    
    field.at('hello').isValidating; // ⮕ true

    Field.validate doesn’t trigger validation of the parent field:

    field.at('hello').validate();
    
    // 🟡 Parent field isn't validated
    field.isValidating; // ⮕ false
    
    field.at('hello').isValidating; // ⮕ true

    Since each field can be validated separately, there can be multiple validations running in parallel. Validator callback can check that a particular field participates in a validation process:

    const field = createField({ hello: 'world' }, [
      validationPlugin(async validation => {
        const helloField = validation.field.rootField.at('hello');
        
        if (helloField.validation === validation) {
          // helloField must be validated
        }
      }),
    ]);

    The validation plugin doesn’t provide a way to associate validation errors with fields since it only tracks validation state. Usually, you should publish an event from a validator, so some other plugin handles the field-error association. For example, use validationPlugin in conjunction with the errorsPlugin:

    import { createField } from 'roqueform';
    import errorsPlugin from 'roqueform/plugin/errors';
    import validationPlugin from 'roqueform/plugin/validation';
    
    const field = createField({ hello: 'world' }, [
      // 1️⃣ This plugin associates errors with fields
      errorsPlugin<{ message: string }>(),
    
      validationPlugin(validation => {
        const helloField = validation.field.rootField.at('hello');
        
        if (helloField.validation === validation && helloField.value.length < 10) {
          // 2️⃣ This event is handled by the errorsPlugin
          helloField.publish({
            type: 'errorDetected',
            target: helloField,
            relatedTarget: validation.field,
            payload: { message: 'Too short' }
          });
        }
      }),
    ]);
    
    field.at('hello').validate();
    
    field.at('hello').errors;
    // ⮕ [{ message: 'Too short' }]

    Validation plugin publishes events when validation state changes:

    field.subscribe(event => {
      if (event.type === 'validationStarted') {
        // Handle the validation state change
        event.payload; // ⮕ Validation
      }
    });

    Schema plugin

    schemaPlugin enhances fields with validation methods that use Standard Schema instance to detect validation issues. schemaPlugin uses validationPlugin under-the-hood, so events and validation semantics are the exactly same.

    Any validation library that supports Standard Schema can be used to create a schema object. Lets use Doubter  as an example:

    import * as d from 'doubter';
    
    const helloSchema = d.object({
      hello: d.string().max(5),
    });

    schemaPlugin publishes errorDetected events for fields that have validation issues. Use schemaPlugin in conjunction with errorsPlugin to enable field-error association:

    import * as d from 'doubter';
    import { createField } from 'roqueform';
    import errorsPlugin from 'roqueform/plugin/errors';
    import schemaPlugin from 'roqueform/plugin/schema';
    
    const field = createField({ hello: 'world' }, [
      // 🟡 errorsPlugin handles Doubter issues 
      errorsPlugin<d.Issue>(),
      schemaPlugin(helloSchema),
    ]);

    The type of the field value is inferred from the provided shape, so the field value is statically checked.

    When you call the Field.validate method, it triggers validation of the field and all of its child fields:

    // 🟡 Here an invalid value is set to the field
    field.at('hello').setValue('universe');
    
    field.validate();
    // ⮕ { issues: [ … ] }
    
    field.errors;
    // ⮕ []
    
    field.at('hello').errors;
    // ⮕ [{ message: 'Must have the maximum length of 5', … }]

    Custom error messages

    You can customize messages of validation issues detected by Doubter:

    import { createField } from 'roqueform';
    import errorsPlugin from 'roqueform/plugin/errors';
    import schemaPlugin from 'roqueform/plugin/schema';
    
    const arraySchema = d.array(d.string(), 'Expected an array').min(3, 'Not enough elements');
    
    const field = createField(['hello', 'world'], [
      errorsPlugin(),
      schemaPlugin(arraySchema),
    ]);
    
    field.validate(); // ⮕ false
    
    field.errors;
    // ⮕ [{ message: 'Not enough elements', … }]

    Read more about error message localization  with Doubter.

    Constraint validation API plugin

    constraintValidationPlugin integrates fields with the Constraint validation API .

    For example, let’s use the plugin to validate text input:

    <input type="text" required />

    Create a new field:

    import { createField } from 'roqueform';
    import constraintValidationPlugin from 'roqueform/plugin/constraint-validation';
    
    const field = createField({ hello: '' }, [
      constraintValidationPlugin(),
    ]);

    Associate the DOM element with the field:

    field.at('hello').ref(document.querySelector('input'));

    Check if field is invalid:

    field.at('hello').isInvalid; // ⮕ true
    
    field.at('hello').validity.valueMissing; // ⮕ true

    Show an error message balloon for the first invalid element and get the field this element associated with:

    field.reportValidity();
    // ⮕ field.at('hello')

    Get the array of all invalid fields:

    field.getInvalidFields();
    // ⮕ [field.at('hello')]

    Subscribe to the field validity changes:

    field.subscribe(event => {
      if (event.type === 'validityChanged') {
        event.target.validity; // ⮕ ValidityState
      }
    });

    React integration

    Roqueform has first-class React integration. To enable it, first install the integration package:

    npm install --save-prod @roqueform/react

    useField hook has the same set of signatures as createField:

    import { FieldRenderer, useField } from '@roqueform/react';
    
    export function App() {
      const rootField = useField({ hello: 'world' });
    
      return (
        <FieldRenderer field={rootField.at('hello')}>
          {helloField => (
            <input
              type="text"
              value={helloField.value}
              onChange={event => helloField.setValue(event.target.value)}
            />
          )}
        </FieldRenderer>
      );
    }

    useField hook returns a Field instance that is preserved between re-renders. The <FieldRenderer> component subscribes to the given field instance and re-renders children when an event is published by the field.

    When a user updates the input value, the rootField.at('hello') value is set and <FieldRenderer> component is re-rendered.

    If you pass a callback as an initial value, it would be invoked when the field is initialized.

    useField(() => getInitialValue());

    Pass an array of plugins as the second argument of the useField hook:

    import { useField } from '@roqueform/react';
    import errorsPlugin from 'roqueform/plugin/errors';
    
    export function App() {
      const field = useField({ hello: 'world' }, [errorsPlugin()]);
    
      useEffect(() => {
        field.addError('Invalid value');
      }, []);
    }

    Eager and lazy re-renders

    Let’s consider the form with two <FieldRenderer> elements. One of them renders the value of the root field and the other one renders an input that updates the child field:

    import { FieldRenderer, useField } from '@roqueform/react';
    
    export function App() {
      const rootField = useField({ hello: 'world' });
    
      return (
        <>
          <FieldRenderer field={rootField}>
            {field => JSON.stringify(field.value)}
          </FieldRenderer>
    
          <FieldRenderer field={rootField.at('hello')}>
            {helloField => (
              <input
                type="text"
                value={helloField.value}
                onChange={event => helloField.setValue(event.target.value)}
              />
            )}
          </FieldRenderer>
        </>
      );
    }

    By default, <FieldRenderer> component re-renders only when the provided field was updated directly, meaning updates from ancestors or child fields would be ignored. So when user edits the input value, JSON.stringify won’t be re-rendered.

    Add the isEagerlyUpdated property to force <FieldRenderer> to re-render whenever its value was affected.

    - <FieldRenderer field={rootField}>
    + <FieldRenderer
    +   field={rootField}
    +   isEagerlyUpdated={true}
    + >
        {field => JSON.stringify(field.value)}
      </FieldRenderer>

    Now both fields are re-rendered when user edits the input text.

    Reacting to changes

    Use the onChange handler that is triggered only when the field value was updated non-transiently.

    <FieldRenderer
      field={rootField.at('hello')}
      onChange={value => {
        // Handle the non-transient value changes
      }}
    >
      {helloField => (
        <input
          type="text"
          value={helloField.value}
          onChange={event => helloField.setTransientValue(event.target.value)}
          onBlur={field.flushTransient}
        />
      )}
    </FieldRenderer>

    Motivation

    Roqueform was built to satisfy the following requirements:

    • Since the form lifecycle consists of separate phases (input, validate, display errors, and submit), the form state management library should allow to tap in (or at least not constrain the ability to do so) at any particular phase to tweak the data flow.

    • Form data should be statically and strictly typed up to the very field value setter. So there must be a compilation error if the string value from the silly input is assigned to the number-typed value in the form state object.

    • Use the platform! The form state management library must not constrain the use of the form submit behavior, browser-based validation, and other related native features.

    • There should be no restrictions on how and when the form input is submitted because data submission is generally an application-specific process.

    • There are many approaches to validation, and a great number of awesome validation libraries. The form library must be agnostic to where (client-side, server-side, or both), how (on a field or on a form level), and when (sync, or async) the validation is handled.

    • Validation errors aren’t standardized, so an arbitrary error object shape must be allowed and related typings must be seamlessly propagated to the error consumers/renderers.

    • The library API must be simple and easily extensible.

    Visit original content creator repository https://github.com/smikhalevski/roqueform
  • AndroidMonkey

    Visit original content creator repository
    https://github.com/baozhida/AndroidMonkey

  • SoC-midterm-project

    Visit original content creator repository
    https://github.com/liz-robson/SoC-midterm-project

  • react-full-stack-blog-site

    react-full-stack-blog-site

    Repository for my react-full-stack-blog-site project

    Find out how to build an blog site platform. Author Melvin Kisten tackles CRUD functions and connects the system to a database of MongoDB (Document database). Created a full-stack platform using JavaScript. The frontend was created using React and the backend was created using NodeJS, Express, MongoDB. Then I used fetch to link my backend with my frontend. I also used Postman to test my end points.

    1. Methodologies/Project Management:

      • Agile
    2. Coding Practices:

      • OOP (Object Oriented Programming)
    3. Programming Languages/Frameworks:

      • JavaScript
      • React
      • NodeJS
      • Express
      • MongoDB
      • Postman

    Live Demo

    Instructions

    1. Make sure you have these installed

      • NodeJS
        • I used LTS node version 14.15.1 and npm version 6.14.8 at time of creation
      • MongoDB
        • I used mongo version 4.4.1 at time of creation
      • Postman
        • I used postman version 7.36.0 at time of creation
    2. Clone this repository into your local machine using the terminal (mac) or Gitbash (PC)

      > git clone https://github.com/iammelvink/react-full-stack-blog-site.git
      
    3. blog-site-frontend setup (running on port 3000)

      > cd blog-site-frontend
      
      > npm install
      

      Compiles and hot-reloads for development

      > npm run start
      
    4. blog-site-backend setup (running on port 8000)

      > cd blog-site-backend
      
      > npm install
      
    5. Insert data into the MongoDB database

      • Start MongoDB server

        > mongod
        
      • Enter mongo shell

        > mongo
        
      • Insert data into the MongoDB database

        > db.articles.insert([ 
           { name: 'learn-react', upvotes: 0, comments: [], }, 
           { name: 'learn-node', upvotes: 0, comments: [], }, 
           { name: 'my-thoughts-on-resumes', upvotes: 0, comments: [], }, ])
        
    6. Compiles and hot-reloads for development

      > npm run start
      
    7. Enjoy!

    Deploy for production

    1. Make sure you have created accounts at

    2. Then follow ALL step by step

      > cd blog-site-frontend
      

      Building optimized version of blog-site-frontend

      > npm run build
      
      copy blog-site-frontend/build to blog-site-backend/src/build
      
      then edit blog-site-backend/src/server.js for live production hosting
      

      Needed in production

      > cd blog-site-backend
      

      MongoDB:

      • Create a free cluster

      • Connect and ‘Allow Access from Anywhere’

      • Create a Database User

      • Choose a connection method

        • Connect with the mongo shelll
      • Choose ‘I have the mongo shell installed’

      • Select matching mongo shell version as local version

      • Copy connection string

        • set ‘<dbname>’ to preferred database name

      Logging into remote MongoDB server (may need to change the url,
      as well as in blog-site-backend/src/server.js)

      > mongo "mongodb+srv://template.mongodb.net/<dbname>" --username <username>
      

      Inserting data into remote MongoDB database

      > db.articles.insert([ 
         { name: 'learn-react', upvotes: 0, comments: [], }, 
         { name: 'learn-node', upvotes: 0, comments: [], }, 
         { name: 'my-thoughts-on-resumes', upvotes: 0, comments: [], }, ])
      

      Heroku:

      Installing Heroku using npm globally

      > npm install -g heroku
      

      Logging into Heroku

      > heroku login
      
      > cd blog-site-backend
      

      Creating a heroku app

      > heroku create
      

      Setting environment variables

      • MongoDB username and password for database and name of db
      > heroku config:set MONGO_USER=<username> -a <app name>
      
      > heroku config:set MONGO_PASS='<password>' -a <app name>
      
      > heroku config:set MONGO_DBNAME=<dbname> -a <app name>
      
      • Edit MongoDB url in blog-site-backend/src/server.js

      • Add this to blog-site-backend/package.json in “scripts”

      To start the server

      "start": "npx nodemon --exec npx babel-node src/server.js",
      

      Deployment to Heroku

      • Edit blog-site-backend/package.json
      • Add:

      "engines": {
         "node": "0.0.0",
         "npm": "0.0.0"
      },
      
      • In blog-site-backend/package.json
      • Cut all devDependencies

      "devDependencies": {
      
       }
      

      Paste all devDependencies in dependencies

      "dependencies": {
      
       },
      
      > cd blog-site-backend
      

      Create .gitignore file
      Add this

      ONLY in entire file

      # Dependency directories
      node_modules/
      

      OR

      Remove 'dist' and 'build' from .gitignore file
      
      > git init
      
      > heroku git:remote -a <app name>
      
      > git add .
      
      > git commit -am "initial commit"
      
      > git push heroku master
      
      > heroku ps:scale web=1
      

    More Stuff

    Check out some other stuff on Melvin K.

    Visit original content creator repository
    https://github.com/iammelvink/react-full-stack-blog-site

  • DenaroWalletClient

    Denaro Wallet Client

    ⚠️ IMPORTANT: Repository Deprecated ⚠️

    This repository is no longer maintained.
    ➡️ Active development has been moved to: The-Sycorax/DenaroWalletClient-GUI

    Introduction

    This repo contains the source code for the Denaro Wallet Client, developed for the Denaro cryptocurrency. It has been designed with a strong emphasis on security, providing users with a secure and efficient way to manage their digital assets.

    The wallet client provides essential functionalities such as wallet creation, address generation, transaction processing, balance checking, and wallet imports. Advanced functionalities are also provided, including encryption and decryption capabilities, two-factor authentication (2FA), wallet entry filtering, support for deterministic wallets, and several security mechanisms to protect wallet data.

    Github repo for the Denaro cryptocurrency: https://github.com/denaro-coin/denaro

    Wallet Security Framework

    Paramount to it’s design, the wallet client has been developed with a high-level of security in mind, perticularly for encrypted wallets. It features several protective security measures to safeguard and fortify wallet data. These measures include proof-of-work based brute-force protection, two-factor authentication, double-hashed password verification, and rigorous integrity checks of wallet data. Additionally, there are measures to identify and record unauthorized access attempts, along with an automatic wallet deletion feature which activates after 10 failed access attempts, providing an added layer of defense (feat: Wallet Annihilation).

    Inherent to its architecture, the wallet client deeply inegrates and bakes these security measures directly into the cryptographic processes that are responsible for encrypting and decrypting wallet data. Central to this approach is a unique dual-layer technique that combines both the ChaCha20-Poly1305 and AES-GCM encryption algorithms.

    This encryption method is implemented in stages, beginning with the encryption of individual JSON key-value pairs of wallet data using the dual-layer technique. Afterwhich, the entire JSON entry that contains these encrypted key-value pairs is also encrypted, resulting in multiple layers of encryption. By implementing this multi-layered encryption approach along with the various security mechanisms, the wallet client not only secures wallet data but also substantially fortifies its underlying cryptographic keys against a variety of threats.

    Installation Guide

    Note: The Denaro Wallet Client has not been tested on Windows or MacOS and support is unknown at this time. It is reccomended to use the wallet client on Ubuntu/Debian Linux to avoid any compatibility or stability issues.

    # Clone the repository
    git clone https://github.com/The-Sycorax/DenaroWalletClient.git
    cd DenaroWalletClient
    
    # Update package list and install required library
    sudo apt update
    sudo apt install libgmp-dev
    
    # Setting Up a Python Virtual Environment (optional but recommended)
    # Install virtualenv with pip
    pip install virtualenv
    # Sometimes virtualenv requires the apt package to be installed
    sudo apt install python3-venv
    # Create the virtual environment
    python3 -m venv env
    # Activate the virtual environment. Should be executed every time that there is new terminal session.
    source env/bin/activate
    
    # Install the required packages
    pip3 install -r requirements.txt
    
    # Run the wallet client
    python3 wallet_client.py <options>

    To exit the Python Virtual Environment use:

    deactivate

    Usage Documentation

    • Command-Line Interface:

      Overview: The Denaro Wallet Client provides a rebust CLI for various operations. This section provides detailed usage documentation for the various sub-commands along with their corresponding options.

      Note: To ensure a high level of security, this wallet client is designed with an auto-delete feature for encrypted wallets. After 10 unsuccessful password attempts, the wallet will be automatically deleted in order to protect its contents and safeguard against unauthorized access. (For more details, please refer to: feat: Wallet Annihilation)

      • Sub-Commands:

        Expand

        generate wallet

        Overview: The generate wallet sub-command is used to generate new wallet files or overwrite existing ones. It will also generate an address for the wallet.

        Usage:
        • Syntax:

          wallet_client.py generate wallet [-h] [-verbose] -wallet WALLET [-encrypt] [-2fa] [-deterministic] [-phrase PHRASE] [-password PASSWORD] [-backup {False,True}] [-disable-overwrite-warning] [-overwrite-password OVERWRITE_PASSWORD]
        • Options:

          Note: The -password option must be set for encrypted and/or deterministic wallets.

          • -wallet: (Required) Specifies the wallet filename. Defaults to the ./wallets/ directory if no specific filepath is provided.

          • -encrypt: Enables encryption for new wallets.

          • -2fa: Enables 2-Factor Authentication for new encrypted wallets.

          • -deterministic: Enables deterministic address generation for new wallets.

          • -phrase: Generates a wallet based on a 12 word mnemonic phrase provdided by the user. This option enables deterministic address generation, therefore password is required. The mnemonic phrase must also be enclosed in quotation marks.

          • -password: Password used for wallet encryption and/or deterministic address generation.

          • -backup: Disables wallet backup warning when attempting to overwrite an existing wallet. A ‘True’ or ‘False’ parameter is required, and will specify if the wallet should be backed up or not.

          • -disable-overwrite-warning: Disables overwrite warning if an existing wallet is not backed up.

          • -overwrite-password: Used to bypass the password confirmation prompt when overwriteing a wallet that is encrypted. A string paramter is required, and should specify the password used for the encrypted wallet.

          • -verbose: Enables verbose logging of info and debug messages.


        generate address

        Overview: The generate address sub-command is used to generate new addresses and add them to wallet entry data. For encrypted wallets only the cryptographic keys for addresses are added, which are later used during decryption to derive the data associated with them (e.g. private_key, public_key, and address).

        Usage:
        • Syntax:

          wallet_client.py generate address [-h] [-verbose] -wallet WALLET [-password PASSWORD] [-2fa-code TFACODE] [-amount AMOUNT]
        • Options:

          Note: The -password option must be set for encrypted and/or deterministic wallets.

          • -wallet: (Required) Specifies the wallet filename. Defaults to the ./wallets/ directory if no specific filepath is provided.

          • -password: The password of the specified wallet. Required for encrypted and/or deterministic wallets.

          • -2fa-code: Optional Two-Factor Authentication code for encrypted wallets that have 2FA enabled. Should be the 6-digit code generated from an authenticator app.

          • -amount: Specifies the amount of addresses to generate (Maximum of 256).

          • -verbose: Enables verbose logging of info and debug messages.


        generate paperwallet

        Overview: The generate paperwallet sub-command is used to generate a Denaro paper wallet either by using an address that is associated with a wallet file, or directly via a private key that corresponds to a particular address.

        • If specifying an address that is associated with a wallet file then the generated paper wallet will be stored in ./wallets/paper_wallet/[walletName]/.

        • If specifying a private key that corresponds to a particular address then the generated paper wallet will be stored in ./wallets/paper_wallets/.

        • All generated paper wallets inherit the name of it’s associated address.

        Usage:
        • Syntax:

          wallet_client.py generate paperwallet [-h] [-verbose] [-wallet WALLET] [-password PASSWORD] [-2fa-code TFACODE] [-address ADDRESS] [-private-key PRIVATE_KEY] [-type {pdf,png}]
        • Options:

          Note: The -password option must be set for encrypted and/or deterministic wallets.

          • -wallet: Specifies the wallet filename. Defaults to the ./wallets/ directory if no specific filepath is provided.

          • -password: The password of the specified wallet. Required for wallets that are encrypted.

          • -2fa-code: Optional Two-Factor Authentication code for encrypted wallets that have 2FA enabled. Should be the 6-digit code generated from an authenticator app.

          • -address: Specifies a Denaro address associated with the wallet file. A paper wallet will be generated for this Denaro address.

          • -private-key: Specifies the private key associated with a Denaro address. Not required if specifying an address from a wallet file.

          • -type: Specifies the file type for the paper wallet. The default filetype is PDF.

            • -type png generates a PNG image of the front of the paper wallet.
            • -type pdf generates a PDF file of the front and back of the paper wallet.

        decryptwallet

        Overview: The decryptwallet sub-command can either decrypt all entries in a wallet file, or selectivly decrypt specific entries based on a provided filter, and return the decrypted data back to the console.

        Note: An encrypted wallet is not required to use this sub-command. Therefore, it has been designed to also return data from wallets that are not encrypted.

        Usage:
        • Syntax:

          wallet_client.py decryptwallet [-h] [-verbose] -wallet WALLET [-password PASSWORD] [-2fa-code TFACODE] [-json] {filter} ...
        • Options:
          Note: The -password option must be set for encrypted wallets.

          • -wallet: (Required) Specifies the wallet filename. Defaults to the ./wallets/ directory if no specific filepath is provided.
          • -password: The password of the specified wallet. Required for wallets that are encrypted.
          • -2fa-code: Optional Two-Factor Authentication code for encrypted wallets that have 2FA enabled. Should be the 6-digit code generated from an authenticator app.
          • -json: Print formatted JSON output for better readability.

        decryptwallet filter

        Overview: The decryptwallet filter sub-command filters wallet entries by one or more addresses and/or fields. Adding a hyphen - to the beginning of an address will exclude it from the results. Wallet entries can also be filtered based on origin (See -show option for more details). This sub-command should come directly after the other options that have been provided for decryptwallet.

        Usage:
        • Syntax:

          wallet_client.py decryptwallet <options> filter [-h] [-verbose] [-address ADDRESS] [-field FIELD] [-show {generated,imported}]
        • Options:

          • -address: One or more addresses to filter by. Adding a hyphen - to the beginning of an address will exclude it from the output.
            • The format is:
              fliter -address=ADDRESS_1,-ADDRESS_2,...
          • -field: One or more fields to filter by.
            • The format is:
              -field=id,mnemonic,private_key,public_key,address
          • -show: Filters wallet entries origin.
            • -show generated retrieves only the information of internally generated wallet entries.
            • -show imported retrieves only the information of imported wallet entries.

        send

        Overview: The send sub-command is used to initiate a transaction on the Denaro blockchain. This sub-command allows users to send Denaro to a specified address.

        Note: The source of funds for the transaction (the sender) can be specified in two ways: either by using an address that is associated with a wallet file, or directly via a private key that corresponds to a particular address.

        Usage:
        • Syntax:

          wallet_client.py send [-h] [-verbose] [-node NODE] -amount <AMOUNT> from [-wallet WALLET] [-password PASSWORD] [-2fa-code TFACODE] [-address ADDRESS] [-private-key PRIVATE_KEY] to <receiver> [-message MESSAGE]
        • Options:

          • send: Main command to initiate a transaction.

            • -amount: (Required) Specifies the amount of Denaro to be sent.
          • from <options>: Specifies the sender’s details.

            • -wallet: Specifies the wallet filename. Defaults to the ./wallets/ directory if no specific filepath is provided.
            • -password: The password of the specified wallet. Required for wallets that are encrypted.
            • -2fa-code: Optional Two-Factor Authentication code for encrypted wallets that have 2FA enabled. Should be the 6-digit code generated from an authenticator app.
            • -address: The Denaro address to send from. The address must be associated with the specified wallet.
            • -private-key: Specifies the private key associated with a Denaro address. Not required if specifying an address from a wallet file.
          • to <options>: Specifies the receiver’s details.

            • receiver: (Required) The receiving address.

            • -message: Optional transaction message.

          • -node: Specifies the Denaro node to connect to. Must be a valid IP Address or URL. If not specified or the node is not valid, then the wallet client will use the default Denaro node (https://denaro-node.gaetano.eu.org/).


        balance

        Overview: The balance sub-command is used to check the balance of addresses on the Denaro blockchain that are asociated with a specified wallet file.

        Note: Similar to decryptwallet filter, the balance sub-command can also filter wallet entries. The -address option can be used to filter one or more addresses that are associated with a wallet. Addresses can be excluded by adding a hyphen (-) to the beginning of it. Wallet entries can also be filtered based on origin (See -show option for more details).

        Usage:
        • Syntax:

          wallet_client.py balance [-h] [-verbose] [-node NODE] -wallet WALLET [-password PASSWORD] [-2fa-code TFACODE] [-address ADDRESS] [-convert-to CURRENCY_CODE] [-show {generated,imported}] [-json] [-to-file]
        • Options:

          • -wallet: (Required) Specifies the wallet filename. Defaults to the ./wallets/ directory if no specific filepath is provided.

          • -password: The password of the specified wallet. Required for wallets that are encrypted.

          • -2fa-code: Optional Two-Factor Authentication code for encrypted wallets that have 2FA enabled. Should be the 6-digit code generated from an authenticator app.

          • -address: Specifies one or more addresses to get the balance of. Adding a hyphen - to the beginning of an address will exclude it.

            • The format is:
              -address=ADDRESS_1,-ADDRESS_2,...
          • -convert-to: Converts the monetary value of balances to a user specified currency, factoring in current exchange rates against the USD value of DNR. Supports 161 international currencies and major cryptocurrencies. A valid currency code is required (e.g., ‘USD’, ‘EUR’, ‘GBP’, ‘BTC’). By default balance values are calculated in USD.

          • -show: Filters balance information based on wallet entry origin.

            • -show generated retrieves only the balance information of internally generated wallet entries.
            • -show imported retrieves only the balance information of imported wallet entries.
          • -json: Prints the balance information in JSON format.

          • -to-file: Saves the output of the balance information to a file. The resulting file will be in JSON format and named as “[WalletName]​_balance_[Timestamp].json” and will be stored in “/[WalletDirectory]/balance_information/[WalletName]/“.

          • -node: Specifies the Denaro node to connect to. Must be a valid IP Address or URL. If not specified or the node is not valid, then the wallet client will use the default Denaro node (https://denaro-node.gaetano.eu.org/).


        import

        Overview: The import sub-command is used to import a wallet entry into a specified wallet file using the private key of a Denaro address.

        Usage:
        • Syntax:

          wallet_client.py import [-h] [-verbose] -wallet WALLET [-password PASSWORD] [-2fa-code TFACODE] -private-key PRIVATE_KEY
        • Options:

          • -wallet: (Required) Specifies the filename of the wallet file where the imported entries will be added. Defaults to the ./wallets/ directory if no specific filepath is provided.

          • -password: The password of the specified wallet. Required for wallets that are encrypted.

          • -2fa-code: Optional Two-Factor Authentication code for encrypted wallets that have 2FA enabled. Should be the 6-digit code generated from an authenticator app.

          • -private-key: Specifies the private key of a Denaro address. Used to generate the corresponding entry data which will be imported into a wallet file.


        backupwallet

        Overview: The backup sub-command is used to create a backup of a wallet file. An option to choose the backup directory is availible.

        Usage:
        • Syntax:

          wallet_client.py backupwallet [-h] -wallet WALLET [-path PATH]
        • Options:

          • -wallet: (Required) Specifies the filename of the wallet file where the imported entries will be added. Defaults to the ./wallets/ directory if no specific filepath is provided.

          • -path: Specifies the directory to save the wallet backup file. Defaults to the ./wallets/wallet_backups/ directory if no specific filepath is provided.

    • Usage Examples:

      Expand
      • Generating New Wallets:

        Expand
        Note: The wallet filename does not require a .json extension to be added as this is entirely optional. By default, the script will add the extension to the filename if not present.

        If the specified wallet file already exists then the user will be prompted with a warning and asked if they want to backup the existing wallet. If the user chooses not to back up an existing wallet, then they will be prompted with an additional warning and asked to confirm the overwrite of the existing wallet. When overwriting an encrypted wallet, the password associated with the it is required, and the user will be prompted to type it in. The user can choose to bypass one or more of these prompts with the use of -backup, -disable-overwrite-warning, or -overwrite-password (Refer to generate wallet options for details).

        • Generates an un-encrypted, non-deterministic wallet:
          python3 wallet_client.py generate wallet -wallet=wallet.json
        • Generates an encrypted, non-deterministic wallet:
          python3 wallet_client.py generate wallet -encrypt -wallet=wallet.json -password=MySecurePassword
        • Generates a deterministic wallet:
          python3 wallet_client.py generate wallet -deterministic -wallet=wallet.json -password=MySecurePassword
        • Generates an encrypted, deterministic wallet, with 2-Factor Authentication:
          python3 wallet_client.py generate wallet -encrypt -deterministic -2fa -wallet=wallet.json -password=MySecurePassword
        • Creates a back up of an existing encrypted wallet and overwrites it with an un-encrypted, deterministic wallet, while skipping various prompts:
          python3 wallet_client.py generate wallet -wallet=wallet.json -deterministic -backup=True -disable-overwrite-warning -overwrite-password=MySecurePassword
      • Address Generation:

        Expand
        • Generates an address for a wallet that is un-encrypted and/or non-deterministic:
          python3 wallet_client.py generate eaddress -wallet=wallet.json
        • Generates an address for a wallet that is encrypted and/or deterministic:
          python3 wallet_client.py generate address -wallet=wallet.json -password=MySecurePassword
      • Wallet Decryption:

        Expand

        Note: An encrypted wallet is not required to use this sub-command. Therefore, it has been designed to also return data from wallets that are not encrypted.

        • Decrypts an entire wallet:
          python3 wallet_client.py decryptwallet -wallet=wallet.json -password=MySecurePassword
      • Wallet Decryption with Filtering:

        Overview:
        • To exclude specific addresses from the filtered data a hyphen - can be added before the specified address.
        • Addresses will only be filtered if they are apart of the wallet that is being decrypted.
        • One or more addresses can be specified and must be seperated by a comma ,.
        • One or more fields can be specified and must be seperated by a comma ,.
        • If one or more fields are not specified, then all fields are included in the filtered data (id,
          mnemonic, private_key, public_key, and address).
        • Various filtering combinations can be used.
        Filtering Examples:
        To get an idea of how filtering works, below are a few examples.

        Note: The following addresses are used only for these examples and you should use your own.

        Retrieves all of the data associated with the addess specified.
        python3 wallet_client.py decryptwallet -wallet=wallet.json -password=MySecurePassword filter -address=DuxRWZXZSeuWGmjTJ99GH5Yj5ri4kVy55MGFAL74wZcW4
        Excludes an address from the results, and will only retrieve the data associated with the rest of the wallet entries if any:
        python3 wallet_client.py decryptwallet -wallet=wallet.json -password=MySecurePassword filter address=-DuxRWZXZSeuWGmjTJ99GH5Yj5ri4kVy55MGFAL74wZcW4
        Excludes an address from the results, and will retrieve only the ‘mnemonic’ associated with the rest of the wallet entries if any:
        python3 wallet_client.py decryptwallet -wallet=wallet.json -password=MySecurePassword filter -address=-DwpnwDyCTEXP4q7fLRzo4vwQvGoGuDKxikpCHB9BwSiMA -field=mnemonic
        Retrieves all of the data associated for the multiple addresses specified:
        python3 wallet_client.py decryptwallet -wallet=wallet.json -password=MySecurePassword filter -address=DuxRWZXZSeuWGmjTJ99GH5Yj5ri4kVy55MGFAL74wZcW4,DwpnwDyCTEXP4q7fLRzo4vwQvGoGuDKxikpCHB9BwSiMA
        Retrieves only the ‘private_key’ and ‘public_key’ associated with the multiple addresses specified:
        python3 wallet_client.py decryptwallet -wallet=wallet.json -password=MySecurePassword filter -address=DuxRWZXZSeuWGmjTJ99GH5Yj5ri4kVy55MGFAL74wZcW4,DwpnwDyCTEXP4q7fLRzo4vwQvGoGuDKxikpCHB9BwSiMA -field=private_key,public_key
        Excludes the specified addresses from the results, and will retrieve only the ‘public_key’ and `id` associated with the rest of the wallet entries if any:
        python3 wallet_client.py decryptwallet -wallet=wallet.json -password=MySecurePassword filter -address=-DuxRWZXZSeuWGmjTJ99GH5Yj5ri4kVy55MGFAL74wZcW4,-DwpnwDyCTEXP4q7fLRzo4vwQvGoGuDKxikpCHB9BwSiMA -field=public_key,id
        Retrieves only the ‘address’ associated with all wallet entries:
        python3 wallet_client.py decryptwallet -wallet=wallet.json -password=MySecurePassword filter -field=address
      • Making a Transaction:

        Expand

        Note: If a wallet is encrypted, be sure to specify the password for it.

        • Sends 100 Denaro to a recipient using an address associated with a wallet:

          python3 wallet_client.py send -amount=100 from -wallet=wallet.json -address=DuxRWZXZSeuWGmjTJ99GH5Yj5ri4kVy55MGFAL74wZcW4 to DwpnwDyCTEXP4q7fLRzo4vwQvGoGuDKxikpCHB9BwSiMA
        • Sends 100 Denaro to a recipient using the priate key associated with a Denaro address:

          Private keys should be in hexdecimal format and are generally 64 characters in length. It is not reccomended to directly specify a private key, as this could lead to the irreversable loss of funds if anyone has access to it.

          python3 wallet_client.py send -amount=100 from -private-key=43c718efb31e0fef4c94cbd182e3409f54da0a8eab8d9713f5b6b616cddbf4cf to DwpnwDyCTEXP4q7fLRzo4vwQvGoGuDKxikpCHB9BwSiMA
      • Checking Balances:

        Expand

        Note: If a wallet is encrypted, be sure to specify the password for it.

        • Retrieves the balance information of all wallet entries:

          python3 wallet_client.py balance -wallet=wallet.json
        • Prints the balance information of wallet entries in json format:

          python3 wallet_client.py balance -wallet=wallet.json -json
        • Saves the json output of balance information of wallet entries to a file:

          python3 wallet_client.py balance -wallet=wallet.json -to-file
        Filtering Examples:

        As mentioned in the usage documentation, the balance sub-command has a way to filter wallet entries similar to decryptwallet filter. The -address option can be used to filter one or more addresses that are associated with a wallet. Addresses can be excluded by adding a hyphen (-) to the beginning of it. Addresses can also be filtered based on origin (See -show option for more details).

        Many filter combinations can be used. Below are just a few examples but for more information please refer to the “Wallet Decryption with Filtering” section.

        Note: If a wallet is encrypted, be sure to specify the password for it.

        • Will only retrieve the balance information of imported wallet entries:

          python3 wallet_client.py balance -wallet=wallet.json -show=imported
        • Will only retrieve the balance information of generated wallet entries:

          python3 wallet_client.py balance -wallet=wallet.json -show=generated
        • Retrieves the balance information of a specific address associated with a wallet:

          python3 wallet_client.py balance -wallet=wallet.json -address=DuxRWZXZSeuWGmjTJ99GH5Yj5ri4kVy55MGFAL74wZcW4
        • Retrieves the balance information of multiple addresses associated with a wallet:

          python3 wallet_client.py balance -wallet=wallet.json -address=DuxRWZXZSeuWGmjTJ99GH5Yj5ri4kVy55MGFAL74wZcW4,DwpnwDyCTEXP4q7fLRzo4vwQvGoGuDKxikpCHB9BwSiMA
        • Retrieves the balance information of all wallet entries but excludes specific addresses:

          python3 wallet_client.py balance -wallet=wallet.json -address=-DuxRWZXZSeuWGmjTJ99GH5Yj5ri4kVy55MGFAL74wZcW4,-DwpnwDyCTEXP4q7fLRzo4vwQvGoGuDKxikpCHB9BwSiMA
      • Importing a Wallet Entry:

        Expand

        Note: If a wallet is encrypted, be sure to specify the password for it.

        Private keys should be in hexdecimal format and are generally 64 characters in length. It is not reccomended to directly specify a private key, as this could lead to the irreversable loss of funds if anyone has access to it. The private key in this example was randomly generated and dose not have funds.

        • Imports a wallet entry based on the private key of a Denaro address:

          python3 wallet_client.py import -wallet=wallet.json -private-key=43c718efb31e0fef4c94cbd182e3409f54da0a8eab8d9713f5b6b616cddbf4cf

    Disclaimer

    Neither The-Sycorax nor contributors of this project assume liability for any loss of funds incurred through the use of this software! This software is provided ‘as is’ under the MIT License without guarantees or warrenties of any kind, express or implied. It is strongly recommended that users back up their cryptographic keys. User are solely responsible for the security and management of their assets! The use of this software implies acceptance of all associated risks, including financial losses, with no liability on The-Sycorax or contributors of this project.


    License

    The Denaro Wallet Client is released under the terms of the MIT license. See LICENSE for more
    information or see https://opensource.org/licenses/MIT.

    Visit original content creator repository
    https://github.com/The-Sycorax/DenaroWalletClient

  • install_netcdf

    install_netcdf

    Install open source packages to work with netCDF and openMPI on Mac OS X and Linux.

    The script was initially written to install netCDF4 (hence its name) and all its
    dependencies to be used with different Fortran compilers, as well as
    some netCDF tools such as cdo, nco and ncview.

    It is also used to install missing packages locally on computing
    clusters. For example, a cluster might have the netCDF C-library
    installed but not the Fortran version.

    Set parameters in Setup section, as well as directories to packages that are already installed.

    Prerequisites: curl, c and c++ compilers, pkg-config for nco.
    Optional prerequisites: fortran compiler (e.g. gfortran) for netcdf3 and netcdf4-fortran
    java compiler for antlr2, i.e. ncap2 of nco

    The script was tested on Mac OS X 10.9 through 10.11 (Mavericks, Yosemite, El Capitan).
    It was not tested on Ubuntu for quite a while.

    Dependencies are:

    hdf5 <- zlib, szip
    netcdf4 <- hdf5
    netcdf4_fortran <- netcdf4
    grib_api <- netcdf4, jasper, libpng
    or
    eccodes <- netcdf4, jasper, libpng
    cdo <- netcdf4, proj4, grib_api or eccodes, udunits
    nco <- netcdf4, gsl, udunits, pkg-config, antlr v2 (not v3/4) for ncap2
    ncview <- netcdf4, udunits
    tiff <- jpeg
    ffmpeg <- yasm

    The websites to check for the latest versions are:

    zlib http://zlib.net
    openssl https://www.openssl.org/source/
    szip http://www.hdfgroup.org/ftp/lib-external/szip/
    hdf5 http://www.hdfgroup.org/ftp/HDF5/releases/
    netcdf4/_fortran https://www.unidata.ucar.edu/downloads/netcdf
    netcdf3 http://www.unidata.ucar.edu/downloads/netcdf/netcdf-3\_6\_3
    udunits ftp://ftp.unidata.ucar.edu/pub/udunits/
    libpng http://sourceforge.net/projects/libpng/files/
    libjpeg http://www.ijg.org/files/
    tiff https://download.osgeo.org/libtiff/
    proj4 https://download.osgeo.org/proj/
    jasper http://www.ece.uvic.ca/~frodo/jasper/
    grib_api https://software.ecmwf.int/wiki/display/GRIB/Releases
    eccodes https://software.ecmwf.int/wiki/display/ECC/Releases
    cdo https://code.zmaw.de/projects/cdo/files
    ncview ftp://cirrus.ucsd.edu/pub/ncview/
    gsl ftp://ftp.gnu.org/gnu/gsl/
    antlr http://www.antlr2.org/download.html
    nco http://nco.sourceforge.net/src/
    openmpi http://www.open-mpi.org
    mpich http://www.mpich.org/downloads/
    geos https://download.osgeo.org/geos
    gdal https://trac.osgeo.org/gdal/wiki/DownloadSource
    yasm http://yasm.tortall.net/Download.html
    ffmpeg http://ffmpeg.org/releases/
    p7zip http://sourceforge.net/projects/p7zip/
    hdf4 http://www.hdfgroup.org/release4/obtain.html
    enscript http://ftp.gnu.org/gnu/enscript
    htop http://hisham.hm/htop/

    Check for all latest versions by copying the following to open/xdg-open:

    http://zlib.net https://www.openssl.org/source/ http://www.hdfgroup.org/ftp/lib-external/szip/ http://www.hdfgroup.org/ftp/HDF5/releases/ https://www.unidata.ucar.edu/downloads/netcdf http://www.unidata.ucar.edu/downloads/netcdf/netcdf-3\_6\_3 ftp://ftp.unidata.ucar.edu/pub/udunits/ http://sourceforge.net/projects/libpng/files/ http://www.ijg.org/files/ https://download.osgeo.org/libtiff/ https://download.osgeo.org/proj/ http://www.ece.uvic.ca/~frodo/jasper/ https://software.ecmwf.int/wiki/display/GRIB/Releases https://software.ecmwf.int/wiki/display/ECC/Releases https://code.zmaw.de/projects/cdo/files ftp://cirrus.ucsd.edu/pub/ncview/ ftp://ftp.gnu.org/gnu/gsl/ http://www.antlr2.org/download.html http://nco.sourceforge.net/src/ http://www.open-mpi.org http://www.mpich.org/downloads/ https://download.osgeo.org/geos https://trac.osgeo.org/gdal/wiki/DownloadSource http://yasm.tortall.net/Download.html http://ffmpeg.org/releases/ http://sourceforge.net/projects/p7zip/ http://www.hdfgroup.org/release4/obtain.html http://ftp.gnu.org/gnu/enscript http://hisham.hm/htop/releases/

    Note

    • Do not untabify the script because the netcdf_fortran libtool patch will not work anymore.
    • If some libraries are already installed such as png, set dolibpng=0 below.
    • One can set EXTRA_CPPFLAGS and EXTRA_LDFLAGS if the compilers do not find it automatically, for example:
      EXTRA_LDFLAGS=’-L/opt/local’

    Note on Mac OS X using homebrew

    install homebrew with

    /usr/bin/ruby -e "$(curl -fsSL  https://raw.githubusercontent.com/Homebrew/install/master/install)"  
    

    install the following packages via homebrew by typing: brew install

    brew install gcc netcdf cmake udunits proj jasper gsl
    brew cask install java
    brew install antlr@2 geos gdal ffmpeg enscript htop
    brew install nco
    brew install ncview
    

    Set CMAKE below to cmake.
    All libraries should link into /usr/local. If a package cannot link properly then try

    brew link <PACKAGE>
    

    This normally shows a directory which cannot be written. Set owner to username, e.g.

    sudo chown ${USER} /usr/local/share/man/man3
    

    Then, do not select the instaled packages below

    dozlib=0
    doszip=0
    dohdf5=0
    donetcdf4=0
    doudunits=0
    dolibpng=0
    dolibjpeg=0
    dotiff=0
    doproj4=0
    dojasper=0
    dogsl=0
    doantlr=0
    donco=0
    doncview=0
    

    Then use the script to install all libraries that provide Fortran interfaces with all your Fortran compilers,
    such as netcdf4-fortran, netcdf3, openmpi, mpich, giving the list of your Fortran compilers below, e.g.

    fortran_compilers="gfortran nagfor pgfortran ifort"
    

    Also install cdo with the script because of the dropped science support of homebrew.
    Homebrew can also be used exclusivley for the additional packages:

    geos
    gdal
    ffmpeg
    enscript
    htop
    

    Note on (Scientific) Linux

    zlib installed by default.
    Install antlr-C++ bindings from paket manager.

    Note on Ubuntu

    install the following software from package management via the command line
    by typing sudo apt install

    zlib [installed by default on Ubuntu]
    or
    libz-mingw-w64 [on Ubuntu on Windows]
    libpng-dev
    libtiff-dev [installs libjpeg-dev]
    libantlr-dev
    libexpat-dev
    libcurl4-openssl-dev
    xorg-dev
    cmake
    bison
    

    Therefore do not select the packages below

    dozlib=0
    dolibpng=0
    dolibjpeg=0
    dotiff=0
    doantlr=0
    

    Authors: Matthias Cuntz, Stephan Thober
    Created: Oct 2014

    Copyright (c) 2014-2019 Matthias Cuntz – mc (at) macu (dot) de

    Visit original content creator repository
    https://github.com/mcuntz/install_netcdf