Category: Blog

  • myJaffleShop-DBT

    Testing dbt project: jaffle_shop

    jaffle_shop is a fictional ecommerce store. This dbt project transforms raw data from an app database into a customers and orders model ready for analytics.

    What’s in this repo?

    This repo contains seeds that includes some (fake) raw data from a fictional app.

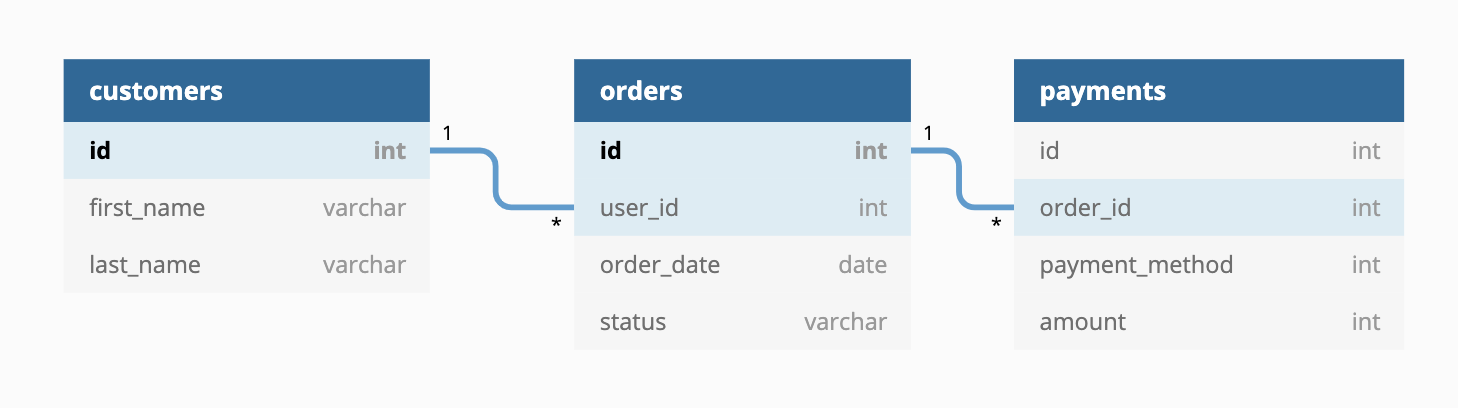
    The raw data consists of customers, orders, and payments, with the following entity-relationship diagram:

    Jaffle Shop ERD

    Running this project

    To get up and running with this project:

    Note : Before running this commands first give command of ” venv/Scripts/activate ” to acticate the environment.

    1. Install dbt using these instructions.

    2. Clone this repository.

    3. Change into the jaffle_shop directory from the command line:

    $ cd jaffle_shop
    1. Set up a profile called jaffle_shop to connect to a data warehouse by following these instructions. If you have access to a data warehouse, you can use those credentials – we recommend setting your target schema to be a new schema (dbt will create the schema for you, as long as you have the right privileges). If you don’t have access to an existing data warehouse, you can also setup a local postgres database and connect to it in your profile.

    2. Ensure your profile is setup correctly from the command line:

    $ dbt debug
    1. Load the CSVs with the demo data set. This materializes the CSVs as tables in your target schema. Note that a typical dbt project does not require this step since dbt assumes your raw data is already in your warehouse.
    $ dbt seed
    1. Run the models:
    $ dbt run

    NOTE: If this steps fails, it might mean that you need to make small changes to the SQL in the models folder to adjust for the flavor of SQL of your target database. Definitely consider this if you are using a community-contributed adapter.

    1. Test the output of the models:
    $ dbt test
    1. Generate documentation for the project:
    $ dbt docs generate
    1. View the documentation for the project:
    $ dbt docs serve

    What is a jaffle?

    A jaffle is a toasted sandwich with crimped, sealed edges. Invented in Bondi in 1949, the humble jaffle is an Australian classic. The sealed edges allow jaffle-eaters to enjoy liquid fillings inside the sandwich, which reach temperatures close to the core of the earth during cooking. Often consumed at home after a night out, the most classic filling is tinned spaghetti, while my personal favourite is leftover beef stew with melted cheese.


    For more information on dbt:


    Visit original content creator repository https://github.com/KunjPathak12/myJaffleShop-DBT
  • big-query-visualizer

    Big-Query-Visualizer Application Description

    Big-Query-Visualizer is a comprehensive full-stack application that combines the power of a Next.js frontend with a Django REST Framework backend. This application is uniquely designed to perform bigquery queries through an intuitive graphical interface, eliminating the need for direct SQL input.

    Key Features

    • Query Saving: Users can effortlessly save their queries for future reference, enhancing usability and efficiency.
    • View All Saved Queries: The platform allows users to view all queries saved by any user, fostering a collaborative environment.
    • Commenting on Queries: Users have the ability to comment on queries, enabling a dynamic exchange of ideas and insights.
    • Delete Own Comments: Each user has the control to delete their own comments, ensuring a manageable and relevant discussion.
    • Manage Saved Queries: Users can easily manage (edit/delete) their saved queries, providing a personalized experience.
    • Authentication Module: The application includes a robust authentication module, which is essential for performing any action within the app. This feature ensures secure access and operation.

    Multi-Container Docker Application Demo

    In this section, we will provide a demonstration of our application running within multiple Docker containers. The demonstration offers a detailed insight into how the application functions and is deployed using multiple Docker containers to achieve a highly scalable and modular environment.

    Click the following link to watch the demo video:
    Watch the Docker demo

    In this demo, you will see how each component of our application is packaged into separate Docker containers, making it easier to manage and scale our infrastructure. We hope you enjoy the demonstration!

    Please note that at the end of this video, there is another explanatory video available in English.

    Getting Started

    Prerequisites

    Ensure you have the following installed:

    • Python 3.8 and pip (Python package installer).
    • Node.js >=18 and npm/Yarn for managing frontend dependencies.
    • A virtual environment manager for Python (like venv or virtualenv).

    Installation

    Backend Setup

    1. Clone the repository:

    git@github.com:emazou/big-query-visualizer.git
    cd big-query-visualizer/backend

    Set up a Python virtual environment

    python -m venv venv
    source venv/bin/activate  # On Windows use `venv\Scripts\activate`
    

    Install the required Python packages

    pip install -r requirements.txt
    

    Set up the Django development environment

    Make sure you create a .env file with all the necessary environment variables as per .env.example. Then run the migrations and start the development server

    python manage.py migrate
    python manage.py runserver
    

    Frontend Setup

    Navigate to the frontend directory

    cd part2-test/frontend
    

    Install the required node modules

    npm install
    

    Start the Next.js development server

    npm run dev
    

    Accessing the Application

    Open your web browser and visit:

    Frontend: http://localhost:9000
    Backend: http://localhost:8000

    Database Setup

    SQLite will be used as the database for development purposes due to its simplicity and ease of setup. Django comes with built-in support for SQLite.

    1. Configure the DATABASES setting in settings.py to use SQLite:

    # settings.py
    
    DATABASES = {
        'default': {
            'ENGINE': 'django.db.backends.sqlite3',
            'NAME': BASE_DIR / 'db.sqlite3',
        }
    }

    Apply database migrations to set up your database schema

    python manage.py migrate
    

    Docker Setup

    To facilitate development and deployment, PART2-TEST utilizes Docker. Follow these steps to set up and run the application using docker-compose.

    To achieve this, please remember to configure your database with PostgreSQL as we will be in production.

    To achieve this, please remember to configure your database with PostgreSQL as we will be in production.

    # settings.py
    
    DATABASES = {
        'default': {
        'ENGINE': 'django.db.backends.postgresql',
        'NAME': name,
        'USER': user,
        'PASSWORD': password,
        'HOST': host,
        'PORT': yourport,
      }
    }

    Building Docker Images

    1. Build Images:
      • Make sure you are in the root of the project.
      • Run the following command to build Docker images for both frontend and
        backend:

        docker-compose -f docker-compose.dev.yml build

    Starting Containers

    If the images are already run docker-compose up

    1. Run Containers:
      • Once the images are built, you can start the containers with:

        docker-compose -f docker-compose.dev.yml up
        
        or 
        
        docker-compose up

    Accessing Services

    1. Accessing the Application:

    Additional Resources

    For a better understanding of the development and setup process, you can watch a tutorial video. This video provides a detailed, step-by-step explanation of how to configure and run PART2-TEST using Docker.

    Visit original content creator repository
    https://github.com/emazou/big-query-visualizer