This repository is intended as a playground to calculate and verify KPIs and metrics defined in the research project DoDo.
The repository contains a description of the calculated KPIs here.
The documentation of the fundamental data model for this KPI system can be accessed here.
Further Repositories
An additional project is used to visualize the calculated data and can be found here.
To deploy the complete setup using docker and adding traefik for routing between the containers you can use this repository.
Installation
$ npm install
Running the app
Start the database by running docker-compose up -d. Per default a web interface displaying the current state of the database is launched on localhost:8081. The credentials are defined in the docker-compose file.
# development
$ npm run start

# watch mode
$ npm run start:dev

# production mode
$ npm run start:prod
OpenApi
The OpenApi description of this API is reachable on the /api endpoint.
Test
# unit tests
$ npm run test# e2e tests
$ npm run test:e2e
# test coverage
$ npm run test:cov
Create local .env.local file in which you store a GitHub access token under the GITHUB_ACCESS_TOKEN key. The GitHub REST API is restricted to 60 requests per hour if you don’t use any access token and this will be exceeded by one of the predefined queries. For more details of the limited rates see the GitHub documentation.
Database
Add the URI and user credentials for your database to the .env.local file.
DB_URI=mongodb://localhost:27017/<shouldReflectYourDatabaseDefinedInDockerCompose>
DB_USER=<userName as defined in docker-compose>
DB_USER_PASSWORD=<password as defined in docker-compose>
The user credentials have to match the ones defined in the docker-compose.yml.
In order to get a clean setup you have to remove the docker volume! Use docker volume rm visu-code-db-service_mongodb-data for that.
Windows Only
Make sure the mongo-init.sh is stored with LF line endings!
Translations in languages other than English are machine translated and are not yet accurate. No errors have been fixed yet as of March 21st 2021. Please report translation errors here. Make sure to backup your correction with sources and guide me, as I don’t know languages other than English well (I plan on getting a translator eventually) please cite wiktionary and other sources in your report. Failing to do so will result in a rejection of the correction being published.
Note: due to limitations with GitHub’s interpretation of markdown (and pretty much every other web-based interpretation of markdown) clicking these links will redirect you to a separate file on a separate page that isn’t the intended page. You will be redirected to the .github folder of this project, where the README translations are hosted.
Translations are currently done with Bing translate and DeepL. Support for Google Translate translations is coming to a close due to privacy concerns.
Try it out! The sponsor button is right up next to the watch/unwatch button.
Version history
Version history currently unavailable
No other versions listed
Software status
All of my works are free some restrictions. DRM (Digital Restrictions Management) is not present in any of my works.
This sticker is supported by the Free Software Foundation. I never intend to include DRM in my works.
I am using the abbreviation “Digital Restrictions Management” instead of the more known “Digital Rights Management” as the common way of addressing it is false, there are no rights with DRM. The spelling “Digital Restrictions Management” is more accurate, and is supported by Richard M. Stallman (RMS) and the Free Software Foundation (FSF)
This section is used to raise awareness for the problems with DRM, and also to protest it. DRM is defective by design and is a major threat to all computer users and software freedom.
on 2020-06-03 updated the webapp to add the linkup to the actual text of each article stored here, to allow for line-by-line reference
on 2020-07-18 the Italian Government released on the Gazzetta Ufficiale Law 77 of 2020-07-17, replacing the decree; 155 implementation (“decreti attuativi”) will have to follow within 90 days
on 2020-07-18 started the update of the GitHub and local database, to be released officially on 2020-07-21; pending the update, the GitHub content is not accessible from the application (only the tag cloud is visible), and the GitHub content update will be completed by 2020-07-20 11 AM UTC
on 2020-11-21 added the reference to the new webapp that has been available since 2020-07-20, in preparation of the release of a new repository focused on a further Government Decree converted into Law (Decreto Semplificazioni – Law 120 of 2020-09-11, published on Gazzetta Ufficiale on 2020-09-14), that modified some elements of Law 77
The latter includes also a visualization of the timeframe of impacts of each article
Purpose: an experiment in dissemination to ease access and evidence-based negotiation using open data and open platforms, without necessarily being involved in the ensuing uses
Next steps: further experiments and probably updated on the webapp and Kaggle dataset based upon request
Disclosure: beside my Italian passport, I have neither political nor organizational affiliation with any State, local authorities, or private sector organization in this endeavour
Prototype based programming is a style of object orientated programming. It is commonly referred to as object based programming because it lacks classes and instead relies solely on objects. Objects can contain values, methods or references to other objects.
Self was designed in 1986 and was one of the first prototype orientated programming languages. In recent years the paradigm has become increasingly popular due to the rise of JavaScript. Traditionally JavaScript was used as a scripting language. However, the expanding complexity of front-end applications and the development of Node.js on the server-side has resulted in the JavaScript community progressively favouring a prototype based approach.
Today we will discuss the historical background of prototype based programming, how prototypes can be used, and their main advantages and limitations. We will also canvas JavaScript classes that were introduced in ECMAScript 2015 and explain why their introduction has been criticised by some commentators as syntactic sugar for JavaScript’s existing prototype based system. To conclude, a reflection will be offered on prototype based programming in the context of other programming paradigms.
Although many languages now support prototype based programming, JavaScript examples will be used.
Historical background
The idea of a prototype stems back to a philosophical dispute on the representation of abstractions in the 20th century. Ludwig Wittgenstein at the time observed that it was difficult to say in advance exactly what characteristics are necessary to define a category. Wittgenstein instead proposed what can now be considered the origin of prototype based programming – the concept of family resemblance. This concept advocates that objects in a particular category may be connected via numerous similarities, but there is not necessarily one feature that is common to all objects in a category. Thus, the family resemblance approach determines whether an object belongs in a category by considering whether it is similar to a standard representation of that category.
Henry Lieberman popularised prototypes and the concept of delegation as an alternative object orientated paradigm in his 1986 paper. Lieberman introduced prototypes with an example of trying to categorise elephants. In short, the example considers an individual, John, who has never heard of or seen an elephant before. If John was to meet an elephant named Bob, then when thinking about elephants John would think of Bob because that is the only concrete example John has of an elephant. If John was to then meet another elephant, Sarah, who is smaller than Bob – John is likely to categorise Sarah as similar to Bob but smaller in size.
Lieberman’s example illustrates how the primary idea behind prototype based programming is to use a concrete example to represent an object, and then use cloning or adding of new properties to present newfound knowledge of the model.
Object creation
An object is a collection of properties. A property is an association between a key and a value. A property’s value can also be a function, in which case the property is referred to as a method. Although there are multiple approaches to creating objects in JavaScript, they all fall into one of two categories: ex nihilo object creation or through cloning an existing object.
Ex nihilo object creation allows new objects to be created without cloning from an existing defined object.
// An object created ex nihilo using literal object notationvardog={name: 'Max',breed: 'Poodle'};
An alternative to using literal object notation is to write a constructor function and create new object instances with the reserved word new. Each instance of the object will have its own properties.
functionDog(name,breed){this.name=name;this.breed=breed;
bark: function(){console.log("Woof!");};};varpoodle=newDog('Max','Poodle');vardalmatian=newDog('Bobby','Dalmatian');console.log(poodle.name);// Output is 'Max'console.log(dalmatian.name);// Output is 'Bobby'
The Object.create method can be used in place of a explicitly defined constructor function.
varDog={
name ="Max";breed="Poodle";
bark: function(){console.log("Woof!");};};varmax=Object.create(Dog);max.bark();// Output is 'Woof!'
A new object can also be created by cloning the behaviour of an existing object. The cloned object will have the same properties as the original. Once created, the new object can also be modified.
vardog={name: 'Max',breed: 'Poodle'};// The newDog object is created by cloning the dog objectvarnewDog=Object.assign({},dog);console.log(dog.name);// Output is 'Max'console.log(newDog.name);// Output is 'Max'newDog.name="Jessica";console.log(dog.name);// Output is 'Max'console.log(newDog.name);// Output is 'Jessica'
Delegation and Inheritance
The language feature that supports prototype based programming is delegation. Objects can be cloned and extended via delegation. This principle provides that when accessing a property of an object, the property will be sought on the object and also all other objects in the prototype chain. Objects inherit directly through a prototype property. Every object has a prototype link to another object. Objects by default are linked to the object Object.prototype.
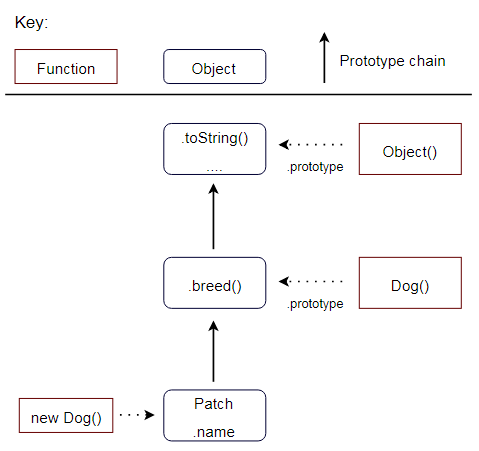
varDog=function(){this.name="Patch";}varpatch=newDog();Dog.prototype.breed="Great Dane";console.log(patch.name);// Output is 'Patch'console.log(patch.breed);// Output is 'Great Dane'
In the above example, the patch object contains the name property. The breed property is also found by traversing the prototype chain and accessing its prototype. Using the .prototype property of Dog, new properties can be assigned so that when a new object is created from the Dog constructor function, those properties will be available to the new object.
The prototype chain in this example can be visually illustrated as follows:
If you’re a visual learner, Dave Atchley provides many more examples.
All objects can be altered or extended using prototypes, including JavaScript’s native object prototypes such as string and array. However, this is generally considered bad practice particularly from the point of view of code integration. It is very common to use use libraries and frameworks in JavaScript which rely upon the standard implementations of the native prototypes. In addition, when working within a team, modifications to the already existing JavaScript objects can cause confusion and hours of lost time. In almost all cases it is more appropriate to create a new object to encapsulate the desired functionality.
Cloning
If an object is created by cloning using Object.assign(), then the top level properties of that object are copied to the new object without any reference. However, if a value is a reference to an object, then the reference will be copied and not the value.
varbook={id: 1,authors: {author1: "John Jims"}};varnewBook=Object.assign({},book);console.log(book.authors.author1);// Output is 'John Jims'console.log(newBook.authors.author1);// Output is 'John Jims'// Update author1 value for the book objectbook.authors.author1="Jess Simpson";console.log(book.authors.author1);// Output is 'Jess Simpson'console.log(newBook.authors.author1);// Output is 'Jess Simpson'
In the above example, newBook maintains a link to its prototype. Changes in the object reference to the prototype will cause a corresponding change in newBook.
The use of ‘this’
In prototype based programming, any function can be added to an object in the form of a property. An inherited property will behave the same as any other property. When an inherited function is invoked, the value of this will point to the inherited object, not the prototype object where the function is a property.
varcalculate={num: 5,sum: function(){returnthis.num+5;}};// When executing calculate.sum, 'this' refers to the calculate objectconsole.log(calculate.sum());// Output is '10'// modifier is an object that inherits from calculatevarmodifier=Object.create(calculate);modifier.num=20;// When executing modifier.sum, 'this' refers to the modifier objectconsole.log(modifier.sum());// Output is '25'
Performance
Most JavaScript engines use a dictionary-like data structure to store object properties. Consequently the lookup time for properties that are high in the prototype chain can have a negative impact on performance.
Lookup operations are repeated every time a property or variable is accessed. Accessing a non-existent property will always result in a full traversal of the prototype chain. In addition, when iterating over the properties of an object, every enumerable property that is on the prototype chain will be enumerated. The consequence of this is that accessing properties in prototype based languages is typically much slower than accessing variables in languages such as Java.
Prototypes vs. Classes
In class based languages classes are defined first and then objects are instantiated based on those classes. An object cannot exist without a class that defines its behaviour. Once an object is created, its behaviour can also not be extended. To this end classes provide a level of certainty. If dog and cat objects are instantiated from the class Animal, then it is reasonable for a programmer to expect the same attributes and behaviours on both objects.
Conversely, in prototype based languages objects are the primary entities. There is no class construct. The prototype of an object is just another object to which the object is linked. Only single inheritance can be implemented through a prototype as every object only has one prototype link.
New objects can be created based on existing objects. New behaviour can also be added to objects after their creation. Using prototypes, the method of sharing behaviour between objects is by delegation. When a variable or method is requested from an object and it does not know how to handle it, the object delegates its request to its list of prototypes.
JavaScript classes
JavaScript classes, introduced in ECMAScript 2015, provide a new means of creating a class by using the class keyword. However, the introduction of classes does not change the way that prototype inheritance works in JavaScript. Consequently, classes have been met with some criticism from parts of the JavaScript community as an unnecessary and convoluted addition to the language.
There are two ways to define a class – by expression or by declaration.
Unlike function declarations, class declarations and expressions are not hoisted. This means that the class must be defined before it can be accessed.
varb=newBook();// Reference error here classBook{};
Subclasses
The extends keyword can be used in class declarations and class expressions to create a class that is a child of another class.
classDog{constructor(name){this.name=name;}woof(){console.log(`${this.name} woofs!`);}};classPuppyextendsDog{constructor(name){super(name);}};varbobby=newPuppy('Bobby');bobby.woof()// output is 'Bobby woofs!'
In this example Puppy is a child class of Dog. As a child class, Puppy can access and execute the woof function from its parent class.
Criticism
JavaScript classes have been criticised by commentators as syntactic sugar over JavaScript’s existing prototype based inheritance. Inspecting the typeof a class reveals that under the hood it is a function. This explains why the class can be used just like a constructor function by using the new keyword.
As such, classes are said to obscure the true nature of JavaScript inheritance. There is a disconnect between what a class looks like (an object) and how it behaves (as a function). Classes in JavaScript also only provide single inheritance which limits a programmer’s ability to express object oriented design.
Perhaps the only saving grace for JavaScript classes are that they provide greater familiarity to programmers coming from class based languages such as Java, and are backwards compatible with most existing code.
Conclusion
Class based programming and prototype based programming both seek to implement the object orientated paradigm. Most programmers are familiar with class based programming due the popularity of languages such as C#, C++ and Java. However the rise of JavaScript, which adopts a prototype based approach, has meant that increasingly programmers are having to learn and use prototypes. JavaScript has tried to cater to programmers coming from popular object orientated languages by introducing a class syntax. But this has been criticised by some commentators as it does not replace the underlying prototype based system and arguably only adds further confusion.
Prototype based programming provides greater freedom and flexibility to programmers because of its dynamic nature. Objects do not need a class to exist and are designed to have their behaviour easily cloned, shared or extended – even at runtime. The limitation to this approach is maintainability and performance, particularly in large scale projects. While a class based approach requires the programmer to adopt a more rigid approach in declaring classes and hierarchy at compile time, the benefit is greater robustness and performance. Consequently, the type of problem to be solved and valued characteristics of the envisaged system will more often than not decide the most appropriate object orientated approach to adopt.
Este repositorio forma parte del desarrollo de proyecto web para el startup UwU®, que es una One page (Desktop first) para su Instagram Shop. Esta conformado por dos carpetas, una destinada para el diseño UI (donde se puede visualizar la IA, el wireframing, el diseño plano y el prototipo de alta fidelidad) y otra para el desarrollo Front end (html, css, js).
This repository is part of the web project development for the startup UwU®, which is a One page (Desktop first) for an Instagram Shop. The project has two folders, one for the UI design (with the IA, wireframes, flat design and high fidelity prototype) and the other for Front end development.
mysql -uroot -prootroot -e "CREATE DATABASE IF NOT EXISTS ordin DEFAULT CHARACTER SET utf8mb4 COLLATE utf8mb4_general_ci;CREATE DATABASE IF NOT EXISTS inspection DEFAULT CHARACTER SET utf8mb4 COLLATE utf8mb4_general_ci;CREATE DATABASE IF NOT EXISTS risk DEFAULT CHARACTER SET utf8mb4 COLLATE utf8mb4_general_ci;"
Conf
You should modify conf/config.dev.toml
[database]
Type = mysql
User = root
Password = rootroot
Host = 127.0.0.1:3306
ODBName =  ordin
IDBName = inspection
RDBName = risk

[redis]
Host = 127.0.0.1:6379
Password = ""
db = 0
pool_size = 100
Run
Specify the configuration file go run main.go -c conf/config.dev.toml,or run the air command to live reload for server,useful for development and debugging
$ git clone https://github.com/anzhihe/gin-web-example.git

$ cd gin-web-example

$ go run main.go or make run or air
Project information and existing API
[GIN-debug] [WARNING] Running in"debug" mode. Switch to "release" mode in production.
- using env: export GIN_MODE=release
- using code: gin.SetMode(gin.ReleaseMode)
[GIN-debug] GET /health --> thor-backend/internal/controller.(*Server).health-fm (3 handlers)
[GIN-debug] GET /swagger/*any --> github.com/swaggo/gin-swagger.CustomWrapHandler.func1 (3 handlers)
[GIN-debug] GET /api/v1/test --> thor-backend/internal/controller.(*Server).ServeTest-fm (3 handlers)
[GIN-debug] GET /debug/pprof/ --> github.com/gin-contrib/pprof.pprofHandler.func1 (3 handlers)
......
Listening port is 8080
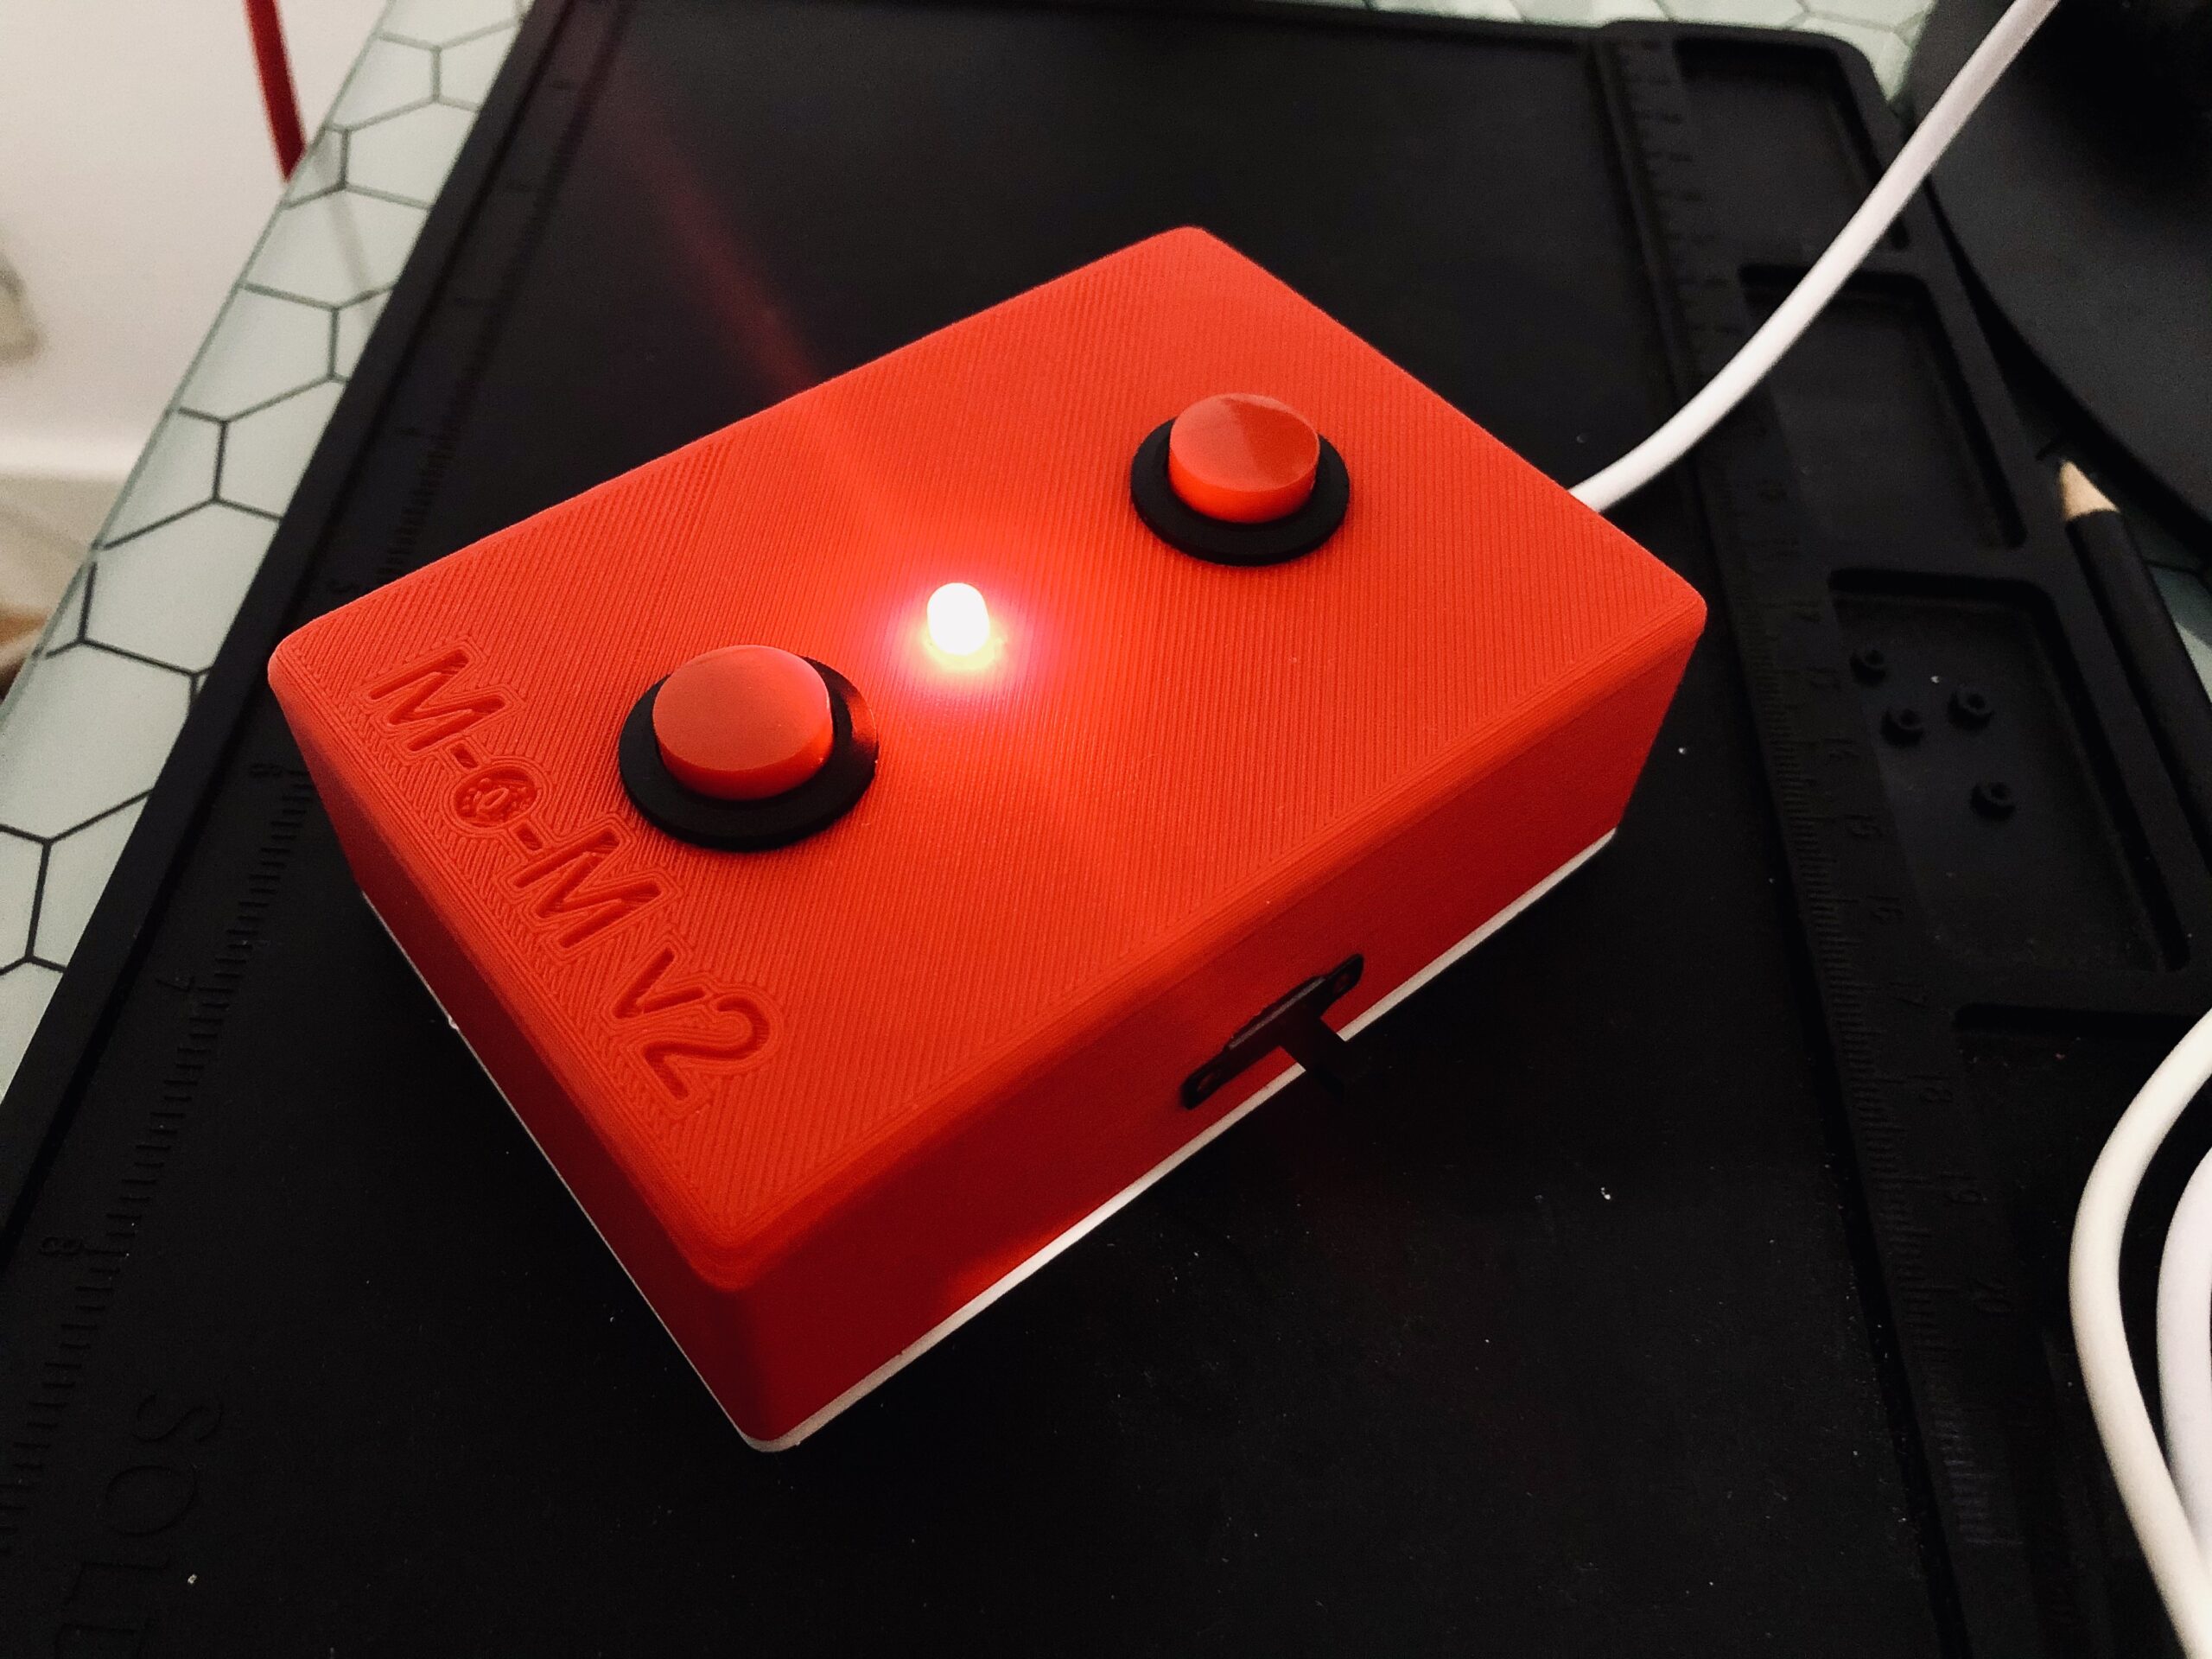
Hardware mute button and end call for MS Teams, with led indicator. Since I’m using both macOs and Windows, it has a nice and comfortable slide SPST switch on the side to select OS.
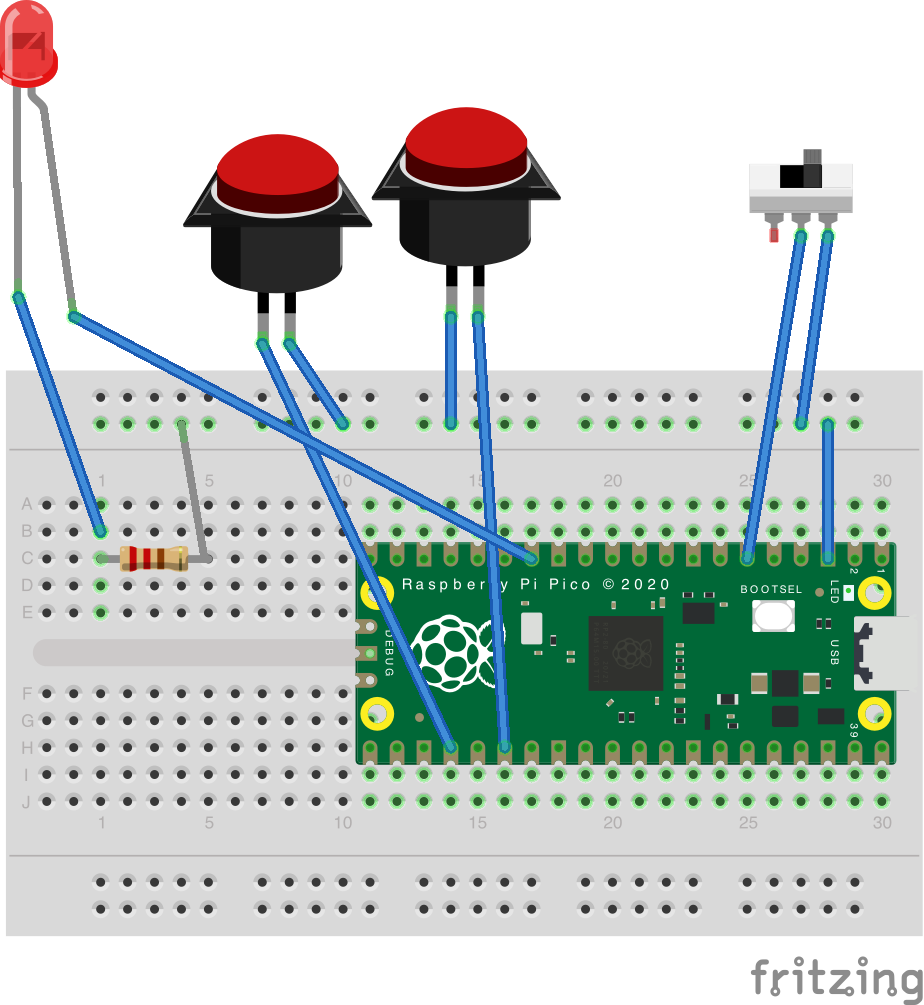
This was my test project for the new Raspberry Pi Pico; with ~4€ you get a crazy good microprocessor and implementing HID functionality is extremelty trivial.
The project is written in CircuitPython, using the Adafruit HID Library. Remember to copy the library file on the Pico together with the code.py file. I used a transparent plastic container because… well, that’s the only thing I had in the house and there’s lockdown due to COVID-19. Feel free to buy me a 3D Printer ❤️ I actually ended up buying a 3D printer so here you are the Mute-o-Matic v2 in its fancy plastic box!
You can find the design of the case in the case folder. It’s my first design, so expect some filing here and there, it needs some millimetric adjustments.
A random Fritzing here
This is just to give you a idea of what’s doing what.
How it works
🚀 Rocket science! Jokes aside, it’s just a HID which sends shortcuts defined in MS Teams, according to the OS selected with the side switch.
For Windows:
CTRL + Shift + M to toggle the mute (and the led)
CTRL + Shift + B to close the call (for strange reasons, this is not a documented shortcut on Teams official page)
For macOs (For macOs, cmd is mapped to GUI. I guess in Windows this would be the Windows logo):
CMD + Shift + M to toggle the mute (and the led)
CMD + Shift + B to close the call (guess what, this is also not a documented shortcut on Teams official page)
Easy. I just needed something to quickly mute/unmute the calls because I tend to get distracted and racing to find the proper button with the mouse is too hard.
On my personal version of the Mute-o-Matic V2, I included another command which brings Teams on focus before toggling mute. This can be done with an idiot trick: pin Teams’ icon in the bar (how is it called? the one below) and count what number is it starting from the left. You can switch to that with the shortcut:
Alt + [Number]
You will need to do this twice because Teams will have two windows, the first one with the chat and all the other stuff and the second one with your active call. So, let’s say I’ve put the icon as third in my Windows bar, the correct sequence will be:
This repository houses a suite of plugins which add tasks to automatically download and run Minecraft server/proxy
software along with your plugin built by Gradle. This provides a streamlined method of integration testing plugins.
Run Paper
Basic Usage
In build.gradle.kts:
plugins {
// Apply the plugin
id("xyz.jpenilla.run-paper") version "2.3.1"
}
tasks {
runServer {
// Configure the Minecraft version for our task.// This is the only required configuration besides applying the plugin.// Your plugin's jar (or shadowJar if present) will be used automatically.
minecraftVersion("1.21.8")
}
}
You can now run a Paper server simply by invoking the runServer task!
Run Velocity
Basic Usage
In build.gradle.kts:
plugins {
// Apply the plugin
id("xyz.jpenilla.run-velocity") version "2.3.1"
}
tasks {
runVelocity {
// Configure the Velocity version for our task.// This is the only required configuration besides applying the plugin.// Your plugin's jar (or shadowJar if present) will be used automatically.
velocityVersion("3.4.0-SNAPSHOT")
}
}
You can now run a Velocity proxy simply by invoking the runVelocity task!
Run Waterfall
Basic Usage
In build.gradle.kts:
plugins {
// Apply the plugin
id("xyz.jpenilla.run-waterfall") version "2.3.1"
}
tasks {
runWaterfall {
// Configure the Waterfall version for our task.// This is the only required configuration besides applying the plugin.// Your plugin's jar (or shadowJar if present) will be used automatically.
waterfallVersion("1.21")
}
}
You can now run a Waterfall proxy simply by invoking the runWaterfall task!
Check out the wiki for more detailed usage information.