There is also an older version written in TypeScript.
Supports
Browser, ES6, CommonJS, NodeJS, Bun, Svelte, React, Angular, etc.
Installation
npm install @ixjb94/indicators-js
Examples
NodeJS, Bun, React, Svelte, Angular, etc.
import{ema}from"@ixjb94/indicators-js"// orconst{ ema }=require("@ixjb94/indicators-js")constsource=[1,2,3,4,5]constresult=ema(source,3)
Browser – Option 1
<scriptsrc="./node_modules/@ixjb94/indicators-js/dist/index.umd.js"></script><script>const{ ema }=window.indicatorsconstresult=ema([1,2,3,4,5],3)console.log(result)</script>
Some code to harvest and play around with the functions associated with Australian government agencies in the National Archives of Australia’s RecordSearch database.
Install other requirements — pip install -r requirements.txt
The harvester is expecting to save data to a MongoDB database hosted by MongoLab. You can set up a sandbox database for free. Once you’ve created your database, you’ll need to add a user who can access it. Then just:
Copy the MongoDB URI from your database’s control panel to the credentials_blank.py file.
Replace <dbuser> and <dbpassword> in the URI with your database user’s details.
Rename credentials_blank.py to credentials.py.
Of course you can change this to point to a local MongoDB instance, or anywhere else really.
Starting a harvest
Assuming you’re in the recordsearch-functions directory, just:
Start up Python, or preferably iPython — ipython
Import the harvest module — import harvest_functions
Set up a harvester instance, supplying the name of the function you want to harvest, eg. MIGRATION — harvester = harvest_functions.FunctionHarvester(function='MIGRATION')
If everything’s working you’ll see the number of agencies that are going to be harvested, and the number of results pages that will be processed.
Then just start the harvest — harvester.start_harvest()
Analysing the harvested data
Save a summary of the agencies associated with a particular function to a CSV file:
Start up Python, or preferably iPython — ipython
Import the analyse module — import analyse_functions
Create a CSV file for a single function, eg. MIGRATION — analyse_functions.write_csv('MIGRATION')
Create CSV files for all harvested functions — analyse_functions.write_csv()
Look in the data directory for some example CSV files.
Aggregate agencies associated with a particular function by their status, eg. ‘Department of State’, or ‘Head Office’:
Start up Python, or preferably iPython — ipython
Import the analyse module — import analyse_functions
Aggregate agencies for a single function, eg. ‘INTERNAL SECURITY’ — analyse_functions.calculate_status_totals('INTERNAL SECURITY')
The results look something like this:
[
    {u'agency_status': u'Regional or State Office', u'total': 22},
    {u'agency_status': u'Head Office', u'total': 10},
    {u'agency_status': u'Local Office', u'total': 1},
    {u'agency_status': u'Judicial Court or Tribunal', u'total': 1},
    {u'agency_status': u'Department of State', u'total': 1}
]
Retrieve a list of agencies by function and agency status:
Start up Python, or preferably iPython — ipython
Import the analyse module — import analyse_functions
Retrieve agencies with a particular status, associated with a specific function — analyse_functions.get_agencies('MIGRATION', status='Department of State')
The result is a list of agencies, something like this:
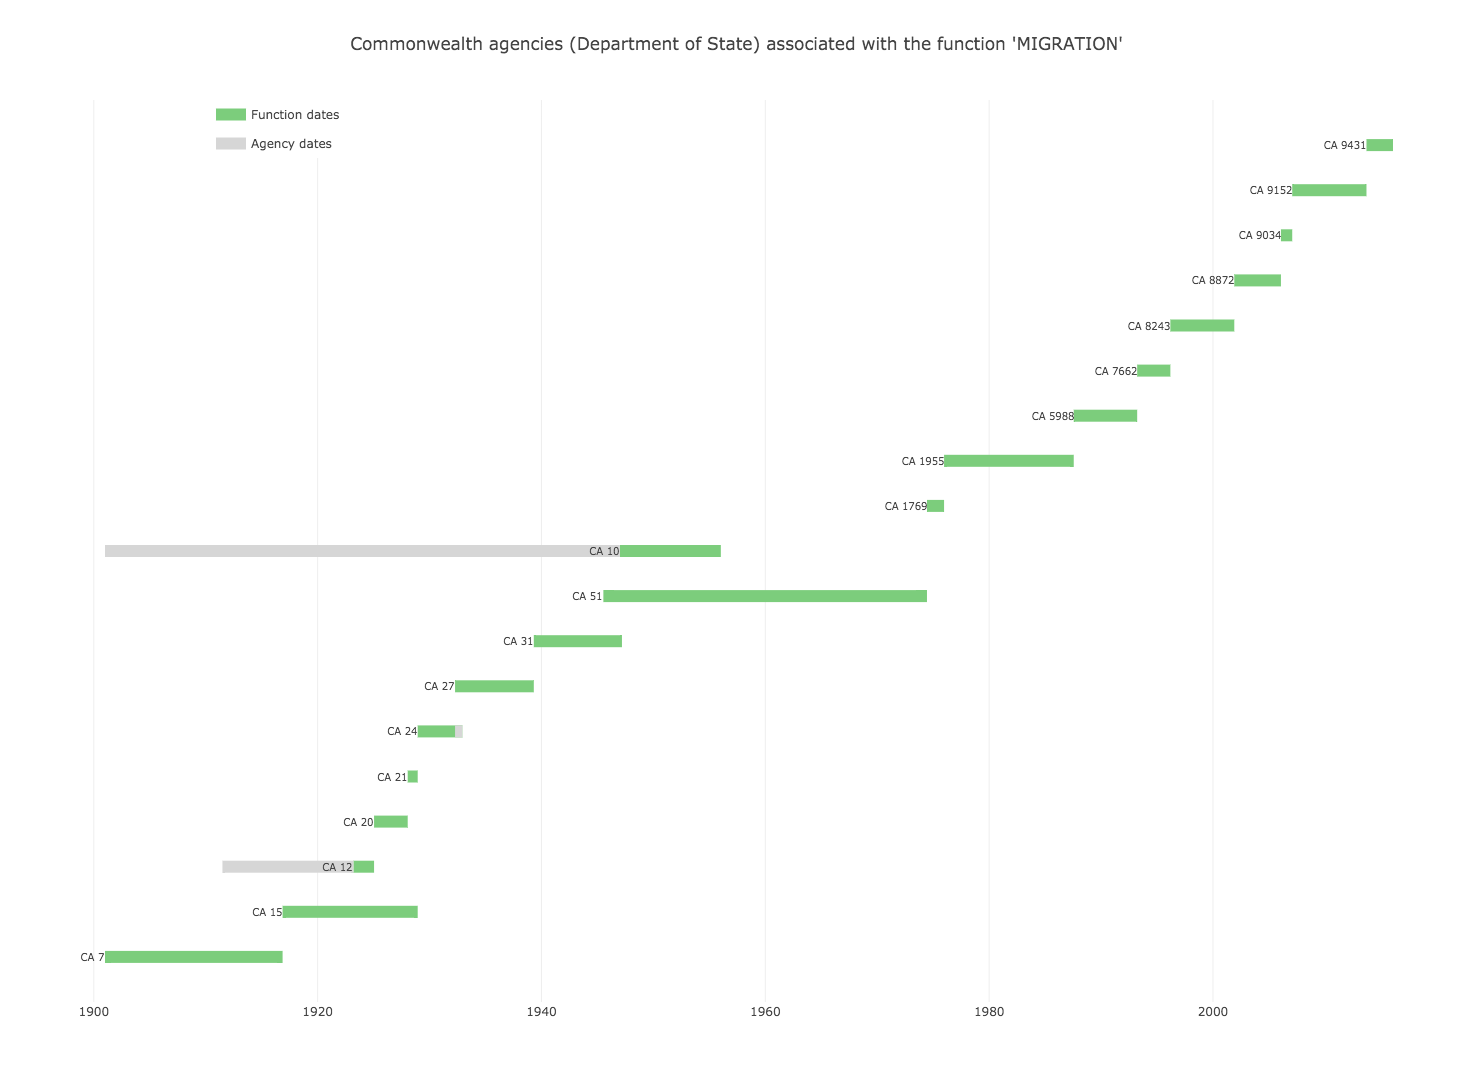
Plot a list of agencies by function and agency status:
Start up Python, or preferably iPython — ipython
Import the analyse module — import analyse_functions
Retrieve agencies with a particular status, associated with a specific function — analyse_functions.plot_agencies('MIGRATION', status='Department of State')
Note that this uses Plot.ly to generate the charts. You’ll have to sign up for a free account and install the necessary Python modules.
I’M NOT RESPONSIBLE FOR ANY DAMAGE/LOSS OF YOUR NOTABILITY FILES! This program is primarily made just for me, I cannot guarentee it will work for an average joe
This project is a heavily hard coded hack designed to automatically sync PDF files to Notability. In other words, this program automatically converts a given PDF file (or files) to Notability format and imports it into Notability.
Works on all operating systems (including Linux) and doesn’t deserialize NSKeyedArchive encoded files; instead, it directly modifies them (which is why it works on all operating systems).
Motivation
This program proves to be exceptionally valuable if you frequently receive PDF files that you wish to annotate. Importing such files into Notability can often be quite tedious, involving multiple button presses and the hassle of navigating to locate the correct PDF file.
With a seamless integration between this program and Notability, you can completely forget about importing files you desire to annotate. All of the files will automatically be present in Notability, ready for you to annotate on.
Context
Notability has its proprietary file format with the extensions of .nbn. When a PDF file is imported into Notability, the application creates an .nbn file. To the best of my knowledge, there are no tools available other than Notability itself that can convert a PDF file into the Notability proprietary format. Most of the data is stored in a file called Session.xml, which is serialized NSKeyedArchive. Unarchiving and archiving NSKeyedArchive can typically only be done on macOS operating systems (archiving, in particular, although there are software tools capable of decoding NSKeyedArchive on other operating systems). As a clever workaround, I have devised a hacky solution that involves directly modifying the archived XML file, which surprisingly yields excellent results.
It is recommended to install the dependencies in python virtual environment. A python virtual environment can be created via:
python3 -m venv venv
To activate the virtual environment, execute
source venv/bin/activate
Then install the requirements (see above).
Before running the application, you need to be signed into your iCloud account. This can be done via:
icloud --username=youremail@apple.com
It is recommended to store your password in the system keyring.
Usage
Execute the program in a virtual environment
python .
This will start a process that runs indefinitely. The program creates a server socket on port 8000, enabling communication with other software. In this way, other programs can notify AutoSyncNotability to convert specific PDF files located at a given path.
The communication message format follows the structure below:
PDF_FILE_PATH:::CHANGED;;;PDF_FILE_PATH:::CHANGED
…where CHANGED is a string representation of a boolean value.
Whenever AutoSyncNotability receives a file and successfully converts the PDF file to the corresponding .nbn file, it creates a .zip archive and stores it in the dump_folder (see configuration). Then, the file must be manually extracted and place extracted .nbn file should be placed in the folder. This step is necessary, as uploading an .nbn file from a local machine to iCloud is more challenging and prone to errors compared to moving an .nbn file from one iCloud location to another.
To streamline this process, you can set up Apple Shortcuts to automatically unarchive the .zip file and rename the extracted folder to .nbn. Additionally, you can schedule this Shortcut to run multiple times a day to fully automate the process.
Configuration
Prior to using the program, configuration must be done. All possible configurations of the program are made by modifying the $XDG_CONFIG_HOME/AutoSyncNotability/config.ini file.
id represents your iCloud email.
destination_name is a location in iCloud where all Notability files are stored. This path can be found under ~/Library/Mobile \Documents/ on macOS device.
dump_folder is a folder that will be used for communication between your Apple device and this program. The folder must be located directly under your iCloud Drive.
The program operates by copying a pre-created template in Notability and utilizing it as a foundation to generate other .nbn files. Therefore, it is necessary for you to create base templates. The program will subsequently determine the appropriate template to use based on the PDF file name, employing Regex for matching.
Todo
CHANGED implementation (when a provided PDF file is marked as changed, swap the PDF file in Notability)
💬 If you prefer static files, import assets from the dist folder.
Examples
MyComponent.vue (using Composition API)
<template>
<divstyle="font-family: sans-serif">
<divv-if="!serial.isAvailable">Web Serial is not available. Check that this browser supports Web Serial API and this page is served with HTTPS.</div>
<divv-else>
<div>vue-serial: {{ serial.isOpen ? "is open (device is " + (serial.isConnected ? "connected)" : "disconnected)") : "is closed" }}</div>
<divv-if="serial.isOpen"><inputref="input"><button:disabled="!serial.isConnected"@click="user_send">Send to device</button></div>
<div><button:disabled="serial.isClosing"@click="user_connect">{{ !serial.isOpen ? "Connect to a device..." : "Close connection" }}</button></div>
</div>
</div>
</template>
<script setup>
// In this example we use the Vue3 "Composition API" but it works with the "Option API" as well.import { ref, watch } from'vue'importVueSerialfrom'vue-serial'constinput=ref(null); // input will contain the `<input ref="input">` element// Configure the serial settingsconstserial=newVueSerial();serial.baudRate=115200;serial.dataBits=8;serial.stopBits=1;serial.parity="none";serial.bufferSize=255; // set to 1 to receive byte-per-byteserial.flowControl="none";// Function to ask the user to select which serial device to connectasyncfunctionuser_connect () {if(serial.isOpen) awaitserial.close(); // in your application, encapsulate in a try/catch to manage errorselse {awaitserial.connect(); // can be `serial.connect([{ usbVendorId:1027 }])` to show only FTDI devicesif(serial.isOpen) {serial.startSignalsPolling(); // (optional) to listen for CTS, DCD, DSR, and RI signal events// await serial.write(...); // to send bytes to device automatically after connection } }}// Function to send the value contained in the inputasyncfunctionuser_send () {constinput_elt=input.value; // refers to <input ref="input">constvalue=input_elt.value;awaitserial.write(value); // in your application, encapsulate in a try/catch to manage errorsconsole.log("bytes sent:", value);}// This will watch for incoming dataserial.addEventListener("read", ({ value }) => { console.log("bytes read:", value); });// This will watch for CTS input signal changes (startSignalsPolling must have been called)watch(() =>serial.clearToSend, (value) => { console.log("CTS signal:", value); });
</script>
same example using static files loaded with a CDN (using Options API)
<html><head><scriptsrc="https://cdn.jsdelivr.net/npm/vue@3/dist/vue.global.prod.js"></script><scriptsrc="https://cdn.jsdelivr.net/npm/vue-serial/dist/vue-serial.umd.js"></script></head><body><divid="app"><divstyle="font-family: sans-serif"><divv-if="!serial.isAvailable">Web Serial is not available. Check that this browser supports Web Serial API and this page is served with HTTPS.</div><divv-else><div>vue-serial: {{ serial.isOpen ? "is open (device is " + (serial.isConnected ? "connected)" : "disconnected)") : "is closed" }}</div><divv-if="serial.isOpen"><inputref="input"><button:disabled="!serial.isConnected" @click="user_send">Send to device</button></div><div><button:disabled="serial.isClosing" @click="user_connect">{{ !serial.isOpen ? "Connect to a device..." : "Close connection" }}</button></div></div></div></div><script>constapp=Vue.createApp({data(){return{serial: newVueSerial()}},mounted(){// Configure the serial settingsthis.serial.baudRate=115200;this.serial.dataBits=8;this.serial.stopBits=1;this.serial.parity="none";this.serial.bufferSize=255;// set to 1 to receive byte-per-bytethis.serial.flowControl="none";// This will watch for incoming datathis.serial.addEventListener("read",({ value })=>{console.log("bytes read:",value);});},methods: {asyncuser_connect(){// Function to ask the user to select which serial device to connectif(this.serial.isOpen)awaitthis.serial.close();// in your application, encapsulate in a try/catch to manage errorselse{awaitthis.serial.connect();// can be `serial.connect([{ usbVendorId:1027 }])` to show only FTDI devicesif(this.serial.isOpen){this.serial.startSignalsPolling();// (optional) to listen for CTS, DCD, DSR, and RI signal events// await serial.write(...); // to send bytes to device automatically after connection}}},asyncuser_send(){// Function to send the value contained in the inputconstinput_elt=this.$refs.input;// refers to <input ref="input">constvalue=input_elt.value;awaitthis.serial.write(value);// in your application, encapsulate in a try/catch to manage errorsconsole.log("bytes sent:",value);}},watch: {// This will watch for CTS input signal changes (startSignalsPolling must have been called)"serial.clearToSend": (value)=>{console.log("CTS signal:",value);}}}).mount('#app');</script></body></html>
This App applies the given non-linear warp to the T1 image and to all Diffusion Tensor Image Scalars. WARNING: all the given inputs should be in the same anatomical space.
brainlife.io is publicly funded and for the sustainability of the project it is helpful to Acknowledge the use of the platform. We kindly ask that you acknowledge the funding below in your publications and code reusing this code.
Citations
We kindly ask that you cite the following articles when publishing papers and code using this code.
Avesani, P., McPherson, B., Hayashi, S. et al. The open diffusion data derivatives, brain data upcycling via integrated publishing of derivatives and reproducible open cloud services. Sci Data 6, 69 (2019). https://doi.org/10.1038/s41597-019-0073-y
Input:
T1 image and Diffusion Tensor Image Scalars (tensor datatype) in the same anatomical space. Up to now, supported scalars are: FA (Fractional Anisotropy), MD (Mean Diffusivity), RD (Radial Diffusivity), and AD (Axial Diffusivity).
Syntax aware text-objects, select, move, swap, and peek support.
Warning: tree-sitter and nvim-treesitter are an experimental feature of nightly versions of Neovim.
Please consider the experience with this plug-in as experimental until tree-sitter support in Neovim is stable!
We recommend using the nightly builds of Neovim or the latest stable version.
Installation
You can install nvim-treesitter-textobjects with your favorite package manager, or using the default pack feature of Neovim!
Using a package manager
If you are using vim-plug, put this in your init.vim file:
Define your own text objects mappings
similar to ip (inner paragraph) and ap (a paragraph).
lua<<EOFrequire'nvim-treesitter.configs'.setup {
textobjects= {
select= {
enable=true,
-- Automatically jump forward to textobj, similar to targets.vimlookahead=true,
keymaps= {
-- You can use the capture groups defined in textobjects.scm
["af"] ="@function.outer",
["if"] ="@function.inner",
["ac"] ="@class.outer",
-- You can optionally set descriptions to the mappings (used in the desc parameter of-- nvim_buf_set_keymap) which plugins like which-key display
["ic"] = { query="@class.inner", desc="Select inner part of a class region" },
-- You can also use captures from other query groups like `locals.scm`
["as"] = { query="@local.scope", query_group="locals", desc="Select language scope" },
},
-- You can choose the select mode (default is charwise 'v')---- Can also be a function which gets passed a table with the keys-- * query_string: eg '@function.inner'-- * method: eg 'v' or 'o'-- and should return the mode ('v', 'V', or '<c-v>') or a table-- mapping query_strings to modes.selection_modes= {
['@parameter.outer'] ='v', -- charwise
['@function.outer'] ='V', -- linewise
['@class.outer'] ='<c-v>', -- blockwise
},
-- If you set this to `true` (default is `false`) then any textobject is-- extended to include preceding or succeeding whitespace. Succeeding-- whitespace has priority in order to act similarly to eg the built-in-- `ap`.---- Can also be a function which gets passed a table with the keys-- * query_string: eg '@function.inner'-- * selection_mode: eg 'v'-- and should return true or falseinclude_surrounding_whitespace=true,
},
},
}
EOF
Text objects: swap
Define your own mappings to swap the node under the cursor with the next or previous one,
like function parameters or arguments.
Define your own mappings to jump to the next or previous text object.
This is similar to ]m, [m, ]M, [M Neovim’s mappings to jump to the next
or previous function.
lua<<EOFrequire'nvim-treesitter.configs'.setup {
textobjects= {
move= {
enable=true,
set_jumps=true, -- whether to set jumps in the jumplistgoto_next_start= {
["]m"] ="@function.outer",
["]]"] = { query="@class.outer", desc="Next class start" },
---- You can use regex matching (i.e. lua pattern) and/or pass a list in a "query" key to group multiple queries.
["]o"] ="@loop.*",
-- ["]o"] = { query = { "@loop.inner", "@loop.outer" } }---- You can pass a query group to use query from `queries/<lang>/<query_group>.scm file in your runtime path.-- Below example nvim-treesitter's `locals.scm` and `folds.scm`. They also provide highlights.scm and indent.scm.
["]s"] = { query="@local.scope", query_group="locals", desc="Next scope" },
["]z"] = { query="@fold", query_group="folds", desc="Next fold" },
},
goto_next_end= {
["]M"] ="@function.outer",
["]["] ="@class.outer",
},
goto_previous_start= {
["[m"] ="@function.outer",
["[["] ="@class.outer",
},
goto_previous_end= {
["[M"] ="@function.outer",
["[]"] ="@class.outer",
},
-- Below will go to either the start or the end, whichever is closer.-- Use if you want more granular movements-- Make it even more gradual by adding multiple queries and regex.goto_next= {
["]d"] ="@conditional.outer",
},
goto_previous= {
["[d"] ="@conditional.outer",
}
},
},
}
EOF
You can make the movements repeatable like ; and ,.
localts_repeat_move=require"nvim-treesitter.textobjects.repeatable_move"-- Repeat movement with ; and ,-- ensure ; goes forward and , goes backward regardless of the last directionvim.keymap.set({ "n", "x", "o" }, ";", ts_repeat_move.repeat_last_move_next)
vim.keymap.set({ "n", "x", "o" }, ",", ts_repeat_move.repeat_last_move_previous)
-- vim way: ; goes to the direction you were moving.-- vim.keymap.set({ "n", "x", "o" }, ";", ts_repeat_move.repeat_last_move)-- vim.keymap.set({ "n", "x", "o" }, ",", ts_repeat_move.repeat_last_move_opposite)-- Optionally, make builtin f, F, t, T also repeatable with ; and ,vim.keymap.set({ "n", "x", "o" }, "f", ts_repeat_move.builtin_f_expr, { expr=true })
vim.keymap.set({ "n", "x", "o" }, "F", ts_repeat_move.builtin_F_expr, { expr=true })
vim.keymap.set({ "n", "x", "o" }, "t", ts_repeat_move.builtin_t_expr, { expr=true })
vim.keymap.set({ "n", "x", "o" }, "T", ts_repeat_move.builtin_T_expr, { expr=true })
You can even make a custom repeat behaviour.
-- This repeats the last query with always previous direction and to the start of the range.vim.keymap.set({ "n", "x", "o" }, "<home>", function()
ts_repeat_move.repeat_last_move({forward=false, start=true})
end)
-- This repeats the last query with always next direction and to the end of the range.vim.keymap.set({ "n", "x", "o" }, "<end>", function()
ts_repeat_move.repeat_last_move({forward=true, start=false})
end)
Furthermore, you can make any custom movements (e.g. from another plugin) repeatable with the same keys.
This doesn’t need to be treesitter-related.
-- example: make gitsigns.nvim movement repeatable with ; and , keys.localgs=require("gitsigns")
-- make sure forward function comes firstlocalnext_hunk_repeat, prev_hunk_repeat=ts_repeat_move.make_repeatable_move_pair(gs.next_hunk, gs.prev_hunk)
-- Or, use `make_repeatable_move` or `set_last_move` functions for more control. See the code for instructions.vim.keymap.set({ "n", "x", "o" }, "]h", next_hunk_repeat)
vim.keymap.set({ "n", "x", "o" }, "[h", prev_hunk_repeat)
Alternative way is to use a repeatable movement managing plugin such as nvim-next.
Textobjects: LSP interop
peek_definition_code: show textobject surrounding definition as determined
using Neovim’s built-in LSP in a floating window. Press the shortcut twice
to enter the floating window.
Textobjects are defined in the textobjects.scm files.
You can extend or override those files by following the instructions at https://github.com/nvim-treesitter/nvim-treesitter#adding-queries.
You can also use a custom capture for your own textobjects,
and use it in any of the textobject modules, for example:
Here are some rules about the query names that should be noted.
Avoid using special characters in the query name, because in move module the names are read as regex (lua) patterns.
@custom-capture.inner (X)
@custom_capture.inner (O)
In select module, it will be preferred to select within the @*.outer matches. For example,
@assignment.inner, @assignment.lhs, and even @assignment will be selected within the @assignment.outer range if available. This means it will sometimes look behind.
You can write something like @function.name or @call.name and make sure @function.outer and @call.outer covers the range.
This project demonstrates how to create a tutorial video using Manim and gTTS. The tutorial covers setting up an Apache Airflow DAG for mapping ontology data from an API.
Project Structure
Dependencies
The project uses the following dependencies:
Python 3.12
Manim 0.18.1
gTTS 2.5.4
pydub 0.25.1
Installation
Clone the repository:
git clone <repository-url>cd voiceover
Install dependencies using Poetry:
poetry install
Usage
Generate Voiceover Audio:
poetry run python src/generate_voiceover_audio.py
Render Slides Using Manim:
poetry run manim -pql src/tutorial_script.py AirflowTutorial
This is a simple UI program that allows you to easily explore the concept of the pytschirp project. This project builds Python language bindings for MIDI-capable synthesizers, to allow you to program these synthesizers in, you guessed it, Python.
Real synthesizer programming.
For the time being, currently only the Sequential Prophet Rev2 synthesizer is supported, but many more synths are on their way, let us know if you have a specific device you want supported.
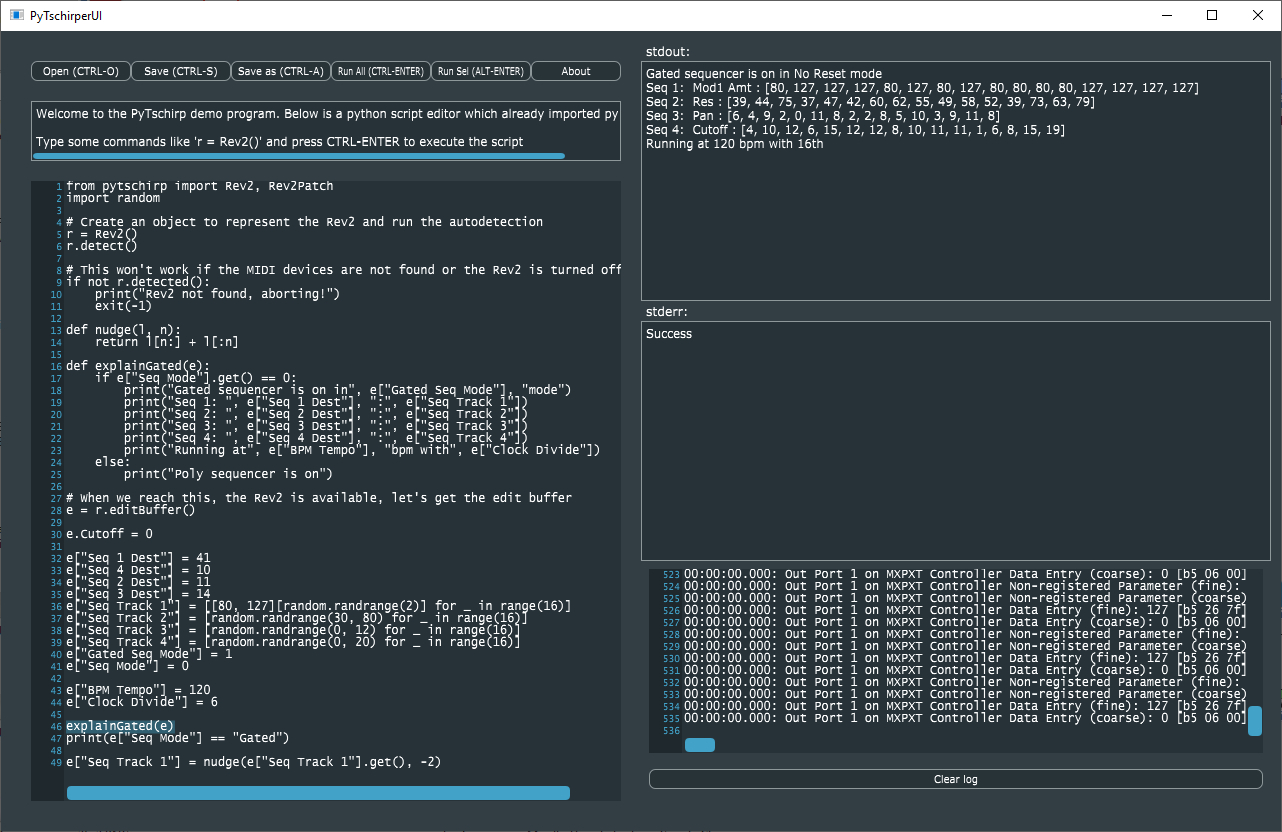
If you acquire the software, this is what you will get:
Effectively it is a little code editor already preloaded with a python interpreter and pytschirp, so you can type into the edit window, execute the python by pressing CTRL-ENTER, and see the output, error messages, as well as the generated MIDI commands going back and forth between your computer and the synthesizer.
You can use it a little bit like a Jupyter Notebook by selecting text and then using ALT-ENTER to execute only the selection.
Live editing of synthesizers is possible.
Example
Creating the synthesizer in Python is as easy as it gets with just three lines of code:
import pytschirp
r = pytschirp.Rev2()
r.detect()
This will produce some MIDI messages in the lower right corner of the screen, and when everything is setup properly (the computer can talk to the Rev2), we are now ready for live editing the edit buffer of the synthesizer. For this, we will retrieve the edit buffer object:
e = r.editBuffer()
which is now “alive” in that every modification we make in python to the edit buffer, MIDI commands will be sent immediately to the synth.
So for example, if you want to set the cutoff parameter:
e.Cutoff = 0
will set that value. Alternatively, you can get a textual print out of the whole edit buffer by doing a
print(e.toText())
Python is ideally suited to to complex things, for example randomize the track one of the gated sequencer in a specific value range by:
import random
e["Seq Track 1"] = [random.randrange(30, 80) for _ in range(16)]
You get the gist. There are some real-life examples in the aptly called examples directory, have a look at them.
Full documentation on the language bindings of pytschirp will be created inside the pytschirp project, head over there for the in-depth infos. pytschirp can be used standalone from any python interpreter or even Jupyter notebook, the PyTschirper UI program is only a little tool that allows people to quickly explore the idea.
Building the software
Supported platforms
Tested currently only on Windows 10, but all technology used is cross platform and it should be possible to build on Linux and Mac OS, if you know what you are doing.
Prerequisites
We use CMake 3.14 and Visual Studio 2017 for C++. Make sure to have both of these installed. Newer Visual Studios might work as well, you can select them as generators in CMake. We also require a Python 3.6 installation.
The recursive clone with submodules is required to retrieve the following additional modules already into the right spot inside the source tree:
We use the magnificent JUCE library to immensly reduce the amount of work we have to do.
juce-cmake to allow us to use JUCE and CMake together.
pybind11 is the solution to use C++ code from within Python, as is done by the pytschirp project, as well as embedding Python into C++ code, which is what we do here in PyTschirper.
The configure step will download (on Windows) the allmighty boost library, sorry for the bloat but I simply had no time to remove the dependency yet. All my professional projects of course rely on boost, so it is a natural to incorporate it here as well.
Building on Windows
Using CMake and building is a simple step if the prerequisites are fulfilled. Simply open a command line in the downloaded root directory <PyTschirpDir> and run
This will generate a solution file for Visual Studio in the builds subdirctory. You can build the software to run it immediately with the command
cmake --build builds --config Release
This will produce the executable in the path builds\source\Release, namely a file called PyTschirper.exe which you can double click and launch.
Licensing
As some substantial work has gone into the development of this, I decided to offer a dual license – AGPL, see the LICENSE.md file for the details, for everybody interested in how this works and willing to spend some time her- or himself on this, and a commercial MIT license available from me on request. Thus I can help the OpenSource community without blocking possible commercial applications.
Contributing
All pull requests and issues welcome, I will try to get back to you as soon as I can. Due to the dual licensing please be aware that I will need to request transfer of copyright on accepting a PR.
About the author
Christof is a lifelong software developer having worked in various industries, and can’t stop his programming hobby anyway.


 https://github.com/ixjb94/indicators-js